Sitemap Event Validation
A Sitemap sends events to Personalization based on the actions of the website visitors (users). There are several ways to validate whether the Sitemap configuration correctly recognizes the targeted user actions and sends the corresponding events.
Sitemap events are HTTP requests sent to the Personalization Event API endpoint to describe either a web page's context or a specific user action performed on the site. Examples of Sitemap events include:
- Visiting a page
- Viewing a catalog item
- Submitting a form
- Adding an item to a shopping cart
- Purchasing an item
- Clicking a designated page area
You can validate Sitemap events using these tools and methods.
As you develop a Sitemap, you can use the Sitemap Editor to confirm whether the JavaScript describing your events is valid and configured correctly.
While the Sitemap Editor is vitally useful for the development process, it’s essential to test your sitemap code using the other methods outlined in this article. The Sitemap Editor initializes the sitemap code after the website it’s running on is fully loaded. Therefore, you can’t use the Sitemap Editor to test the real-world timing of initializing the sitemap while the page is still loading. Make sure to test the real-world timing on sitemap initialization outside the Sitemap Editor by monitoring the events sent by your sitemap as you browse the website using the event validation techniques outlined in this topic.
- Event Validation Using the Event Stream Report
- Event Validation Using Chrome Browser Developer Tools
On the Sitemap JS tab, where you enter your Sitemap JavaScript, a built-in code validator identifies JavaScript syntax errors, as shown in this image.
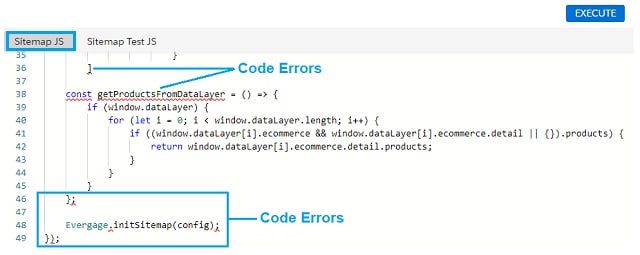
The Logs tab provides messages related to the JavaScript code errors flagged by the Sitemap JS code editor. However, it’s advisable to use a more robust JavaScript validation tool to investigate JavaScript syntax issues and code execution errors flagged in the Sitemap JS code editor.
This image shows the Current Page tab of the Sitemap Editor.
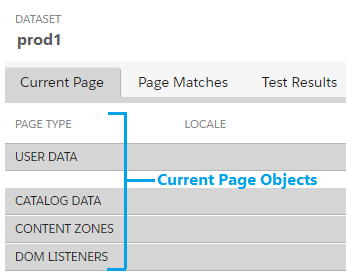
The Current Page tab displays all Sitemap objects configured and executed on the current page shown in the browser, including:
- Page Type: Name of the configured page type of the currently displayed page
- User Data: The ID of the current user browsing the page and any user-triggered events configured on the page. The user ID can be the user ID that is randomly generated for anonymous site visitors, or a named user ID.
- Catalog Data: Names of Catalog objects configured on the current page.
- Content Zones: Names of Content Zone objects configured on the current page.
- DOM Listeners: Names of JavaScript DOM listeners configured on the current page.
This image shows an example of how Sitemap objects appear in the Current Page tab with key functional areas indicated by numbers.
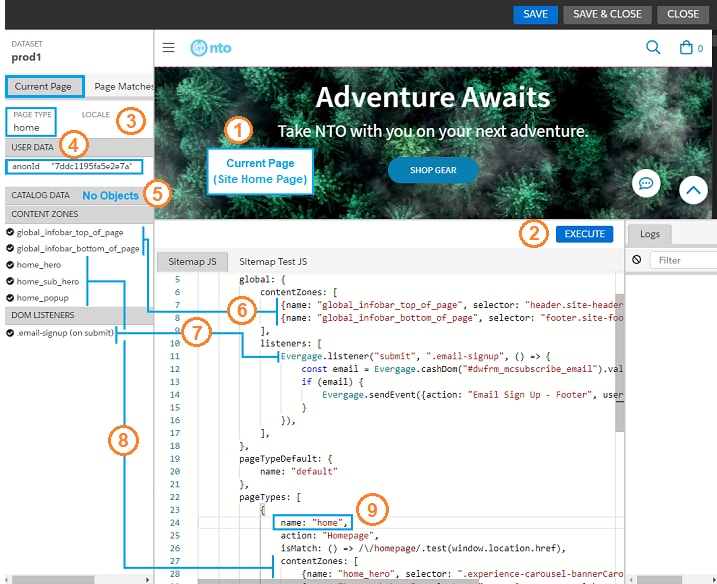
This table lists the areas numbered on the figure and describes the purpose and function of each area.
| Number | Area | Description |
|---|---|---|
| 1 | Current Page (Site Home Page) | This area displays the current page of the target site that the Sitemap editor is targeting. The objects displayed in the Current Page tab are configured for the page type displayed here. In the preceding example, the browser used by the Sitemap editor is on the Home page of the target site and has a pageTypes object called home configured in the Sitemap (9). |
| 2 | Execute (button) | Clicking the Execute button runs and validates the JavaScript in the Sitemap JS editor. Sitemap objects that resolve with the current page type or global configuration are displayed in the Current Page tab. Objects with invalid JavaScript don’t appear in the Current Page tab. |
| 3 | Page Type | This area displays the page type that matches the results of the isMatch function configured for the currently displayed page type. In the preceding example, the site Home page type (1) is matched by the isMatch function configured for the page type named home in the Sitemap (9). |
| 4 | User Data | This area displays the user ID of the user visiting the current page and any user-triggered events configured in the Sitemap. The preceding example shows an anonymous user ID. |
| 5 | Catalog Data | This area displays any catalog objects configured in the Sitemap JS for the currently displayed page. In the preceding Home page example, no catalog objects have been configured. |
| 6 | Content Zones - Global | The preceding example shows that this Sitemap has two global Content Zones that are properly configured to show in the Current Page tab. Global content zones are active in all configured page types. |
| 7 | DOM Listeners | The preceding example shows that this Sitemap has a listener in the global configuration that is configured to show in the DOM Listeners section of the Current Page tab. This listener sends an event to Personalization when a user signs up for an email subscription. |
| 8 | Content Zones - Page Type | The preceding example shows that this Sitemap has three Content Zones that are properly configured to show in the Current Page tab when the Sitemap editor is on the home page type. |
| 9 | pageTypes: home | The preceding example shows that this Sitemap has a home page type configured to display in the Page Type section of the Current Page tab (3) when the Sitemap editor is on the home page type. |
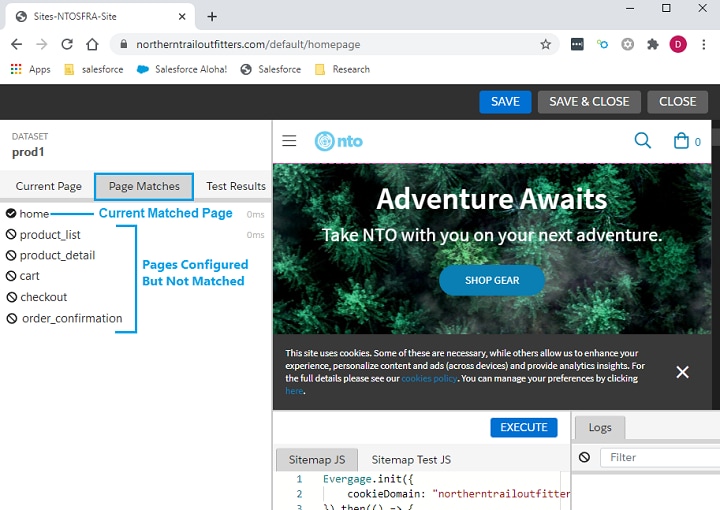
The Page Matches tab displays the currently matched page type as well as all other page types configured in the Sitemap. The currently matched page displays with a "checkmark" while the other configured page types show with a "backslash" to indicate they weren’t matched as the current page.
This image shows an example of the Page Matches tab where the home page is the currently matched page as well as several other pages configured in the Sitemap JS editor but aren’t matched as the current page.
The Personalization Event Stream report displays all events received by Personalization, including events sent from the Sitemap as well as from other sources.
To access the Event Stream report, carry out these steps.
-
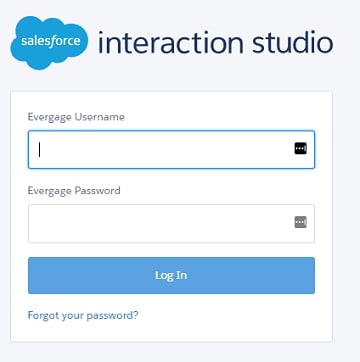
Log in to the Personalization UI.
-
On the Dashboard, use the dataset dropdown to select the dataset that contains the events you want to see.

-
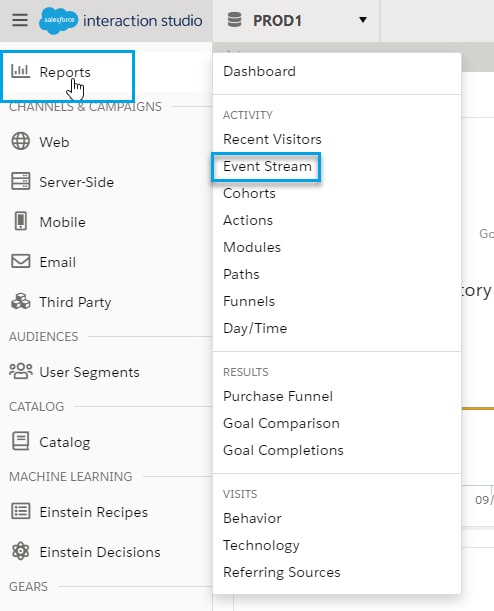
Hover over Reports on the sidebar to show the reports popup, and click Event Stream from the Activity section.
The Sitemap JavaScript sends events to Personalization based on actions performed by site visitors. This section presents an example based on an anonymous user who decides to sign up for emails from the company (thus becoming "known") and then browses the Men's section of the website.
Here's an example of a JavaScript listener configured to send an event when a user signs up for emails. Since the sign-up form appears on the bottom of every page on the site, make sure that you configure this listener as part of the global configuration.
Here's an example of a site email sign-up form completed by "Joe Customer". With the JavaScript listener configured as shown in the preceding section, an event is sent to Personalization and shows up in the Event Stream when a user provides their email address and clicks the submit button (->).
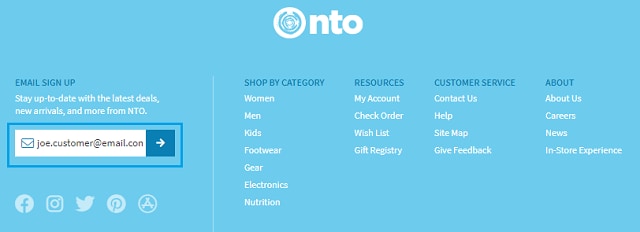
If the email sign-up listener is properly configured in the Sitemap, when "Joe Customer" provides their email and clicks Submit, the event shows up immediately in the Personalization Event Stream report. Within the Event Stream report, you can:
- Search through the event stream
- Review data in an event stream table
- Access specific details for each event
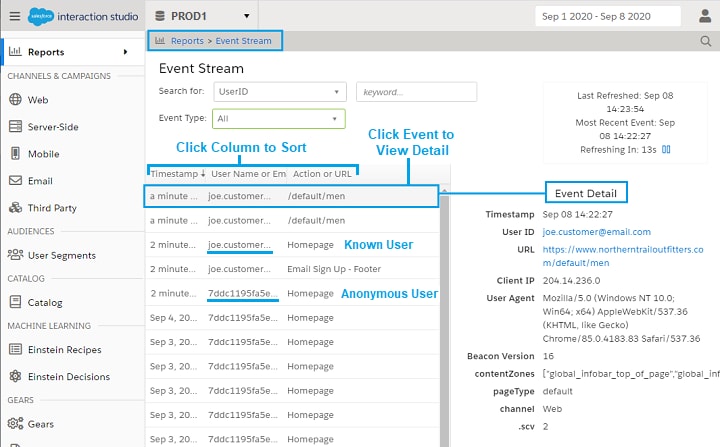
This figure shows an example of the events sent to Personalization before and after Joe Customer submitted their email in the email sign-up form. These sections describe the information and functionality provided by the Event Stream report.
For more information about the available functionality in the Event Stream report, see Event Stream Report.
At this time, the Personalization Event Stream doesn't display price for AddToCart events.
Event Stream Search
In the Event Stream search area, you can search for and filter the Event Stream table to show only events generated by a specific user ID/username or email address. To search through the Event Stream, perform these steps.
-
In the keyword field, enter text that matches characters in the username or email address for the user whose events you want to see.
The matching username shows as soon as you enter characters that match an existing username or email address.
-
Select the user. The Event Stream table then shows events for that user.
-
To view events of a specific type only, select the event type from the Event Type dropdown.
Event Stream Table
The Event Stream table lists event data for all events triggered by the Sitemap and other event sources from other systems in the Personalization integration. The data in the Event Stream table refreshes every 15 seconds and includes this information.
- Timestamp: Time or date that the event occurred. Events triggered on the current day have a timestamp of how many minutes/hours ago the event was triggered. Events triggered the day before the current day have a timestamp of
yesterday. Earlier events have a timestamp of the date the event was triggered. - Username or Email: Username or email address of the user who triggered the event.
- Action or URL: Name of the action that triggered the event, or the URL of the page that the user visited that triggered the event.
Modifying the Event Stream Data View
You can modify the data displayed in the Event Stream table using these features:
- Sort columns: Click a column heading to sort the table by the data in that field. Click the same column heading again to toggle between ascending and descending data sort.
- View event details: Click an event entry to view its detailed information.
From Anonymous to Known User
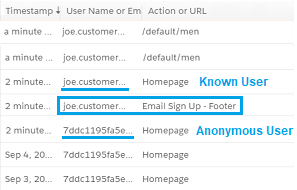
The example shown in this figure depicts what happens after "Joe Customer" submits their email address. Upon submission, the anonymous user 7ddc1195... changes to the known user joe.customer@email.com. This change happens anytime an anonymous user identifies themselves through an action like email submission or log in. Personalization associates the anonymous ID with the known user and adds the browsing behavior to the Unified Customer Profile of the known user. A known user can have many associated anonymous IDs and more than one known username depending on their browsing habits on the site.
This image is for example purposes only. In large environments with hundreds or thousands of simultaneous visitors, it’s difficult to visually associate an anonymous user ID with their known username.
Individual Event Details
When you click an individual event in the Event Stream table, the details for that event appears in the Event Detail area next to the Event Stream table.
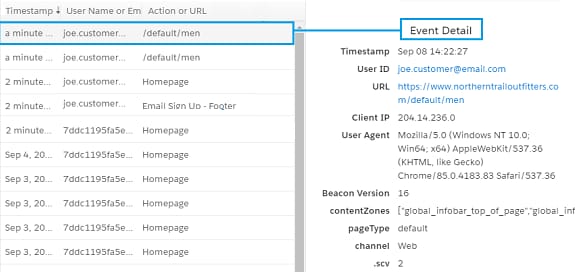
The Event Detail area shows these details for the selected event:
| Field | Description |
|---|---|
| Timestamp | Date and time that the event was triggered. |
| User ID | Username, email address, or anonymous user ID of the user who triggered the event. |
| URL | URL returned from window.location.href on the page where the event originated. |
| Client IP | IP address of the user client that generated the event. |
| User Agent | User Agent (UA) string sent in the HTTP header with browser requests that typically identifies the browser type, browser version, and browser host operating system. |
| Beacon Version | Version of the JavaScript Beacon (Web SDK) that sent the event. |
| pageType | The type of page that the user accessed. The preceding figure shows the event of a user accessing the "Men's" category page of a retailer. |
| contentZones | Content Zones defined for the pageType. Its value is a combination of contentZones defined for the PageConfig matched in the Sitemap and contentZones defined in the GlobalConfig. |
| channel | The engagement channel that generated the event. For Web SDK-generated events, the channel is always Web. |
| .scv | The Site Configuration Version (SCV) increments every time you save changes to the Sitemap. Personalization uses this value internally to prevent conflicts with events sent from earlier Sitemap versions. |
The Event Stream table also includes these additional fields that provide details about specific events, Web SDK and web page performance, and help identify the root cause of Web SDK errors.
| Type | Field | Description |
|---|---|---|
| Error fields | .em | Error message describing the issue that occurred. For example, "Response was not OK." |
| .es | Section where the error was thrown. For example, "Server Response". | |
| .eu | URL of the resource in which the error was thrown. For example, if the error originated in the Personalization Web SDK, this field shows your JavaScript beacon URL. | |
| .ef | Function or method that threw the error. For example, createCustomError. | |
| .el | Line number in the source code file where the error was thrown. | |
| .ec | Column number in the source code file where the error was thrown. | |
| Performance fields | .bt | Time taken for the Web SDK to load on the web page. |
| .pt | Time taken for the Web SDK to parse and process data after it has loaded. | |
| .btdns | Time taken for the Web SDK to resolve DNS requests. | |
| .lt | Time taken for the web page to fully load, including all assets such as images, scripts, and stylesheets. | |
| .dt | Time taken for the Document Object Model (DOM) to fully load. | |
| .tt | Time taken for network requests to complete, including any latency or server-side processing time. | |
| .ttdns | Time taken for DNS requests to resolve when sending or tracking events. |
Sitemap developers can also validate Sitemap events using Google Chrome's built-in developer tools, as described in these sections.
The simplest way to view events that are triggered by page load is to run the SalesforceInteractions.mcis.getSitemapResult().currentPage command (or Evergage.getCurrentPage in the Evergage namespace) from the Chrome Console developer panel. However, this command won't show events triggered after page load. To run this command, perform these steps:
-
Exit the Personalization Sitemap Editor.
-
Go to the web page containing the events you want to validate.
-
Open Chrome Developer Tools and go to the Console panel.
-
Depending on the namespace used, run either of these commands.
This image shows an example of the output from the
SalesforceInteractions.getSitemapResult().currentPagecommand.
This image shows an example of the output from the
Evergage.getCurrentPagecommand.
In the Chrome Network developer panel, you can see all events generated on the current page, including those events generated after page load. To view all events generated on the current page:
-
Exit the Personalization Sitemap Editor.
-
Go to the site page containing the events you want to validate.
-
Perform an action on the page that you expect to generate an event.
-
Open Chrome Developer Tools and go to the Network panel.
-
Find and select the event. The event contains the name of your dataset followed by a question mark (?) and the word "event".
-
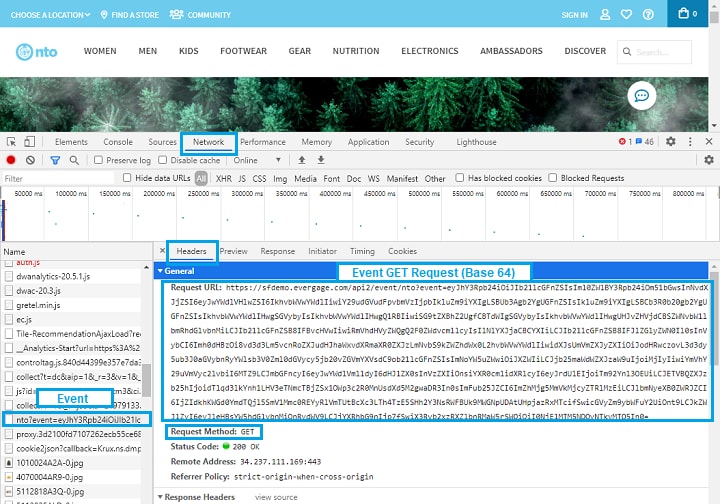
Select the event and then select the Headers panel to view the event. Events are sent from the Sitemap to Personalization as JSON GET requests. The events are converted to Base64 and appended to the request URL, as shown in this image.
-
Copy the event GET request starting immediately after
event=to the end, as highlighted in this image.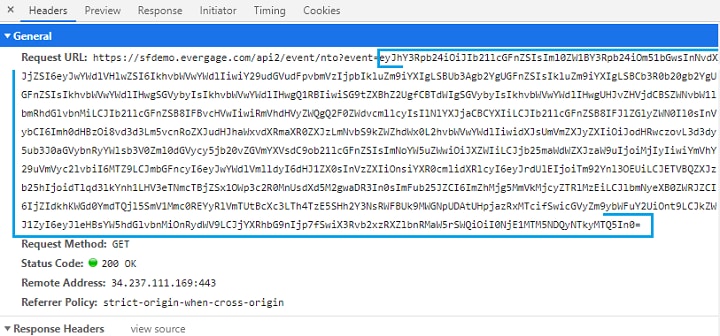
-
Navigate to the Chrome Console developer tool. Run the
atobcommand to convert the event back to JavaScript objects. You can run theJSON.parsecommand in combination with theatobcommand to return the event JavaScript formatted. To run this command, use this syntax:This image shows an example of the output from the
atobcommand in theSalesforceInteractionsnamespace.
This image shows an example of the output from the
atobcommand in theEvergagenamespace.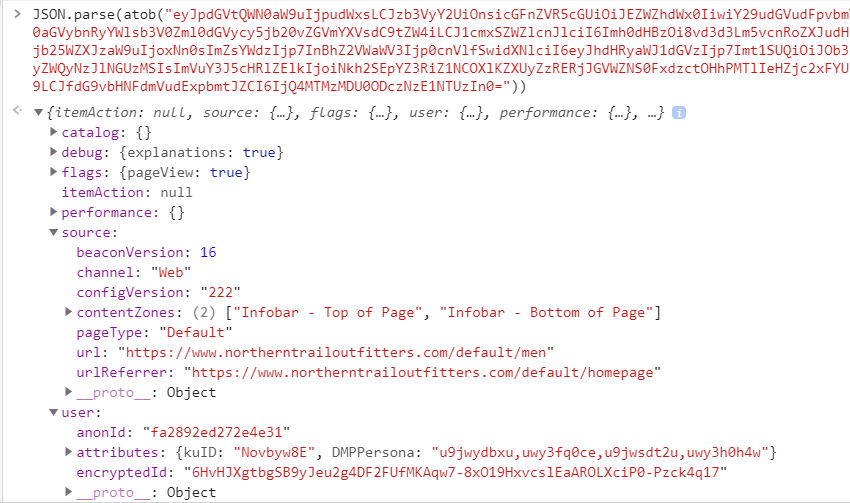
-
Review the event and confirm it contains the expected objects.