Extend Invocable Action Configuration in Flow Builder
Simplify the configuration of Apex invocable actions in Flow Builder by using the InvocableActionExtension metadata file. Create partial custom property editors for one or more input parameters that don’t require updates when you introduce new versions of your action. Define dynamic or static picklists for input parameters and control input parameter display order and grouping. You can also add a custom header to your property editor.
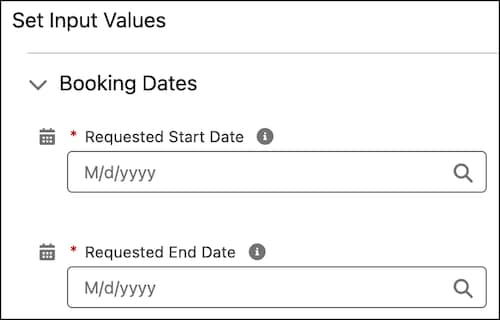
An Apex class for a travel application, BookingAction, uses a custom input type, BookingRequest, to manage two required dates: startDate and endDate. By default, the flow shows inputs alphabetically. Use the InvocableActionExtension metadata file to define the logical order and group the fields under a relevant section header to improve the user experience.
This section shows the Apex class structure required for the invocable action that exposes configurable input parameters to a flow.
This Apex class creates an invocable action, BookingAction, designed to send a booking request to an external system. Note that the method accepts a List input to support bulk processing, a best practice for Apex development.
Users who invoke the action from a flow must have the appropriate Apex class access set in their profile or permission set.
The invoke method uses the @InvocableMethod annotation to be callable from a flow. Input and output are defined by the inner classes, BookingRequest and BookingResult, ensuring data integrity. The individual input variables within BookingRequest use the @InvocableVariable annotation, which allows them to be exposed as configurable fields in Flow Builder.
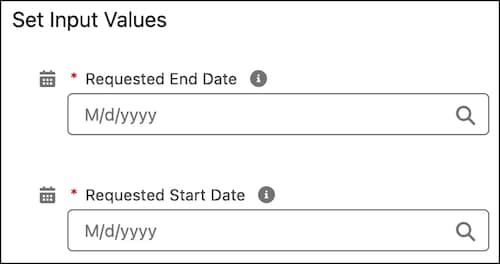
Use the InvocableActionExtension metadata file to specify the sort order of input fields. You can also organize them into collapsible groups for improved usability in Flow Builder.
The file must have the suffix .invocableactionextension-meta.xml and the filename corresponds to the Apex class name, for example, BookingAction.invocableactionextension-meta.xml. Add the metadata file to the invocableactionextensions directory.
This metadata file targets each input parameter and uses the <key>Order</key> attribute so the start date appears before the end date. It also uses the <key>Group</key> attribute to organize both inputs under a single collapsible section named Booking Dates.
To sort the order of input fields, define an Order for all input parameters for the action. If you define an Order for at least one parameter, you must define an Order for all parameters within the action to avoid unexpected behavior.
The <targets> elements identify the specific input parameters to be customized. The <key>Order</key> attribute explicitly controls the vertical display sequence of the input parameters in Flow Builder. The <key>Group</key> attribute is used to create the collapsible Booking Dates section, improving the organization and scannability of the action’s inputs.
Use the ProvidedValuesList standard additional attribute to provide picklist options for input parameters. Users select from predefined values, which reduces configuration errors. Each input parameter supports up to 500 total picklist values.
For a fixed set of values, use a comma-separated list. Optionally include display labels for one or more values by using a pipe delimiter.
First, add a new input parameter to the BookingRequest class:
Then define the static picklist values in the InvocableActionExtension metadata file:
In this example, the values hotel, flight, and car are stored in the flow. The labels Hotel Reservation, Flight Booking, and Car Rental appear to users in Flow Builder.
For picklist values that change based on org data or business logic, create an Apex class that extends VisualEditor.DynamicPicklist. The class’s getValues() method defines the picklist logic and returns the values.
Reference the Apex class in the InvocableActionExtension metadata file by using the apex:// URI format:
Dynamic picklist logic runs when users configure the action in Flow Builder. Efficient logic prevents timeouts during action configuration.
Use the CustomHeaderLwcName standard additional attribute to add a custom header to your Apex action’s standard property editor. The header appears at the top of the property panel in Flow Builder. It provides context, instructions, or additional information to improve the configuration experience.
First, create a Lightning web component that shows the header content. A Lightning web component consists of a JavaScript file and an HTML template file.
Create the JavaScript controller file:
Create the HTML template file that defines the header’s content and appearance:
Then reference the Lightning web component in the InvocableActionExtension metadata file. Use ActionDefinition as the target type to apply the header to the entire action:
When users configure the action in Flow Builder, the custom header appears at the top of the property panel before the input parameters.
Use partial custom property editors (CPEs) to create custom configuration interfaces for one or more related input parameters. Full custom property editors replace the entire action configuration interface. Partial CPEs customize specific parameters while other parameters use the standard property editor.
With partial CPEs, you can add new input parameters to your action without updating the CPE code. The new parameters automatically use the standard property editor. Full CPEs require code updates whenever you modify the action’s parameters. This flexibility makes partial CPEs easier to maintain as your action evolves.
First, add related input parameters to the BookingRequest class that benefit from coordinated configuration:
Create a Lightning web component that serves as the partial CPE. The component can control how both parameters are configured together.
Create the JavaScript controller file:
Create the HTML template file:
Configure the partial CPE in the InvocableActionExtension metadata file. First, assign the CPE to the primary parameter by using the CpeName attribute:
Then link the related parameter to the same CPE using the ConfiguredBy attribute:
When users configure the action in Flow Builder, the partial CPE manages both the assigneeType and assignee parameters. Other input parameters in the action continue to use the standard property editor. Each parameter can belong to only one partial CPE. When a CPE controls multiple input parameters, the primary parameter’s Order attribute determines where the CPE appears in the property panel.
See Also