This is the first post in a two-part series presenting how to work with Developer sandboxes and the Salesforce CLI. Over the course of this series, we’ll cover:
-
Part 1: Sandbox Management
- Manage sandboxes with the Salesforce CLI
- Clone sandboxes instead of creating new ones
- Initialize sandboxes with a custom Apex class (Beta)
- Secure your production org with sandbox-only users
- Import sample data
- Refresh outdated sandboxes
- Delete unused sandboxes
-
Part 2: Metadata Management
- Prefer the source format over the metadata format
- Retrieve metadata with the Org Browser
- Retrieve metadata that does not support wildcards in package.xml (reports, dashboards…)
- Remove metadata that’s no longer needed
- Leverage custom metadata to pass configuration from production to your Developer sandbox
- Test metadata deployments
In this first part, we’ll focus solely on Developer sandbox management. Other types of sandboxes including Lightning sandboxes (pilot announced at Dreamforce ’19) are not discussed here but some tips may apply to them as well. We’ll start with a refresher on Developer sandboxes and provide some management tips with examples.
A refresher on Developer sandboxes
A Developer sandbox is a Salesforce org that includes a copy of your production org’s metadata. Unlike other types of sandboxes, it doesn’t include data. Additionally, its metadata can be refreshed daily. Developer sandboxes are associated with a particular type of license that’s included in your Salesforce contract.
These sandboxes have small storage capacities (200 MB data storage and 200 MB file storage) compared to the other types of sandboxes. Note that there are also Developer Pro sandboxes with similar features yet larger storage capacities (1 GB data storage and 1 GB file storage).
Here’s a recap of the different environment types:

Developer sandboxes are typically used for two things: As an individual development environment, or as part of Continuous Integration (CI). When used in a CI flow, Developer sandboxes are generally used for deployment tests and unit tests. This type of sandbox is generally not suited for integration or functional testing due to its limited storage capacities.
Some teams that have access to sandboxes may use free Developer Edition orgs and scripts with the intent to emulate sandboxes for testing, but this is a bad practice as it implies extra setup, maintenance and increased risk of errors. Sandboxes have a couple unique advantages over Developer Edition orgs:
- Metadata is automatically copied from the production org without any manual setup or upgrades
- Sandboxes maintain a link to the production org for future refreshes
- Sandboxes can match the production org’s licenses and features.
Sandbox management
Sandboxes can be managed in three ways: Declaratively from the production org, using the Tooling API or with the Salesforce Command-Line Interface (CLI). In this series we’ll mainly focus on using the CLI.
Manage sandboxes with the Salesforce CLI
Provided that you have access to the production org and that your user has the “Manage Sandboxes” system permission enabled (default for System Administrators), you can create, clone, or delete sandboxes with easy-to-use CLI commands (Beta in Spring ’20, GA in Summer ’20, forward-looking statement applies).
This is quite convenient because it helps you save valuable time in your day-to-day operations (no need to log into the production org and click around in Setup). It also simplifies task automation by reducing the need for the Tooling API.
As a general security rule, most developers require elevated permissions to do their work, but don’t need to access sensitive business data or work directly in production. Sandboxes let developers work safely with system administrative permissions and sample data.
The CLI commands are particularly interesting if you’re an architect or a technical team lead and you need to provide sandbox access to developers who do not have production access (more on this in a bit).
As of Summer ’20 there’s just one limitation to CLI sandbox management commands. Refreshing a sandbox is not yet supported by the CLI. In the meantime, the refresh can be done with either clicks in the production org or with the Tooling API (more details on that in following sections).
Some sandbox management CLI commands require a sandbox definition file. This is a small JSON file that describes your sandbox configuration (sandbox name, type, template, copy settings and so on). If you have a Salesforce DX project, you typically store the sandbox definition file in the config folder at the root of your project.
Unlike scratch org definition files, sandbox definition files do not hold the list of org features and settings. These values are taken directly from the production org.
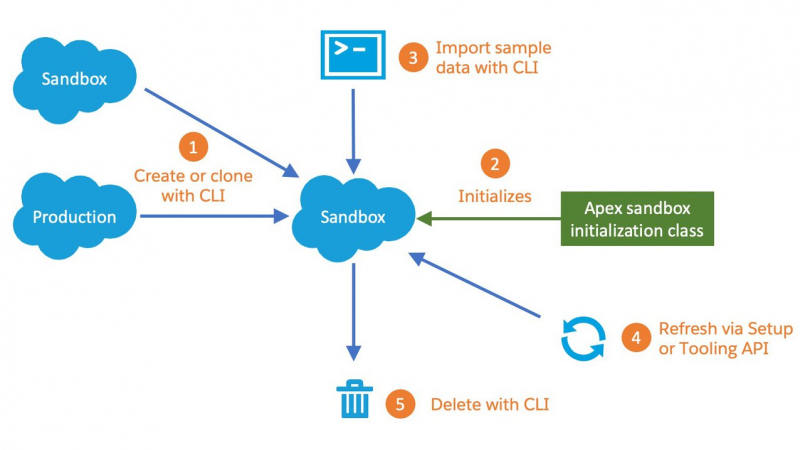
Clone sandboxes instead of creating new ones
Creating a developer sandbox can take half an hour, and then you generally have to import some data and possibly configure third party integrations. All of that adds to the time you have to wait to get your sandbox up and running.
You can save precious time by cloning a reference sandbox instead of creating new ones from production. The cloning process creates a copy of your existing sandbox metadata and data. Cloning is particularly interesting for Developer sandboxes, as it is the only way to preload them with data without using scripts (more on that in the “Import sample data” section).
Consider keeping a reference Developer sandbox as a “template” that you clone for yourself and your teammates.
The Salesforce CLI lets you clone sandboxes with the force:org:clone command. Here’s an example of how you can use this command:
- Edit your sandbox definition file (
config/dev-sandbox-def.jsonin this example) and add a source sandbox name (devSbxhere) in thesourceSandboxproperty:
- Run this command to clone the sandbox and save it with the
myDevSbxClonealias:
Initialize sandboxes with a custom Apex class (Beta)
Whether you create sandboxes from Setup, the CLI or with the Tooling API, you can use a custom Apex class to initialize your sandbox automatically. This allows you to automatically perform business logic on the sandbox and prepare it for use.
Here’s what you need to do to set it up with the CLI:
- Create an Apex class (
PrepareSandboxfor example) that implements the SandboxPostCopy interface in your production org. This interface brings aglobal void runApexClass(SandboxContext context)method that you need to implement (see the next section for an example). - Retrieve the Id of the Apex class with a SOQL query:
- Edit your sandbox definition file and set the
ApexClassIdparameter with the Id of the Apex class.
- Run the sandbox creation command as a production admin or any user that has the “Manage Sandboxes” system permission enabled.
- The
PrepareSandbox.runApexClassmethod is automatically executed when the sandbox is ready. Note that that the sandbox creation process won’t be interrupted if the initialization method fails, so you’ll want to look at the logs to validate that there were no errors.
Secure your production org with sandbox-only users
Not every developer needs production access but they all need sandbox access with admin permissions. If you plan to automate the creation of sandboxes, you can use the custom Apex initialization class to create “sandbox-only” users. Here’s a basic example of how you can create a user with the System Administrator profile:
This sample code is a good starting point but as you may have noticed, the username and email are hardcoded so it’s not production-ready. Check out this GitHub project for a flexible initialization script that relies on a custom metadata type in the production org to dynamically create sandbox users.
Import sample data
Developer sandboxes come without data so you need to import some records in order to have an environment that simulates production data. When adding data, keep in mind that this type of sandbox has a limited storage capacity so you’ll need to work on a limited set of data.
There are several tools that you can use to import sample data. Examples include the Salesforce CLI or third-party tools and scripts. Regardless of the tool you use, make sure that you version your sample data so that all developers work on the same data and that the import is automated. These best practices will ensure that tests can be reproduced consistently.
The Salesforce CLI offers a set of data commands that let you extract some data and import it in a org. One of the most interesting commands is force:data:tree:import. It lets you insert data from multiple object types while maintaining master-detail relationships. Check out this documentation page for more details on how to prepare your sample data (the page is written for scratch orgs but the commands work for any org types).
Alternatively, AppExchange also offers a variety of paid and free tools that can generate sample data.
Refresh outdated sandboxes
One of the advantages of Developer sandboxes is the fact that they can be refreshed daily, and you should leverage this capability. When working on a project, use a Version Control System such as Git to store your work regularly. Doing that in combination with the right branching strategy allows you to refresh your sandbox frequently without losing your work. You’ll be sure to stay as close as possible to the current state of production.
As of Summer ‘20, the CLI sandbox refresh command is still on our roadmap, so you’ll need to use clicks in the production org or the Tooling API for now. If you’re interested in the API option, it turns out that we recently shared a Salesforce API collection for Postman that lets you run a sandbox refresh request with a few clicks.
Refreshing sandboxes is especially important for CI jobs. You need to make sure that you do not reuse “dirty” sandboxes in a CI build so that you do not inherit leftover data from previous tests. You should either delete those sandboxes or refresh them if possible.
Delete unused sandboxes
Make sure to delete sandboxes that are no longer used. For example, the ones created as part of a CI job. Sandboxes are associated with licenses so they’re a valuable resource that should be freed up when not in use.
Deleting a sandbox is as simple as this when using the CLI:
What’s next
That’s it for the first post of this two-part series. In general, we’ve covered how to manage Developer sandboxes.
In the last post of this series, we’ll explore metadata management with the Salesforce CLI. We’ll primarily focus on sandboxes, but some of what we’ll cover also applies to all non source-tracked orgs including Developer Edition orgs.
About the Author
Philippe Ozil is a Principal Developer Evangelist at Salesforce where he focuses on the Salesforce Platform. He writes technical content and speaks frequently at conferences. He is a full stack developer and enjoys working on robotics and VR projects. Follow him on Twitter @PhilippeOzil or check his GitHub projects @pozil.