This is the second post in a two-part series presenting how to work with Developer Sandboxes and the Salesforce CLI. Over the course of this series, we’ll cover:
-
Part 1: Sandbox Management
- Manage sandboxes with the Salesforce CLI
- Clone sandboxes instead of creating new ones
- Initialize sandboxes with a custom Apex class (Beta)
- Secure your production Org with sandbox-only users
- Import sample data
- Refresh outdated sandboxes
- Delete unused sandboxes
-
Part 2: Metadata Management
- Prefer the source format over the metadata format
- Retrieve metadata with the Org Browser
- Retrieve metadata that do not support wildcards in package.xml (reports, dashboards…)
- Remove metadata that’s no longer needed
- Leverage Custom Metadata to pass configuration from Production to your Developer Sandbox
- Test metadata deployments
In this final part, we’ll focus on metadata management for Developer sandboxes, but these best practices can be expanded to any non-source tracked org such as Developer Edition orgs or production orgs. We’ll cover various tools and techniques that you can use to enhance your development workflows.
Prefer the source format over the metadata format
At a high level, Salesforce orgs are made of three things: The Platform, metadata and data:
- The Platform is the base infrastructure, tools and services that are provided by Salesforce.
- Metadata is everything that lets you customize the Platform for your business needs (layouts, source code, permissions, custom objects, fields and so on).
- Data are the records that are stored in the org.
Metadata is what Salesforce developers work on. There are two project formats that developers can work with: Metadata format or source format.
The metadata format is the legacy format that was introduced to represent metadata on a filesystem. This format uses large XML files that are designed to be machine readable. This format is used by the Metadata API.
With the introduction of Salesforce DX, we introduced the source format. This format splits the metadata into smaller files and intuitive subdirectories. This makes it easier to read and manage in version control. With source format, you can easily collaborate on a project with multiple developers, merge changes with fewer conflicts and review the history of your project.
Here’s an example of the same metadata represented in both formats:
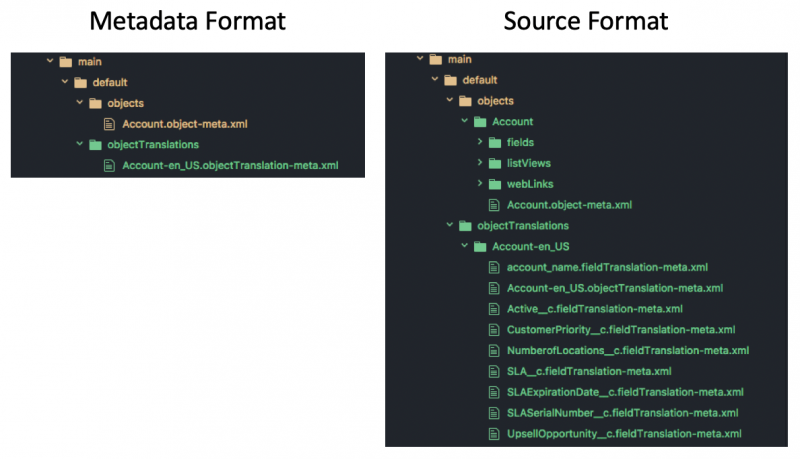
As a general rule, the source format is preferable over the metadata format but there are a few common misconceptions around it so let’s clarify a few things before moving on:
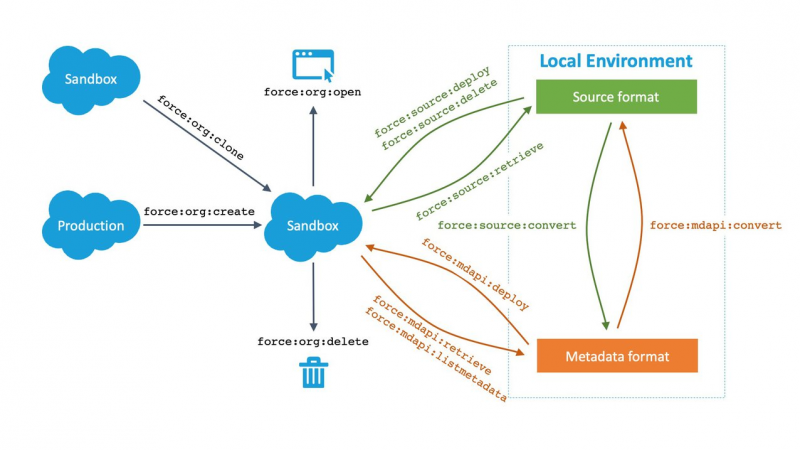
Source format works with any orgs, it’s not limited to Scratch orgs. What is specific to source-tracked orgs are certain CLI commands such as force:source:pull or force:source:push. There are equivalent commands for metadata deployment to non source-tracked orgs like sandboxes or production orgs ( force:source:retrieve and force:source:deploy for example).
Projects aren’t locked into a specific format: the metadata and source formats can be converted from one to the other. There are two CLI commands that let you convert between the two, respectively force:source:convert and force:mdapi:convert. All CLI commands starting with force:source work with source format and all force:mdapi commands work in metadata format.
Always prefer the source format for your projects as it facilitates collaboration and versioning.
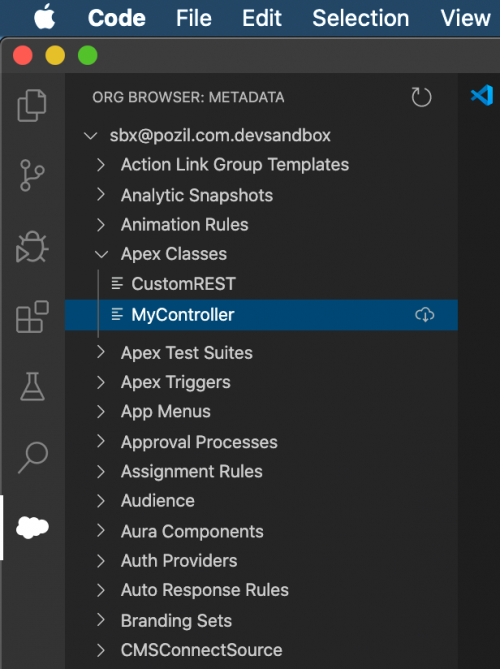
Retrieve metadata with the Org Browser
If you use VSCode, you can use the Org Browser (cloud shaped icon on the left toolbar) to explore the org’s metadata and download selected artifacts in source format with just a few clicks. This feature is amazingly simple and convenient.
Retrieve metadata that doesn’t support wildcards in package.xml
When retrieving artifacts with the CLI, you can use a package.xml file to specify the resources that are retrieved. This is generally pretty easy with the use of wildcards (the * symbol). However, some artifacts like reports, dashboards, documents and email templates can’t be retrieved with wildcards because they’re located in folders. You can either retrieve those artifacts by using the Org Browser (see above) or a combination of CLI commands.
Here’s an example of how you can retrieve reports in source format using the CLI:
- List the metadata folder artifacts (
ReportFoldertype forReportin this example):
- List artifacts for a given folder (in the output of this example we see that there’s a
My_User_Reportreport in theSomeFolderfolder):
- Add the artifacts to your
package.xmlfile. You’ll have to specify the artifactfullName(a combination of folder name and artifact name) that you retrieved in the previous command:
- Retrieve the artifacts in source format with the CLI:
This is a rather manual process when doing an initial import, but note that these operations can be chained and automated with custom CLI plugins or scripts.
Remove metadata that’s no longer needed
Metadata or source deployment only adds new artifacts by default. It’s your responsibility as a developer to do some cleanup and remove unneeded metadata to avoid cluttering your org.
If you use VS Code, you can simply right click on a file in the Explorer and select SFDX: Delete from Project and Org.

You can also delete metadata with CLI commands:
Leverage custom metadata types to pass configuration from production to your Developer sandbox
While Developer sandboxes are created with no initial data, you can leverage custom metadata types to pass configuration from your production org. Because custom metadata records are no ordinary records, they aren’t considered “data”. This means that they get copied over from the production org to the sandbox.
With that special rule in mind, you can set up the following process:
- Admin configures custom metadata in production
- Admin creates a new sandbox
- Metadata and custom metadata records are copied over to the sandbox
- Apex sandbox initialization class executes automatically
- Class reads the custom metadata records
- Class configures the sandbox

Here’s a sample project that illustrates how custom metadata lets the production admin configure new sandbox users. This project contains a sandbox initialization Apex class that relies on a custom metadata type to dynamically create sandbox users with specific names and emails.
Test metadata deployments
You can setup CI to test metadata deployments without modifying the target org. This type of test saves you precious time and eliminates the risk of errors because you do not need to cleanup your sandbox between jobs. Deployment tests are made possible thanks to the checkOnly flag in the metadata deploy command. This option is available in the Salesforce CLI force:source:deploy command with the -c or --checkonly flag.
Here’s an example of how you can test the deployment of your local source (force-app folder) and run tests on your sandbox with the CLI:
Closing words
This concludes our Salesforce CLI Best Practices for Developer Sandboxes series. In this final post we’ve covered CLI best practices for managing metadata in non-source tracked orgs such as Sandboxes, Developer Edition orgs or production orgs.
We covered the benefits of the source format, how to retrieve or remove metadata, how to pass configuration from a production org to a Developer sandbox and how to test metadata deployments.
We’ll leave you with a CLI command cheatsheet that summarizes the commands we’ve covered in the series:
Try them on your orgs and keep an eye out for the Sandbox source-tracking Beta in Summer ’20.
Resources
- Sandbox management best practices for administrators
- Salesforce DX Developer Guide
- Modern Tooling for the Sandbox Development Workflow
About the author
Philippe Ozil is a Principal Developer Evangelist at Salesforce where he focuses on the Salesforce Platform. He writes technical content and speaks frequently at conferences. He is a full stack developer and enjoys working on robotics and VR projects. Follow him on Twitter @PhilippeOzil or check his GitHub projects @pozil.