Building robust apps is hard. Developers can put a lot of effort into writing code, testing, and doing peer reviews, but bugs can still hit production. To reduce this risk and improve code quality, we rely on continuous integration (CI). In this post, we’ll introduce CI and its core concepts, then we’ll discuss how you can set up CI workflows for your Salesforce projects.
An introduction to continuous development
Before we jump into the specifics of CI as applied to the Salesforce ecosystem, we need to look at what CI is from a technology-agnostic point of view. We’ll focus on CI for the sake of brevity, but this is just the first step out of three on the path to continuous development:
- Continuous integration (often referred to as CI) lets you build, deploy, and test your project automatically.
- Continuous delivery take things further by building on CI and automating the packaging of your project deliverables. For instance, continuous delivery is responsible for building installable packages of our sample apps once pull requests are merged into our main Git branch.
- Continuous deployment (often referred to as CD) automatically deploys of the deliverables produced during continuous delivery to your various environments: from your development environment to user acceptance testing (UAT) up to production.

CI requires at least two software components: a version control system (VCS) and a CI system (a tool that lets you automate workflows). A CI workflow is generally composed of a few basic steps: it starts by retrieving your project’s sources from your VCS; then it builds and deploys your project to a test environment, next, it runs tests; and finally it cleans or discards the environment.

CI systems bring automation, predictability, and performance to the process. Several tools are available on the market, but at a high level, they all operate with the same pattern. A CI build starts when an event in Git (or any other VCS) occurs, which is generally some code being saved in the VCS. This triggers a CI workflow (a group of jobs that are composed of steps), and the steps produce and/or consume resources and environments as they execute.
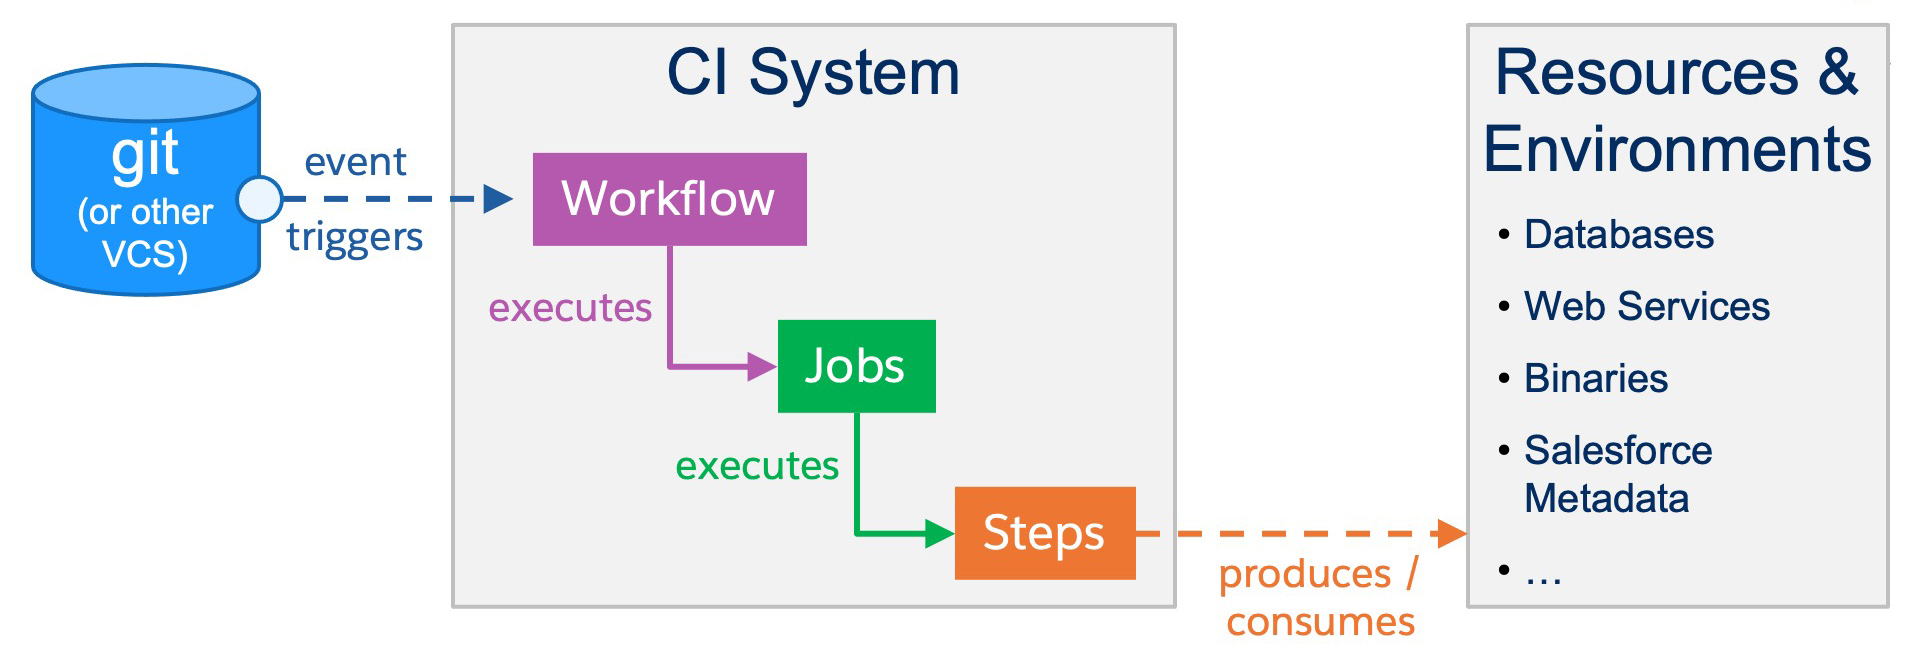
A practical example of this could be:
- Workflow: Verify that a new Pull Request will not introduce regressions in your project
- Job: Verify the app’s front end
- Step: Check out source code
- Step: Verify the front end’s source format
- Step: Lint the front end’s source
- Step: Test the front end’s source
- ….
- Job: Verify the app’s back end
- Step: Check out source code
- …
- Job: Verify the app’s front end
Defining the granularity of CI jobs in a workflow is somehow subjective, but you’ll want to ensure a separation of concern like we did in the previous example by splitting front end and back end checks. If you decide on too few jobs, you’ll likely end up with complex jobs with large number of steps, and this may be hard to maintain. On the other hand, if you have many jobs with few steps, you may waste CI execution time with redundant tasks (checking out sources, installing dependencies/tools, etc.).
As a general rule, CI execution time is considered an expense (whether you actually pay for it with a hosted system or not). To reduce costs, you want to reduce build duration with optimized workflows that fail fast in case of errors.
Let’s see how these CI concepts apply to Salesforce projects.
Set up your CI workflow
There are two types of Salesforce project development: org-driven or source-driven. In org-driven development, your production org is considered the single source of truth and you retrieve metadata from it to develop with sandboxes. In source-driven development, your version control system is the single source of truth and you build from the source code and scratch orgs (or a developer sandbox with source tracking enabled). In this post we’ll focus on source-driven development with scratch orgs, but most CI steps apply to both development types.
We recommend that Salesforce CI workflows should be split in at least two main jobs. The first job leverages Node.js scripts to format, lint, and test Lightning Web Components (LWC) just like you would do on your machine. The second job uses the Salesforce CLI and a scratch org (or a sandbox) to deploy the project’s metadata and test Apex code. Additionally, you can add a third job that handles packaging, but we’ll leave it as a reading exercise.
Here’s an overview of a Salesforce CI workflow for a source-driven development project:

Format sources, lint, and test LWC
The first step of any CI job is generally to check out the source code for the current commit. Then, you’ll set up your environment with any specialty tools needed (like the Salesforce CLI).
For our first job, we want to install the Node.js project that comes with the default Salesforce project template. Installing the Node development dependencies gives us access to range of tools and scripts that we can use on our development machine and during CI. See more details on how to make the most out of the Node.js scripts.
You’ll want to install the project with npm ci (see docs) instead of the traditional npm install (see docs) command. The npm ci command is dedicated to automated environments and guarantees a clean install instead of an incremental install.
Once the Node project is installed, the job runs the following Node scripts in three steps:
These steps are arranged in this order so that the most likely to fail and the shortest ones are positioned first: formatting, linting, then testing.
Deploy metadata and test Apex
The second job of your CI workflow will focus on tasks that involve the Salesforce CLI. As with the first job, you’ll start by checking out the source code then installing the tools. You can work with a virtual machine image that has pre-installed tools, or you can install them dynamically as part of the CI workflow.
You can optionally install a scanner, such as PMD, to perform Apex static code analysis. The scanner analyzes your code and reports potential errors, overly complex code, or security issues based on a set of rules that you configure. Rule violations can be used to halt the CI workflow.
Here’s an example of how you can install PMD and run a scan:
After this, you’ll install the Salesforce CLI. Here’s an example you can do this in a CI step:
Once the Salesforce CLI is installed, you need to authorize it with your DevHub (or your sandbox). There are a couple of ways to do this, but you are limited to the options that support headless mode since the CI workflow is automated. The most secure way of doing this is with the JWT Bearer flow with a self-signed certificate, but you can also use the auth:sfdxurl:store (see docs) CLI command like we did in the sample apps.
Once the CLI is authorized, the CI job runs the following commands in separate steps (these are examples and must be tailored to your project):
Once more, you can add an optional step that uploads the Apex code coverage to a code coverage reporting tool.
Finally, you’ll want to have a last step that always executes no matter the outcome of the job. This step cleans your Salesforce org. If you’re working with a scratch org, all you need to do is simply delete it by running the sfdx force:org:delete --noprompt command. Deleting unused scratch orgs is important as there are limits to the number of active scratch orgs that a DevHub may hold. However, if you’re working with a sandbox, you’ll have to revert any modifications that you may have done during the CI workflow so that future workflows start from a clean org. The fact that scratch orgs are discardable is a great advantage when working with CI.
Go beyond continuous integration
Ideally, you want to catch issues as early as possible. The best place to do this is on your machine before your source code goes into source control and CI kicks in. This saves you precious CI execution time and prevents you from polluting source control history with small fixes.
Fail Fast for the Win — when working on CI
The best way to do this is to use pre-commit hooks that run automated checks before your changes are committed. You don’t want to run an exhaustive CI workflow on your machine because this would be time-consuming and resource-intensive, but you can run some tasks specifically on the files that you’re about to change.
In the default Salesforce project template, we use Husky and lint-staged to achieve this. Husky lets us register a Git pre-commit hook that runs a custom script. We use this script to call lint-staged. Lint-staged then runs formatting, linting, and LWC tests for us. However, unlike CI, lint-staged only runs these tasks on files that are staged in Git: the files that you’ve modified and that are about to be committed, not all files in the project. This makes a significant difference in terms of the speed of execution.
If any of the lint-staged checks fail, then your commit is aborted and you can fix your issues before retrying to commit. If all checks succeed, the Git commit completes and your changes are versioned.

Closing words
Continuous development and Salesforce development are vast topics, and no single blog post can cover everything in depth. But we hope that this introduction has given you valuable pointers for your learning journey.
We provided you with a base CI framework that you can adapt and extend to fit your project’s requirements. With this, you can now pick your preferred tools and build optimized CI workflows. We’ll leave you with a collection of resources that will help you get started.
Don’t forget to join our next “Ask Me Anything” session on Jan 26, this month’s theme is CI/CD and DevOps! Add it to your calendar right here.
Resources
Blog posts
- How to Work with Developer Sandboxes and the Salesforce CLI
- Make the Most of Your DX Projects With Built-in Node.js Scripts
Videos
- Continuous Integration (CI) with GitHub Actions
- Make the Most of Your DX Projects with the Built-in Node.js Scripts
Sample Apps
- LWC Recipes — for example of how to setup CI GitHub Actions
Tools
About the author
Philippe Ozil is a Principal Developer Advocate at Salesforce where he focuses on the Salesforce Platform. He writes technical content and speaks frequently at conferences. He is a full stack developer and enjoys working on DevOps, robotics, and VR projects. Follow him on Twitter @PhilippeOzil or check his GitHub projects @pozil.