Model Builder, a capability of Einstein Copilot Studio, is a user-friendly platform that enables you to create and operationalize AI in Salesforce. The platform uses and amplifies the power of other AI platforms, enabling you to build, train, and deploy custom AI models externally using data in Salesforce. In August 2023, Salesforce announced the launch of Einstein Studio’s integration with Amazon SageMaker, and in November 2023, its integration with Google Cloud Vertex AI. In this blog post, we’ll demonstrate how to use Model Builder for product recommendation predictions using Google Cloud Vertex AI.
About Model Builder
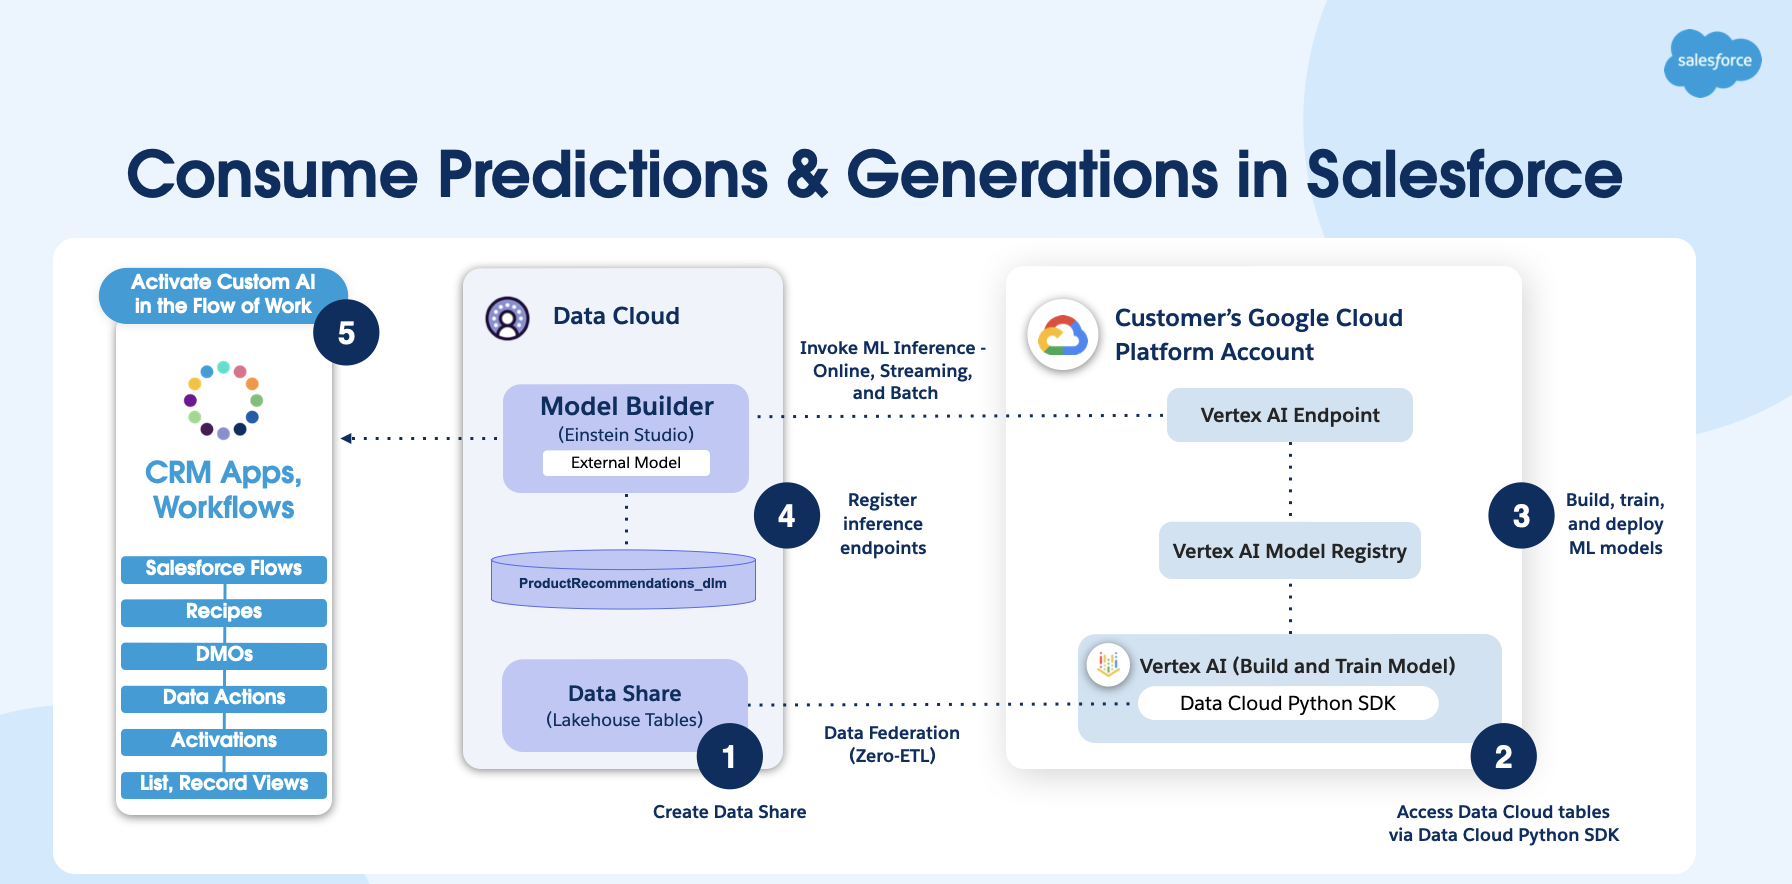
Model Builder’s BYOM capabilities enable data specialists to build and deploy custom AI models in Salesforce Data Cloud. The custom models are trained on an external platform, such as Vertex AI, and deployed in Salesforce. With the zero-copy approach, data from Data Cloud is used to build and train the models in Vertex AI. Using clicks, admins can then connect and deploy the models in Salesforce. Once deployment happens, predictions are automatically and continuously updated in near real time to generate accurate personalized insights.
Predictions and insights can also be directly embedded into business processes and applied by business users. For example, marketing analysts can create segments and customize the end user experience across various channels using the predictions and insights from the model. Also, Salesforce developers can automate processes using flows from model predictions.

Key benefits of Model Builder
Some of the key benefits of Model Builder include:
- Supports diverse AI and ML use cases across Customer 360: Build expert models to optimize business processes across Customer 360. Examples include: customer segmentation, personalization, lead conversion, case classification, automation, and more.
- Uses familiar tools: Access familiar modeling tools in Vertex AI. Customers can use frameworks and libraries, such as TensorFlow, PyTorch, and XGBoost, to build and train models that deliver optimal predictions and recommendations.
- Provides AI-based insights for optimization in Salesforce workflows: Easily operationalize the models across Customer 360 and embed the results into business processes to drive business value without latency.

Architectural overview
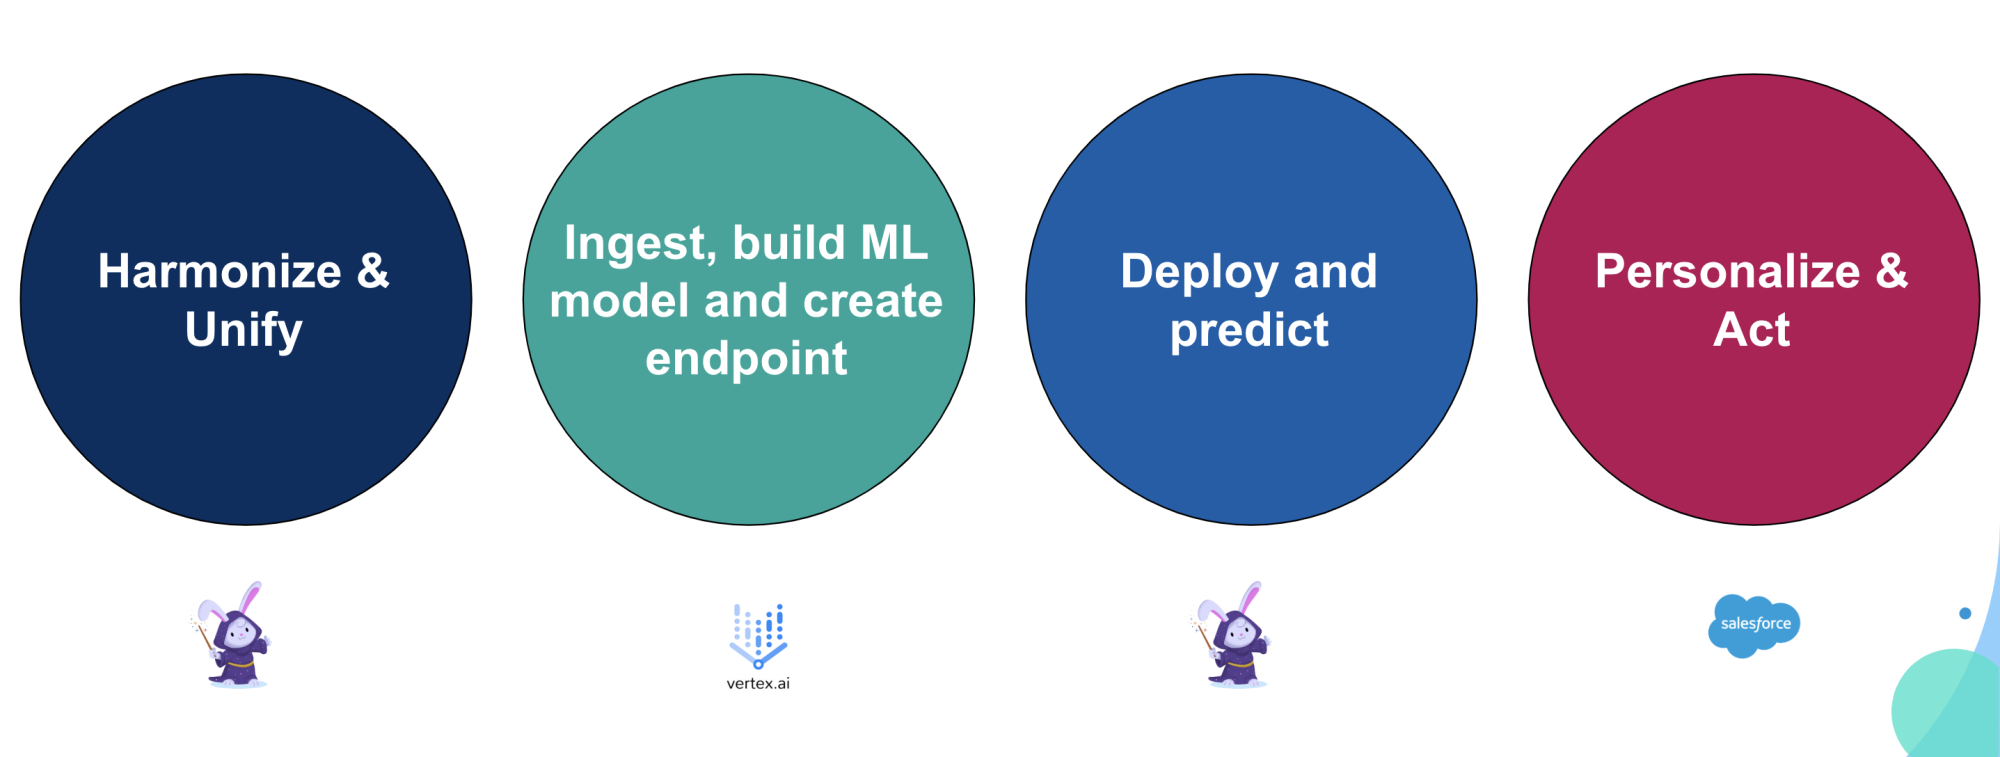
Data from diverse sources can be consolidated and prepared using Data Cloud’s lakehouse technology and batch data transformations to create a training dataset. The dataset can then be used in Vertex AI to query, conduct exploratory analysis, and establish a preprocessing pipeline where the AI models are then trained and built.
To complete the process, create an endpoint to model deployment and scoring in Data Cloud. Once records are scored, the potential of the Salesforce Platform comes into play through its powerful automation flow functionality. This enables the creation of curated tasks for Salesforce users or the automatic inclusion of customers in personalized and tailored marketing journeys.

Operationalize a product recommendation model in Salesforce
Let’s look at how to bring inferences for product recommendations from Vertex AI into Salesforce using an XGBoost classification model.
In our example use case, a fictional retailer Northern Trail Outfitters (NTO) uses Salesforce Sales, Service, and Marketing Clouds. The company wanted to be able to predict their customers’ product preferences in order to deliver personalized recommendations of products that are most likely to spark interest.
In this use case, we’ll leverage Customer 360 data in Data Cloud’s integrated profiles to develop AI models to forecast an individual’s product preferences. This will allow for precise marketing campaigns driven by AI insights, resulting in improved conversion and increased customer satisfaction, particularly among NTO’s rewards members. It will also increase customer engagement via automated tasks for service representatives to reach out to customers proactively.
Step 1: Prepare training data in Data Cloud
The AI model for the product recommendations use case is constructed based on a dataset of historical information encompassing the following information in Data Cloud data model objects (DMOs):
- Customer Demographics: Customer-specific information, such as location, age range, Customer Satisfaction (CSAT) or Net Promoter Score (NPS), and loyalty status
- Case Records: Prior purchases, including the total number of support cases, and if any of the cases were escalated for resolution
- Purchase History: Comprehensive information about products purchased and the purchase dates
- Website and Engagement Metrics: Metrics related to the customer’s website interactions, such as the number of visits, clicks, and engagement score

Step 2: Set up, build, and train in Vertex AI
Once data is curated in Data Cloud, model training and deployment then take place in Vertex AI. By using a Python SDK connector, you can bring the Data Cloud DMO into Vertex AI.
Once you have data in the Vertex AI from Data Cloud, you can use Vertex AI Workbench, a Jupyter notebook-based development environment for building and training your AI model. The screenshot below is from the Jupyter notebook instance. You can see how to query for the input features that go into the model, such as products purchased, club member status, and so on.

Next is hyperparameter tuning, which is crucial for systematically adjusting the parameters and selecting the best algorithm. Hyperparameter tuning helps to maximize the performance of AI on a dataset. The optimization involves techniques, such as grid search or random search, cross-validation, and careful evaluation of performance metrics, ensuring the model’s ability to perform on new data.

Deploy the model in Vertex AI
The final task in this step is to create model endpoints to enable the scoring of records in Data Cloud. A model endpoint is a URL that can request or invoke an AI model. It provides an interface to send requests (input data) to a trained model and receive the inferencing (scoring) results back from the model.

Step 3: Set up the model in Model Builder
Once the endpoint is created in Vertex AI, it’s simple to set up the model in Data Cloud using the no-code interface.
- Navigate to Data Cloud → Einstein Studio → New The latest release allows you to automatically trigger an inference when data mapped to the model input variable is changed in the source DMO. To enable streaming, click Yes under Update model when data is updated?

- Give the model a name. The API name should automatically populate.

- Enter endpoint details by clicking Add Endpoint.
- Enter the endpoint URL from Vertex AI and click Next.

- Enter your Google Service account credentials, JWT, or key-based authentication (note that Google Service account credentials were made available in this release). You can enter your service account email, private key ID, and private key from your Google Cloud account as shown below.

- Set up input features.
- Navigate to the Input Features tab, select the object that has the predictors, and click Save.

- Next, start selecting the fields from the DMO for model scoring. Note that the order in which you choose the fields is critical here and should match up with the SELECT query in Vertex AI. If the predictors are across multiple objects, the records are harmonized and can be scored.

- Drag each predictor and click Done one by one in the specific order. When completed, click Save.

- For each input predictor, you can also choose the streaming option by choosing Yes for the Refreshes Score setting. This means that when the value for this predictor in the DMO changes, it triggers a call to the AI platform to refresh the prediction.

- Set up output predictions.
- Next, click Output Predictions, give the DMO a name, and click Save. This is where the output predictions will be saved.

- Enter the outcome variable API name and the JSON key. Note that in this case, the JSON key is –
$.predictions.product_purchased__csince the original query has product interest as the outcome variable name.

- Next, activate the model.

- Once the model is activated, click Refresh on the top right to see the predictions in the DMO. You will only need to refresh if you are using batch inferences. With streaming inferences, new inferences are triggered only when there is a change to the input variable from the DMO.

Step 4: Create flows to automate processes in Salesforce
- Navigate to Setup → Flows.

- Select New → Data Cloud-Triggered Flow.

- Click Create. The system will ask you to associate it with a Data Cloud object. Select the DMO that stores the predictors. In this case, it is the Account Contact Object DMO.

- All the records that have a prediction value change, or records with new predictions, will now be reflected in this flow. Now, you can create automated tasks in Salesforce core based on specific criteria.

Step 5: Create segments and activations in Data Cloud for targeted marketing campaigns
- In Data Cloud, navigate to Segments.

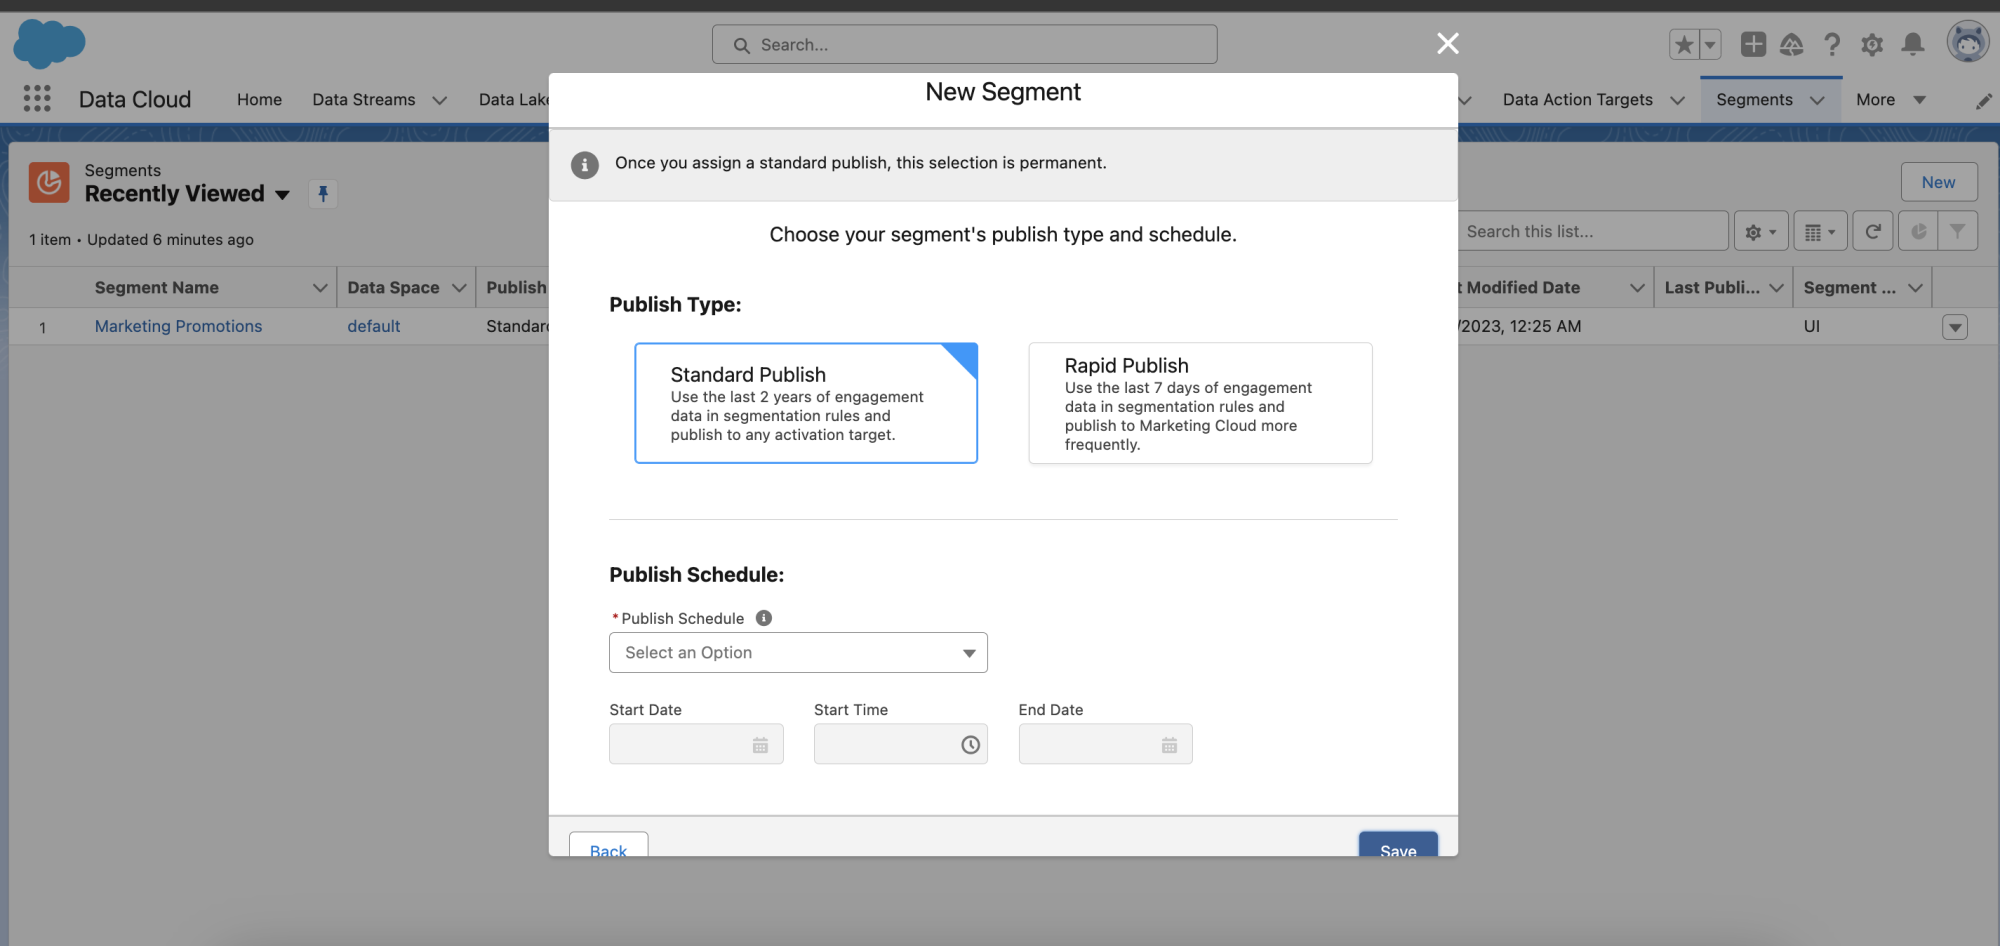
- Select New and give the segment a name.

- Click Next. Choose publish type and schedule.

- Once you click Save, you can edit the segmentation rules. Add the segmentation rule and click Save.

- Now add the segmentation to an activation. Navigate to the Activations tab in Data Cloud.

- To add segmentation to an Activation, choose the segment and activation target; for example, Google Ads or Marketing Cloud. Then select the unified individual as the activation membership, and click Continue.

The activations are created. As the predictions change, the activations are automatically refreshed and sent to the activation targets.
Conclusion
Model Builder is an easy-to-use AI platform that enables data science and engineering teams to build, train, and deploy AI models using external platforms and data in Data Cloud. External platforms include Amazon SageMaker, Google Cloud Vertex AI, and other predictive or generative AI services. Once deployed, you can use the AI models to power sales, service, marketing, commerce, and other Salesforce applications.
To elevate your AI strategy using Model Builder, attend our free webinar with AI experts from Salesforce and Google Cloud.
Additional Resources
- Newsroom release announcement
- Einstein Studio Release Notes
- Einstein Studio Salesforce Help
- Einstein Studio GA announcement with Google Cloud Vertex AI
- Einstein Studio GA with Amazon SageMaker
- Learn about Generative AI and Large Language Models (LLMs) on the Salesforce 360 blog and Building AI-Powered Apps with LLMs and Einstein.
About the authors
Daryl Martis is the Director of Product at Salesforce for Einstein. He has over 10 years of experience in planning, building, launching, and managing world-class solutions for enterprise customers, including AI/ML and cloud solutions. Follow him on LinkedIn or Twitter.
Sharda Rao is a Distinguished Technical Architect for Data Cloud. She has over 20+ experience in the financial industry specializing in implementing data science and machine learning solutions.