With the increasing use of agents in day-to-day operations, it becomes clear that users should not be limited to text interactions. With the Summer ’25 release, we’re introducing custom Lightning types, a new way to customize the appearance of agent conversations in Lightning Experience, enhance their interactivity, and add an initial layer of validation. In this post, we’ll give you a quick refresher on the anatomy of an agent conversation, and we’ll dive into the customization of user inputs and agent responses.
Anatomy of an agent conversation
Before we dive into the world of customization, let’s take a moment to look at Lightning types and how they can be used as building blocks in agent conversation.
About Lightning types
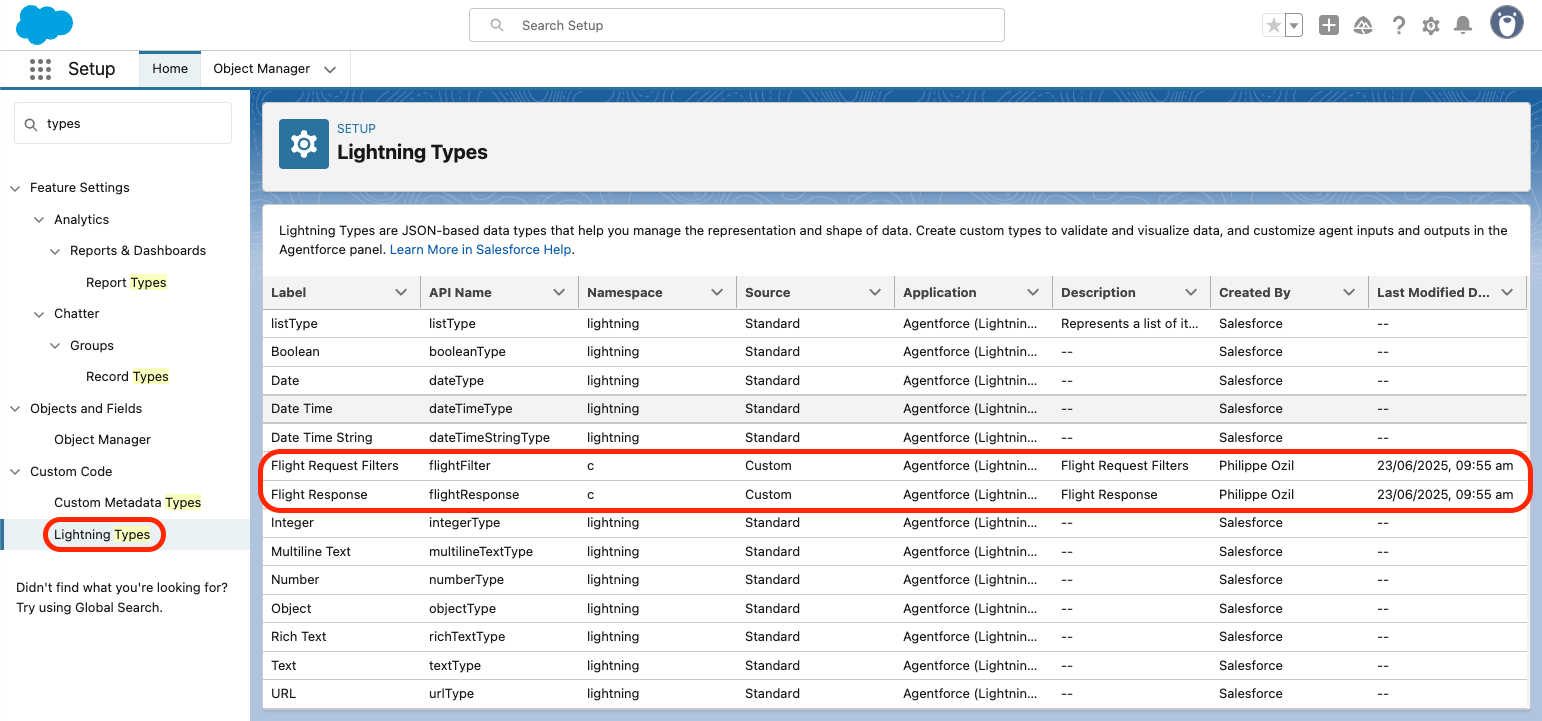
A Lighting type is a metadata type that specifies the user interface associated with a given data type (for example a date type that maps with a date picker). A number of standard Lightning types are provided out of the box and, since the Summer ’25 release, you can create custom Lightning types (CLTs) for actions that use Apex classes as input or output.
With CLTs, you can configure editors and renderers to use specific Lightning web components for input and output in agent conversations. A CLT consists of two or three JSON files:
- A
schema.jsonfile that defines the data type (an Apex class with@InvocableVariableproperties) - An optional
editor.jsonfile that specifies a LWC that is displayed so that the user enters or edits data (for example: a date picker for the date type) - An optional
renderer.jsonfile that specifies a LWC that displays the data (for example: a record card)
This translates to a LightningTypeBundle metadata bundle located in the lightningTypes folder of your Salesforce DX project with the following folder structure.
Lightning types are building blocks for agent conversations
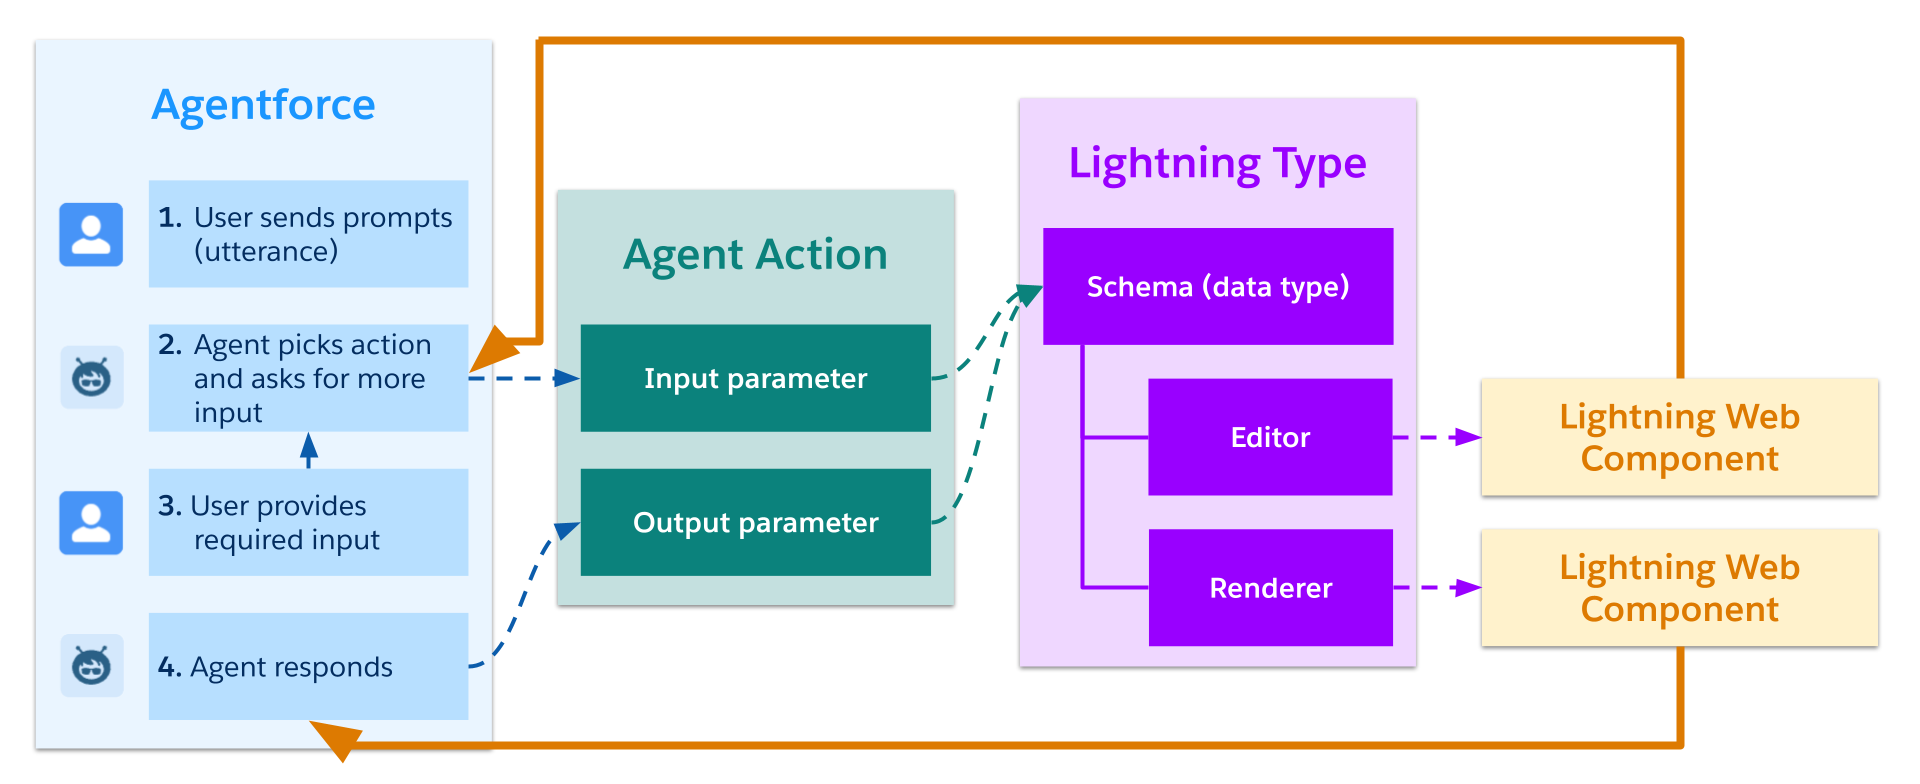
A typical agent conversation goes like this:
- The user starts by sending an initial prompt, also known as an “utterance.”
- The agent uses the Atlas Reasoning Engine to process the utterance and to define a plan that includes one or more actions. Sometimes, the agent requests extra information, such as required input parameters, for the actions.
- If so, the user provides the required information.
- Once the agent has all of the required inputs, it executes the actions and responds.
During such a conversation, data is being exchanged between the user and the agent. This data maps to action input and output parameters, which are in turn associated with Lightning types. The diagram below summarizes the interactions between all of these elements.
Now that we’ve clarified the key concepts, let’s look at how we can customize user inputs with CLTs.
Customize user inputs in agent conversations
CLTs allow you to use custom LWCs, such as forms, to collect user inputs. Not only does this provide a user-friendly interface that helps to avoid back and forth between the user and the agent, but it also adds a first layer of validation in the browser before calling the agent.
This validation improves the user experience by saving both time and resources. In effect, users are no longer calling the agent multiple times and waiting to receive responses that are just prompts for additional information or error messages.
As a practical example, let’s assume that you want to run an action that searches for flights. The action has a number of required input parameters and some optional search filters. Unless you have access to the action’s documentation beforehand, you will likely have to send multiple prompts to fill all required inputs and you have no way to identify the optional filters.
As an administrator, you can simplify things by adding instructions to request that the action inputs are displayed as an automatically-generated form, but the UI will be basic. It will consist of a list of generic inputs with no user-friendly labels.
This is where CLTs comes in handy: you can replace the generic form with a custom LWC. For example, it could be one that contains an accordion that toggles the optional filters and some sliders that provide a visual guide for the optional price and discount ranges.

Here’s the JavaScript of the flightRequestFilter LWC pictured above:
In the code above, all values (price and discount percentage) are injected into the component as a single object through the value public property (note the @api decorator on the getter and setter). Then, the component exposes value changes to its parent component thanks to a valuechange custom event that bubbles up.
We won’t detail the rest of the component’s configuration for the sake of brevity but, in addition to the JavaScript, the component requires a lightning__AgentforceInput deployment target with a source type that matches the CLT name (c__flightFilter in this example).
The flightFilter CLT is composed of an editor.json file that points to the above LWC (c/flightRequestFilter) and a schema.json file that points to the Apex class used to store the filter values (@apexClassType/c__FlightAgent$Filter, that is, a Filter subclass in the FlightAgent class).
Once all of these elements are deployed, the admin can then toggle the display type of the Find Flights agent action input parameter from the default Apex type to the flightFilter CLT.

Customize agent outputs in agent conversations
In the same spirit as user inputs, rather than having the agent output be a block of unformatted text or a bulleted list, you can customize agent outputs with CLTs.
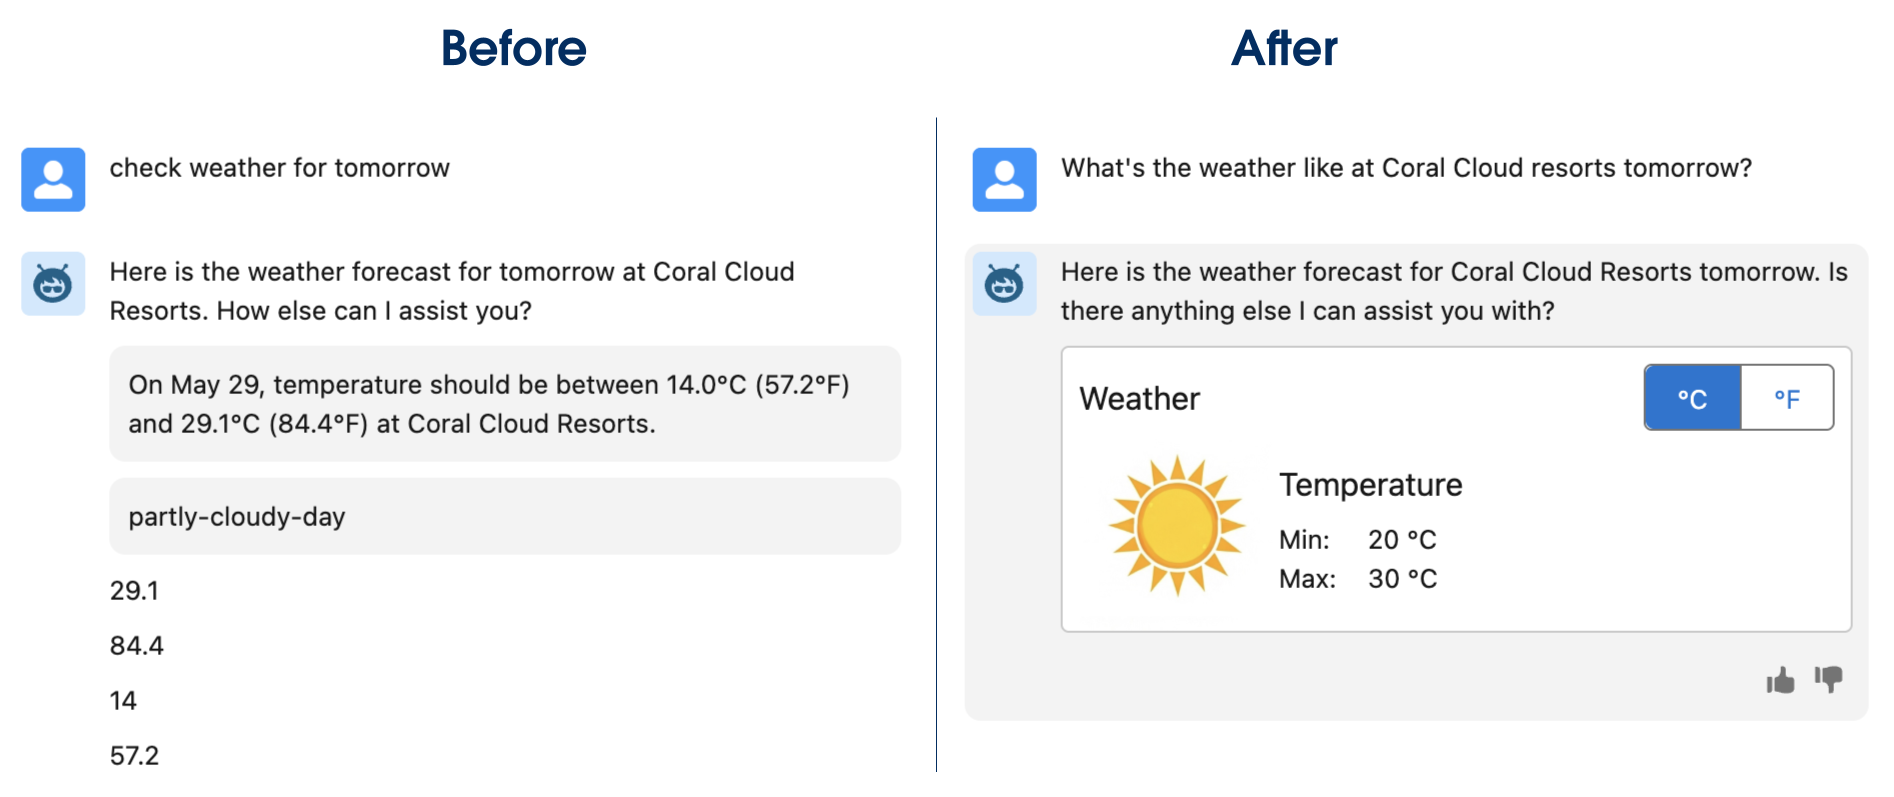
For example, take the Check Weather action that returns the weather and temperature at Coral Cloud resorts in both Celsius and Fahrenheit. Prior to CLTs, the action would display a text description of the weather along with min/max temperature values. These unformatted outputs can easily be replaced by a CLT and a user-friendly LWC.
In addition to providing a custom appearance, CLTs allow for actionable outputs.
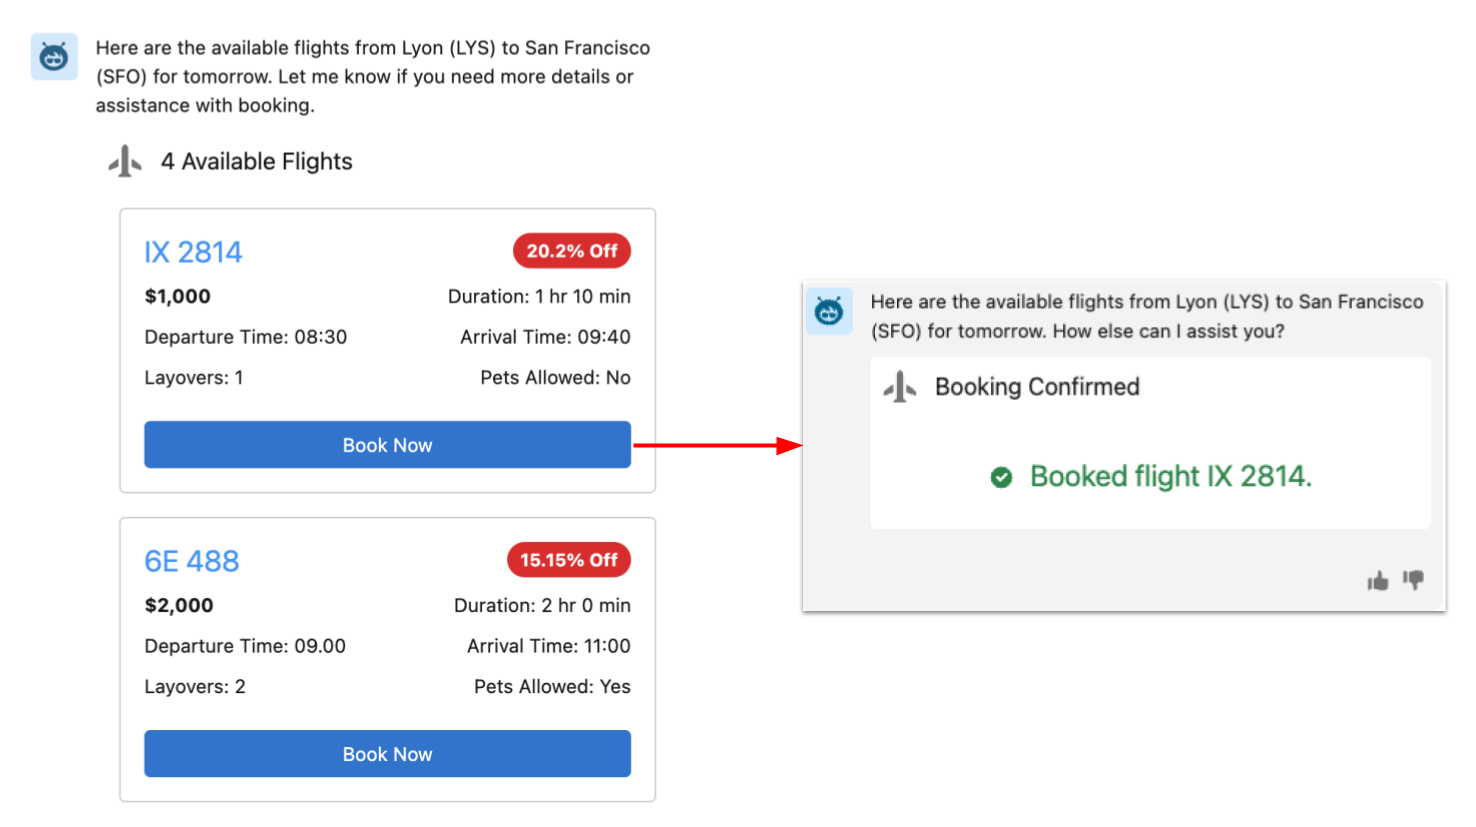
Going back to the previous flight search example, you can use a flightResponse CLT with a flightDetails LWC that renders a list of flights as cards. And, since the most common action is to book one of these flights, you can implement a Book button in your cards. Once the button is clicked, the flight is booked and the UI can either be refreshed accordingly or the user can be redirected to the booking page to finalize their order.
Here’s an overview of the configuration that is required for this scenario:
- The
flightDetailsLWC has alightning__AgentforceOutputdeployment target that points to theflightResponseCLT - The
flightResponseCLT has:- A
renderer.jsonfile that points to the above LWC (c/flightDetails) - A
schema.jsonfile that points to the Apex class used to store the flights (@apexClassType/c__FlightAgent$AvailableFlights, that is, anAvailableFlightssubclass in theFlightAgentclass)
- A
- The Find Flights agent action uses the
flightResponseCLT as the display type for its output parameter
Conclusion
You’ve learned how to get the best out of your agents by mixing unstructured text-based interactions with more structured interactions, thanks to custom Lightning types. You can implement custom editors and renderers with LWC to create delightful and actionable agentic experiences.
This first iteration of CLTs is limited to Lightning Experience as of the Summer ’25 release, but we’ll soon see custom Lightning types in Experience Cloud. Get started today by exploring the documentation and the Coral Cloud sample application.
Resources
- Video: Agentforce Decoded: Enhance the Agent UI with Custom LWCs and Lightning Types
- Custom Lightning Types Developer Guide
- LWC target configuration reference:
- Coral Cloud sample app
About the author
Philippe Ozil is a Principal Developer Advocate at Salesforce, where he focuses on the Salesforce Platform. He writes technical content and speaks frequently at conferences. He is a full-stack developer and enjoys working with APIs, DevOps, robotics, and VR projects. Follow him on X, LinkedIn, and Bluesky, and check out his GitHub projects.