The Salesforce Metadata API is a powerful tool for developers and admins to programmatically manage the metadata that defines a Salesforce org. It’s a key part of the Salesforce Platform that allows customers to create, read, update, and delete both standard and custom metadata. By understanding and using Metadata API, you gain the power to manage your org’s development lifecycle with greater control and efficiency using a structured, repeatable process.
In this blog post, we’ll explore how Metadata API deployments work, their stages, and how to optimize these deployments.
Metadata API overview
Metadata API provides a flexible approach to metadata deployment and retrieval that is essential for building scalable and automated deployment processes. The command-line method offered by the Salesforce CLI enables advanced development practices like version control, CI/CD, and bulk deployments.
Salesforce metadata is the configuration that defines your business data’s structure and your org’s behavior. Examples include page layouts, Apex classes and triggers, profiles, and permission sets. Note that Metadata API is designed to manage these configuration components and not the business records themselves.
Read the developer documentation to learn more about what Metadata API offers and how to use it for different business use cases. For the purposes of this blog post, we’ll assume that you have a basic understanding of Metadata API and its associated tools, so that you may more easily gain deeper insight into the inner workings of the deployment process discussed here.
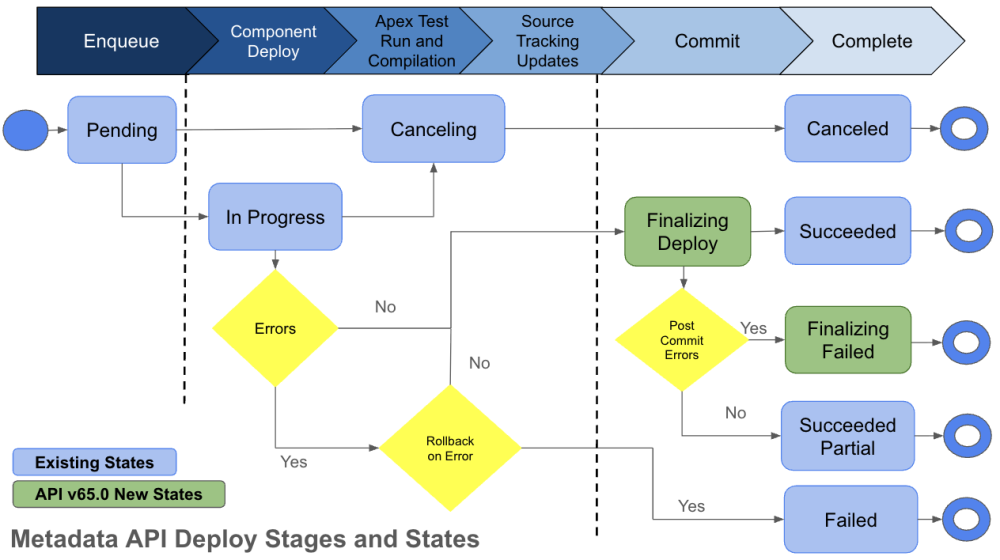
Understanding the deployment transaction (stages and states)
So, what happens when a user — whether it’s an admin using DevOps Center or Change Sets, or a developer using the CLI — requests a deployment?
Single transaction deployment
Deployments with Metadata API are done as a single transaction to ensure that your org’s customizations are always in a consistent state. This means that the entire deployment cycle has to execute through each stage. Note that it’s possible to use the rollbackOnError deploy option for a deploy call which, if set, allows the deploy to be completely rolled back — even if some deploy actions were successful.

Deployment queuing
The first step for any deployment involves placing the deploy zip file in a queue for processing. The zip is a deployment artifact containing the collection of metadata files for your components. The deploy status then changes to Pending, and the deploy is waiting to be processed. The start time for processing is based on queue traffic and server availability. While multiple deployments can be enqueued, only one can be processed per org at a time.
Component deploys
Once dequeued, the deployment begins with component deploys and the deployment state is changed to In Progress. The deployment service works through the deploy zip to ensure that the number of files are within the Metadata API limits before it begins processing. After a deployment artifact is confirmed to be within limits, the service begins the metadata upsert and delete operations on the included components.
Apex testing, compilation, and source tracking updates
If the components’ CRUD are successful, the deployment proceeds to the Apex testing stage. At this point, tests are executed based on the test level that you select, with the deployment status remaining as In Progress.
If source tracking is enabled in your target org, the deployment service updates any source tracking related information after the test run succeeds. When complete, the deployment is committed to the database. Up to this stage, there are a couple possible paths that the deployment can take:
- If any CRUD on any metadata component fails, or any of the Apex tests being run fails, and you have set
rollbackOnErrortotrue, any actions performed by the deploy service will be completely rolled back and the deployment state will be saved as Failed. - Before the deployment is committed, you may cancel your deployment. Canceling a deployment rolls back any action that has been taken up until that point, and the deployment is marked as Canceled.
Commit
If the deployment completes with no errors, it proceeds directly to the Finalizing Deploy state for a final commit. The same is true if there are errors, but the rollbackOnError option is set to false. At this stage, the deployment is committed to the database, and cancellation is no longer possible via the UI or API. Not allowing the deployment to be cancelled at this stage prevents metadata inconsistencies that could otherwise occur in your org.
Additional operations
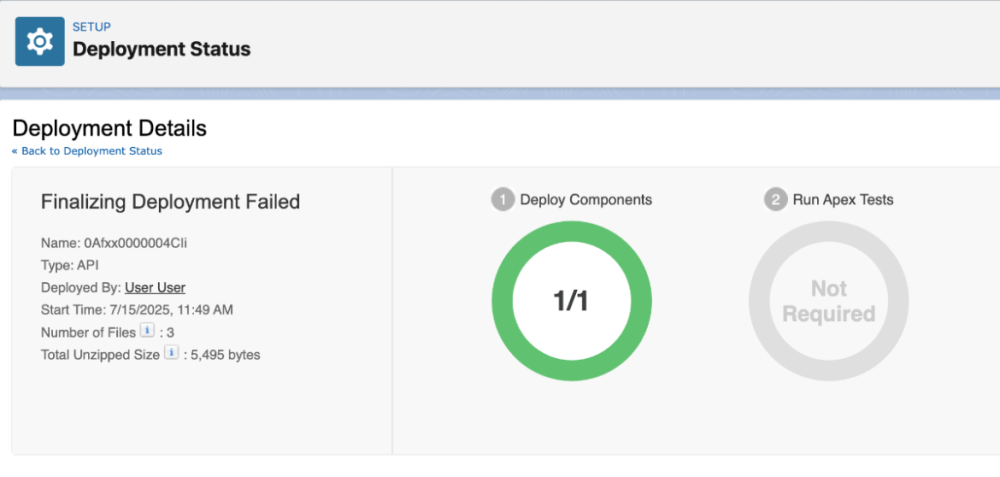
There are additional operations like custom field index creation or custom field type conversions that may be executed in your org before the deploy is marked as either Succeeded or Succeeded Partial (in case of the rollbackOnError option set to false). If there are errors in the post-commit operations, the deployment results in Finalizing Failed state. This is where the deployment transaction ends.
Note that the states Finalizing Deploy and Finalizing Failed are new and have been introduced in API v65.0 with the Winter ’26 release. We’ll talk more about these changes in the “Changes to Metadata API states in Winter ’26” section later in this post.
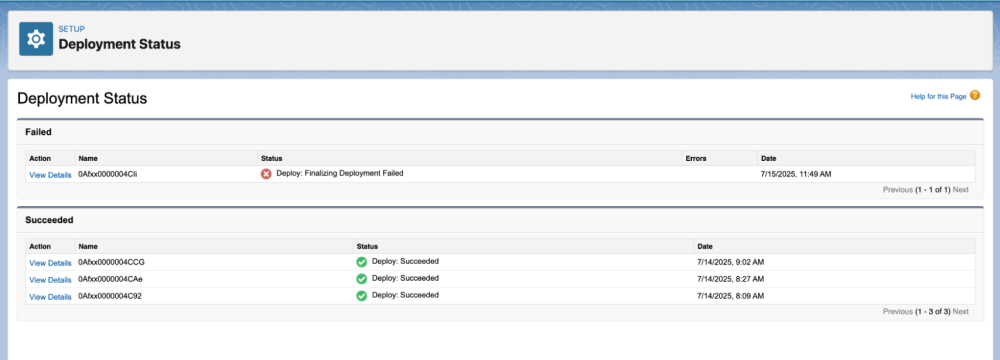
Viewing deployment status information
Now that you understand how the deployment transaction works, you might be wondering how to access this information. Any user with View All Data or Metadata API access can view the status of current or past deployments via the Deployment Status UI page.
To view this page, go to Setup and search for “Deployment Status” in the Quick Find box to directly navigate to it.
Alternatively, you can make a checkDeployStatus() API call to view the same information programmatically. The Salesforce CLI also supports checking the status of a project deployment by running the sf project deploy report command (see the command reference).

Changes to Metadata API states in Winter ’26
As mentioned previously, we’ve introduced two new states — Finalizing Deploy and Finalizing Failed — to make deployment a more stable, transparent, and reliable experience.
The changes to Metadata API are going live with the rollout of the Winter ‘26 release in API v65.0. To confirm when your org will be upgraded to Winter ’26, see status.salesforce.com and enter your org’s instance.
Tip: Consider testing in a preview scratch org during the Salesforce release transition before upgrading to the latest API versions to ensure that client tooling remains functional.
If you have any questions about Metadata API and its changes, please do not hesitate to contact our support team.
Conclusion
To summarize, Metadata API offers Salesforce users a systematic way to handle and move the foundational Salesforce org configurations that define its structure and behavior. The deployment process is carefully designed as a single, cohesive transaction, moving through several phases to maintain the org’s metadata integrity. Hopefully, the blog post provides some insights into this process and its phases for deeper understanding. To further improve this experience, upcoming enhancements in the Winter ’26 release will introduce new states for greater clarity and reliability in the final stages.
About the author
Neha Ahlawat is a Product Management Director at Salesforce focused on Metadata API and its frameworks, source tracking, and metadata coverage.