Use Metadata to Move an Agent to a New Org
After you’ve created an agent in an org, either by using the Agentforce UI or Agentforce DX, you can move the agent to another org by retrieving and deploying its metadata. For example, to move an agent from a sandbox org to a production org, first retrieve the agent’s metadata from the sandbox org to your local machine. Then, deploy the agent’s metadata to the production org.
This document uses Salesforce CLI commands to retrieve and deploy the agent’s metadata. To use VS Code, see Salesforce Extensions for VS Code.
You can download this metadata deployment documentation to help your coding agents or deployment tools deploy Agentforce agents. See Download Agent Script Documentation.
-
Install Salesforce CLI.
To test your setup, run
sf searchand see the list of CLI commands. -
Authorize your source and target orgs by using Salesforce CLI:
When the login window appears, log in to your org and click Allow.
- Ensure you’ve enabled Einstein and Agentforce in your source and target orgs.
- Ensure that you have the required permissions to publish and preview an agent in your source and target orgs.
Create a Salesforce DX project to define your package.xml manifest and contain the retrieved metadata. First, change to the directory where you want to store the project. Then, use sf template generate project.
In this example, we use the standard project template because we don’t need an example agent. We also use --manifest to create a sample package.xml file, which contains example metadata.
A Salesforce DX project is created on your local machine in the <project name> directory; the project contains an example package.xml manifest file.
Create a manifest to define the metadata you want to retrieve. You can copy and edit the default manifest that was created in your project at manifest/package.xml.
- Draft (uncommitted) agents and agent versions are represented by
AiAuthoringBundle, notBotorBotVersion. You can edit a draft agent. - Committed agents and agent versions are represented by
AiAuthoringBundle, plusBotandBotVersion. You can’t edit a committed agent. Instead, create and edit a new version. - Legacy agents don’t have a commit stage, and are represented by
BotandBotVersion(notAiAuthoringBundle). You can edit and overwrite an active legacy agent.
| Agent Type | Metadata Representation | Editable |
|---|---|---|
| Draft Agent | AiAuthoringBundle | Yes |
| Committed Agent | AiAuthoringBundle, Bot, BotVersion | No |
| Legacy Agent | Bot and BotVersion | n/a |
For more details, see Agent Metadata: A Shallow Dive and Agentforce Metadata Types.
Use these examples to get started:
- Replace the version number (for example,
<version>65.0</version>) with your required metadata version. Your project’s samplepackage.xmlmanifest contains the most recent version number. - Add any other metadata types that your agent needs, such as Data 360 dependencies.
| Example Manifest | Description | Notes |
|---|---|---|
| All Agents | Defines metadata for all agents, including legacy agents. Includes metadata for all flows, prompt templates, and Apex classes in the org. | Replace the * wildcard with the API names of the ApexClass, Flows, and GenAiPromptTemplates that your agents use. Using wildcards for these types can pull excessive data, leading to very long deployments or timeouts. |
| Single Agent Version | Defines a single version of an agent, plus the flows, prompt templates, and Apex class types that the agent version uses. | Before deploying a single agent version into an org (using BotVersion), you must have deployed the full agent to the org. Deploying the agent before deploying a specific version ensures that all required metadata and artifacts are created in the target org. |
| Single Agent Version with Different Bot/AiAuthoringBundle Versions | Defines a single agent version when the AiAuthoringBundle version doesn’t match the Bot/BotVersion version. | This difference can happen when you save more versions than you commit. See Step 4 - Update Your Manifest for Different Bot/AiAuthoringBundle Versions. |
To define a single agent version, make these changes to your manifest.
- Instead of
Bot, which is the top-level representation of an agent, useBotVersion, which represents the configuration for a specific agent version. Include the agent version’s name and version number. For example:
- Instead of using the agent’s name to specify
AiAuthoringBundleandGenAiPlannerBundle, use the agent’s versioned name. For example:
Use these steps to specify the correct versions for your agent’s metadata.
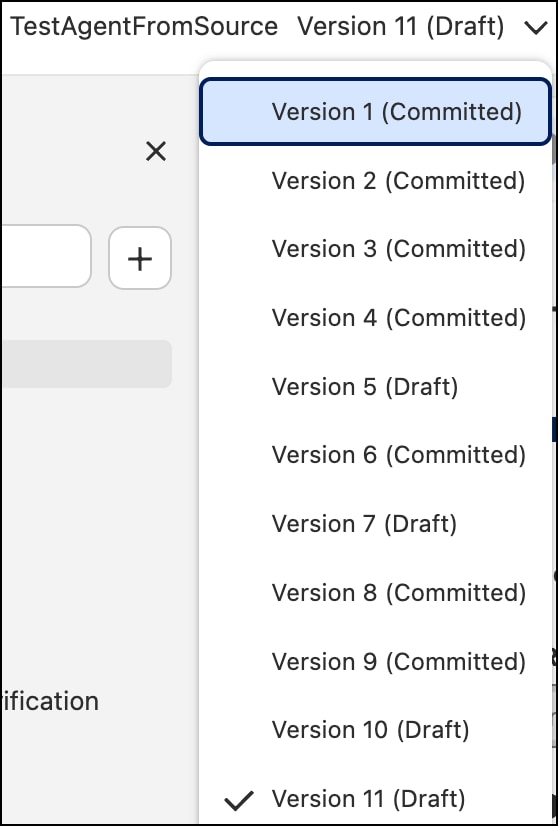
When you save an agent version, Agentforce creates AiAuthoringBundle metadata. When you commit an agent version, Agentforce creates Bot/BotVersion metadata. If you save more versions than you commit, the version of your AiAuthoringBundle won’t match the version of your Bot/BotVersion.
For example, this agent has 11 versions of an agent and 7 committed versions. Therefore, the agent’s metadata contains 11 versions of AiAuthoringBundle and 7 versions of Bot and BotVersion. You’ll need to specify the correct version numbers to match the correct AiAuthoringBundle to the correct Bot and BotVersion.
To find the matching Bot version, open the AiAuthoringBundle folder for your desired version. In the agent version’s bundle-meta.xml file, the target metadata shows the version to use for the GenAiPlannerBundle and BotVersion.
For example, version 9 of the agent “TestAgentFromSource” uses version 7 of GenAiPlannerBundle and BotVersion.

Use these versions to specify your manifest, for example Manifest for Different Bot/AiAuthoringBundle Versions
After defining the metadata in your project’s manifest (for example, package.xml), retrieve the agent’s metadata to your local machine. Use the org’s alias that you configured when authorizing your org.
For more information about retrieving and deploying metadata, see Basic Retrieval and Deployment of Metadata: A Refresher.
Your retrieved metadata contains the agent username(s) from the source org. To enable your draft agent to run out-of-the-box on the target org, you can use string replacement to update the username with a target org’s username. Agents run in the context of a user, and the usernames on your source and target orgs are different. You can’t use string replacement to update a committed agent’s username, because committed agents can’t be edited.
If you deploy a draft agent to your target org without replacing the username, you’ll need to manually update the agent’s username before it can run on the target org.
See Example - Configure String Replacement for Agent Username.
Once you’ve retrieved your agent’s metadata to your local project, you can deploy the metadata to a new org.
Don’t modify the metadata that you retrieved. Uploading edited metadata to an org can corrupt your org. )
Use the right deploy command for your project.
Before using your agent in the new org, you must assign the agent user. If you didn’t configure the agent’s user during deployment, manually configure the agent’s user.
You can’t edit a committed agent. To add an agent user to a committed agent, first create a new agent version. Then, add the user to the new version.
Ensure the agent user has sufficient permissions to carry out the agent’s tasks. For example, if the agent reads a custom contact field, the agent user must have view permission on the custom field.
To learn more about agent users, see create or assign the default agent user.