Checkout Component Communication
Checkout components communicate with each other during checkout processing. Understanding how they communicate helps you develop a custom checkout component for a B2B or B2C store created with an LWR template.
There are two checkout layout options: one-page and accordion. The layout option that you choose affects how the data provider and sections interact with your custom child components.
In the one-page layout, the shopper can generally complete checkout sections in any order. All checkout components are kept in edit mode, so the shopper can edit each section. In Experience Builder, you can reorder the sections and components.
In the accordion layout, the shopper completes the sections in a prescribed order from top to bottom: Shipping Address, Shipping Method, and Payment. The default minimum set of sections and components must be kept in this order. Each section in this layout has a Proceed (or Next) button.
In both layouts, an authenticated customer must provide or confirm their shipping address, shipping method, payment, and billing information. A guest customer must also enter an email address and a phone number as part of the shipping address. To place the order, the customer clicks Place Order.
In the one-page layout, shoppers can edit sections in any order. Editing autosaves on the shipping component, which triggers the shipping methods to load. The checkout place order operation triggered by the Place Order button succeeds when all required sections and forms are completed and they report as valid. The address and shipping methods autoload for a returned authenticated shopper, and only payment information must be entered.
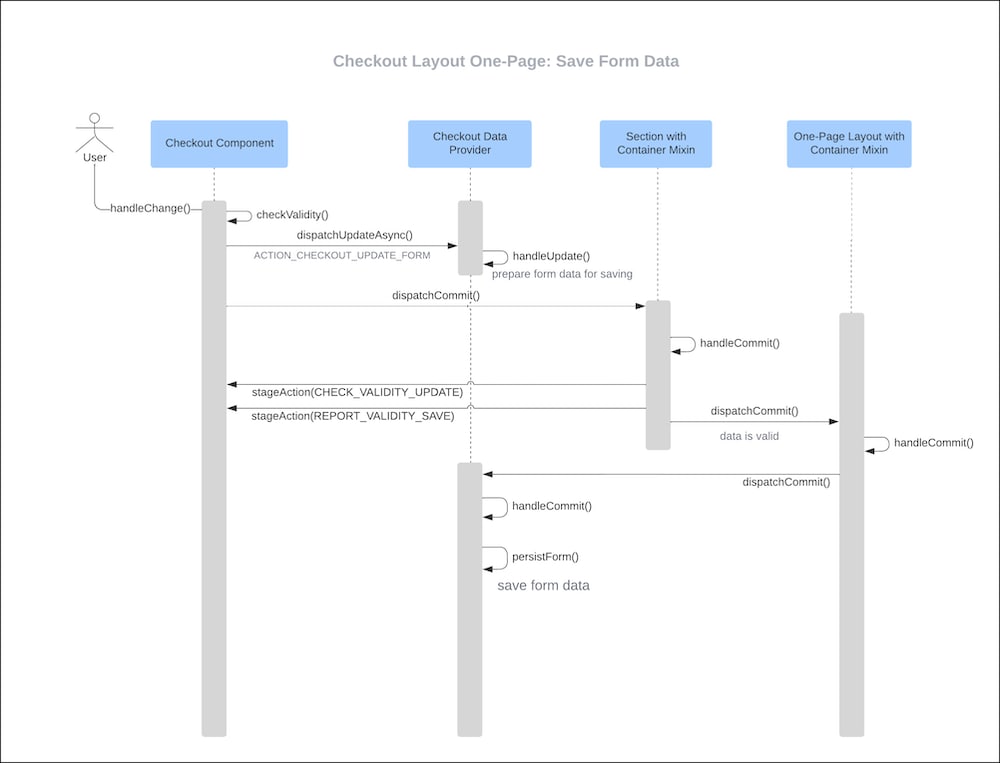
Form Updates and Autosave
One-page layout sections are always expanded and editable. After a customer enters valid information into a component’s form fields, the component typically calls two methods, dispatchUpdateAsync() and dispatchCommit(), to notify the checkout data provider or parent section containers that they’re ready to be saved.
The dispatchUpdateAsync() method notifies the checkout page data provider to update the internal form store with the supplied changes. To avoid updating the internal form store with invalid data, the component typically calls the checkValidity() method first. The dispatchCommit() method informs the section to attempt to save the new internal form store changes. The component stageAction() method handles the CHECKOUT_VALIDITY_UPDATE and REPORT_VALIDITY_SAVE actions. When the component checkValidity() and reportValidity() methods return true, the subsequent dispatchCommit() calls are made through the intermediary one-page layout container component. Finally, the checkout data provider handles the commit and saves the checkout data.
This diagram shows the sequence initiated when a customer interacts with a component form.
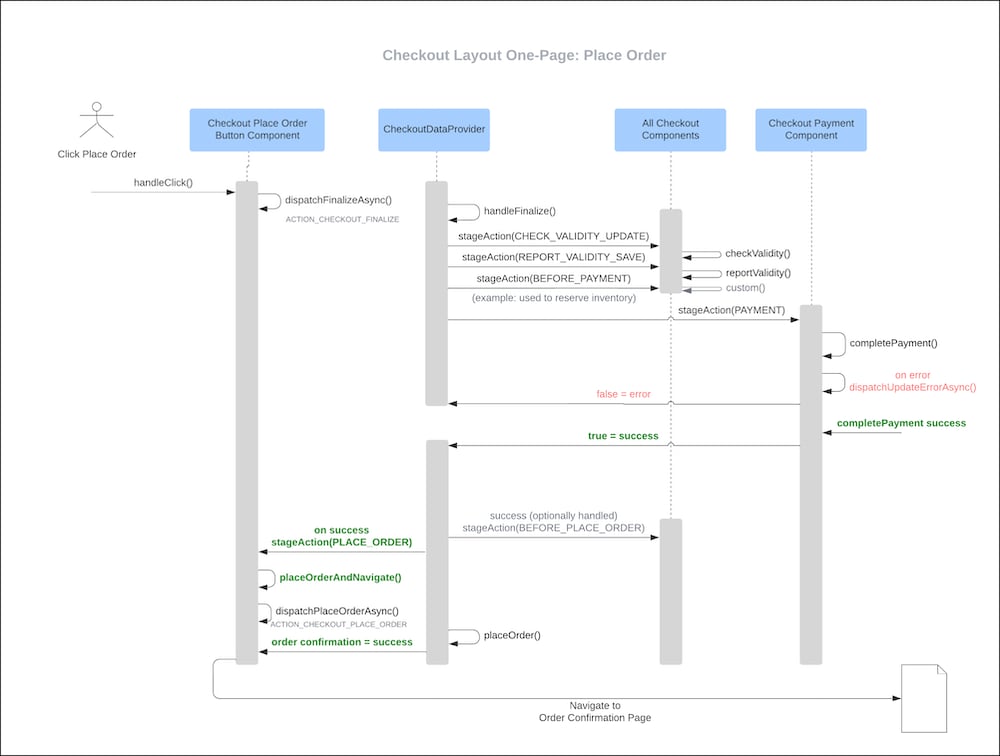
One-Page Place Order Sequence
In one-page checkout, after the user clicks the place order button, the button calls the helper dispatchFinalizeAsync to start the validation cycle. The checkout page data provider executes reportValidity on each child component to determine if all forms are valid and ready. This validity check is complete when components implement the stageAction() method with CHECK_VALIDITY_UPDATE and REPORT_VALIDITY_SAVE handlers. See Sample Custom Checkout Component.
If any form fields are invalid, errors are shown and the place order operation is halted. The customer can then provide missing information or correct mistakes.
If all initial stageAction(...) calls report valid and return true, the ACTION_CHECKOUT_FINALIZE operation continues with stageAction(PAYMENT) and calls completePayment() on the Payment component.
If completePayment() succeeds and returns true from the stageAction(PAYMENT) call, the checkout data provider continues to process calls stageAction(BEFORE_PLACE_ORDER) and stageAction(PLACE_ORDER). When stageAction(PLACE_ORDER) is called, the component uses dispatchPlaceOrderAsync to make the server API call.
Finally, the Place Order Button component handles the PLACE_ORDER option and dispatches the ACTION_CHEKOUT_PLACE_ORDER action. This component also navigates to the order confirmation summary. Custom components can also implement the stageAction(checkoutStage:CheckoutStage) method and handle BEFORE_PAYMENT and BEFORE_PLACE_ORDER for any custom processing needed at those stages.
This diagram shows the sequence initiated when the customer clicks Place Order.
The shopper clicks Proceed on each section to go to the next section.
By default, the accordion layout shows these sections in order: Guest Information (for unauthenticated shoppers), Shipping Address, Shipping Methods, and Payment and Billing. You can add custom sections and components, but you must keep the default sections for checkout to work.
Error handling behaves similarly for both layout options. Whenever an error is caught, a dispatchUpdateErrorAsync() call can be made. For example, in the Place Order diagram, a dispatchUpdateErrorAsync() call is made on the Payment component completePayment() method. The checkout page data provider then updates the Checkout Notification component to display the error. The checkout process is halted until the shopper corrects any issues and clicks Place Order or Proceed again. See FormNotification details in Checkout Interfaces.
To clear previous error messages, use a dispatchUpdateErrorAsync() call with only the groupId parameter specified.