Authorization for Shopper APIs
Learn how to set up the Shopper Login and API Access Service (SLAS) so that you can request access tokens for Shopper APIs.
Shopper APIs are secured with the Shopper Login and API Access Service (SLAS), but SCAPI Admin APIs are secured with Account Manager (AM) instead. This guide only covers how to access the Shopper APIs. To learn how to access the SCAPI Admin APIs, see Authorization for Admin APIs.
To get you up and running as fast as possible, the instructions provided here use a web application called the SLAS Admin UI. If you require additional configuration options or are building automated setup tools, also use the SLAS Admin API instead of the UI.
To do this task, you need:
- Your AM token
- The Account Administrator role in Account Manager. If you get stuck, ask an administrator on your team for help or contact Support.
For each user performing the SLAS administration tasks described in this guide, follow these steps to set up their roles and filters:
-
Log in to Account Manager.
-
Click User from the left navigation.
-
Click the user’s ID.
-
Scroll down to Roles and click Add.

-
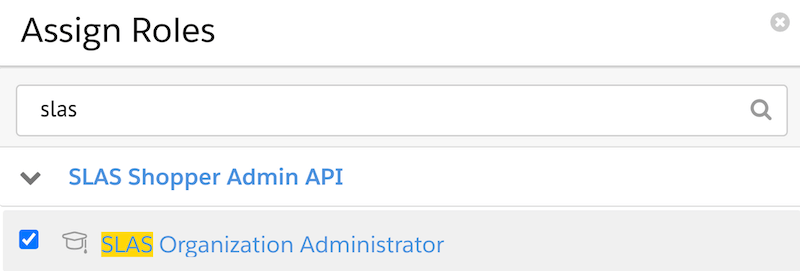
Enter “slas” in the filter search box.
-
(If you see no results, the role has likely been added already, so click Cancel and skip to step 9.)
-
Select SLAS Organization Administrator.
-
Click Add.
-
Look for the SLAS Shopper Admin API category with the SLAS Organization Administrator role below it.
-
Click the filter button next to the SLAS Organization Administrator role.

-
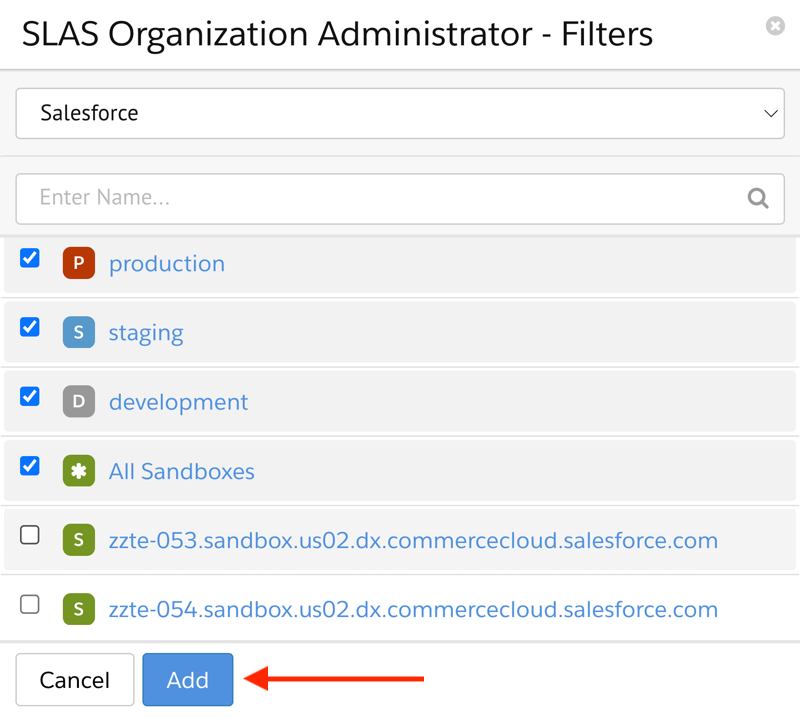
Select an organization.
-
Select the hostnames for specific B2C Commerce instances that you want to configure. Also select All Sandboxes instead of selecting each sandbox individually.
-
Click Add.
-
Scroll down to the bottom of the page.
-
Click Save.
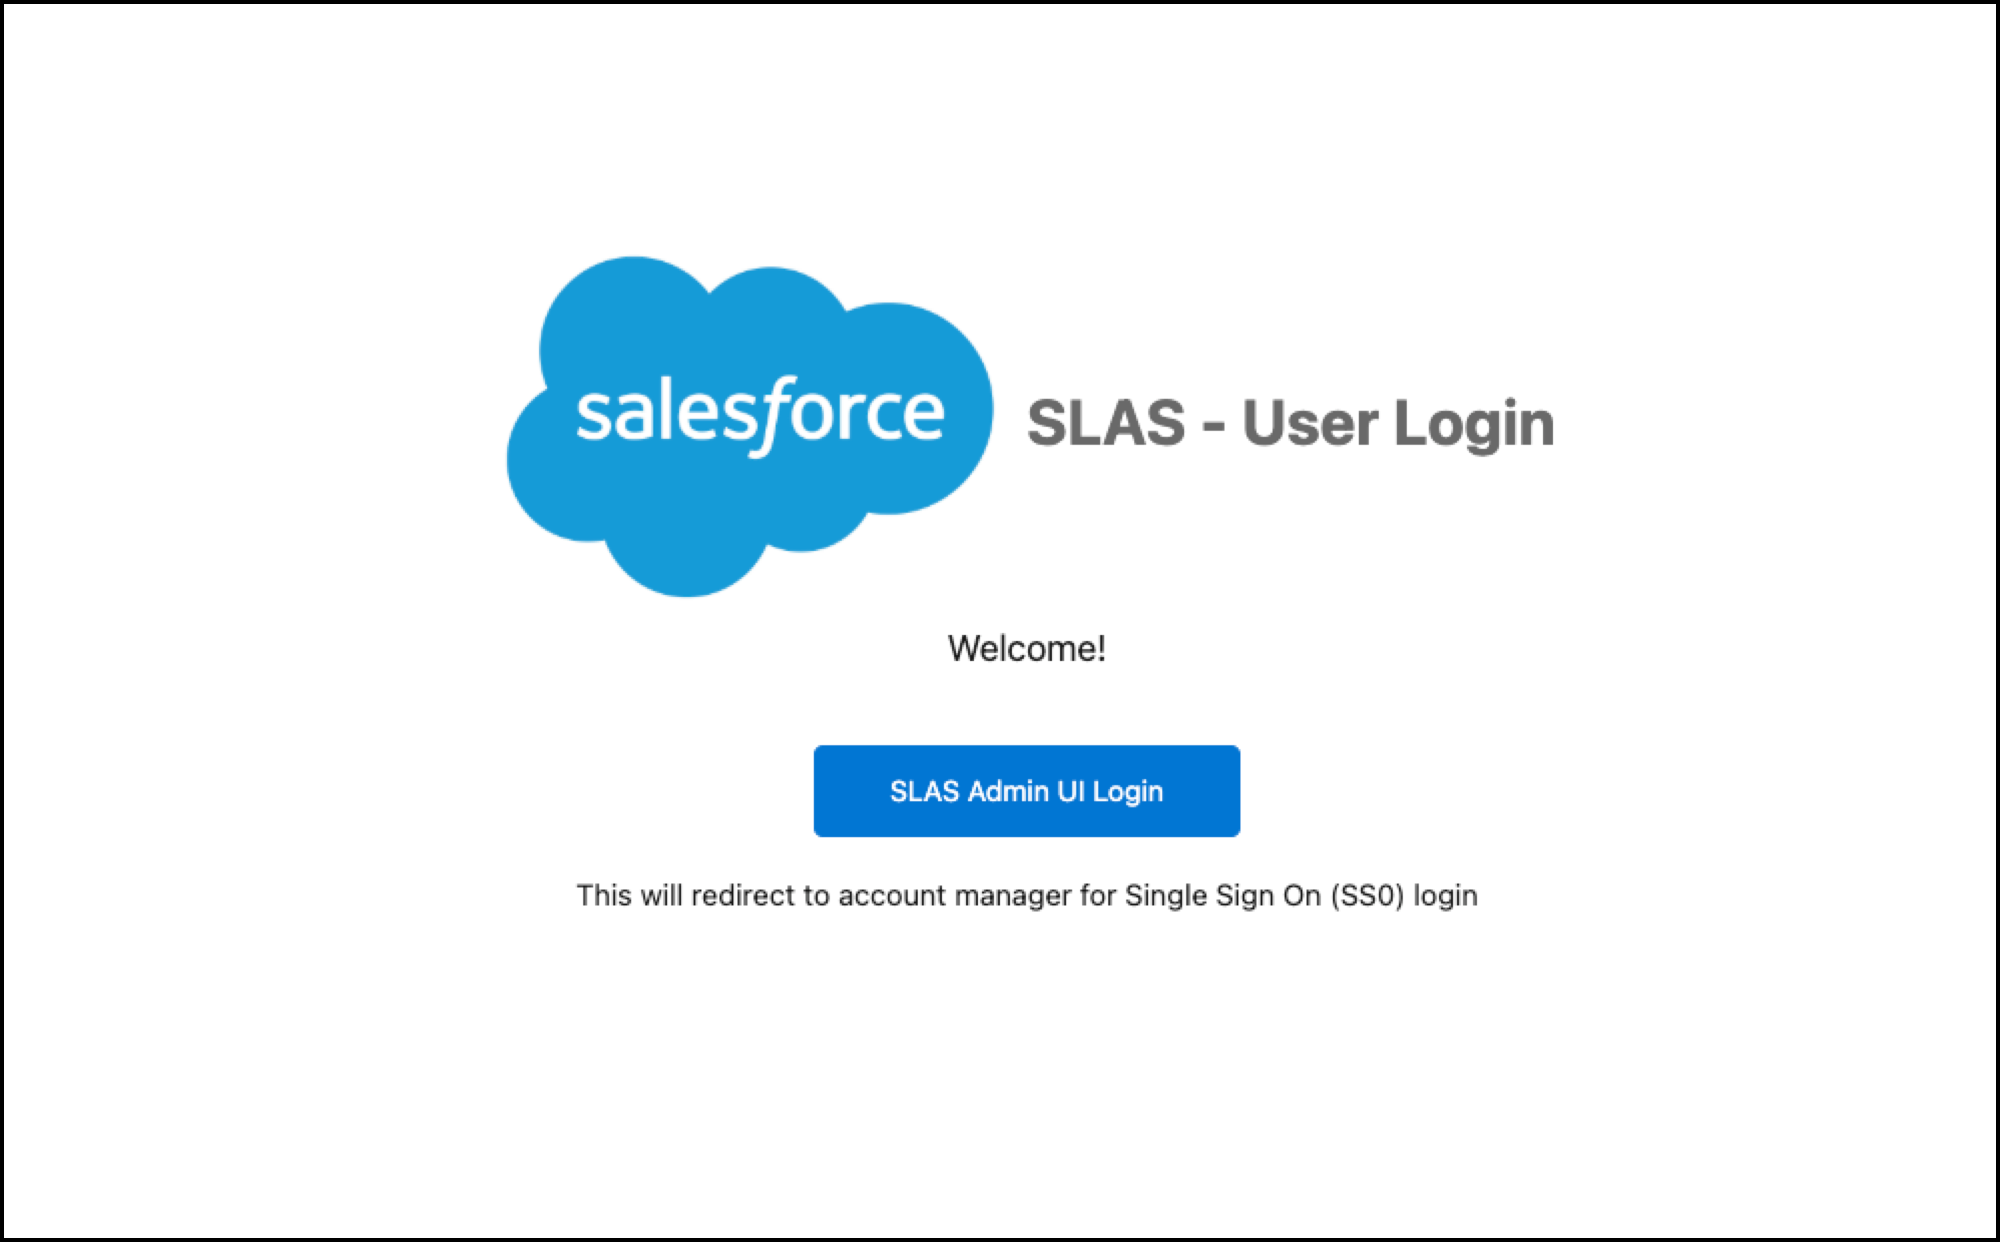
Now log in to the SLAS Admin UI. (It can take up to 15 minutes for role changes to propagate and take effect.)
The easiest way to create a SLAS client is to use the SLAS Admin UI. To access the SLAS Admin UI, replace {short-code} in the following URL with the short code used by your B2C Commerce instances:
You can also use the B2C Commerce CLI to automate this. First, see B2C CLI, MCP and Tooling SDK to install the tool and authenticate:
For a complete list of SLAS CLI commands, see SLAS Commands.
To learn more about B2C Commerce short codes, see the Base URL and Request Formation guide.
Repeat these steps to create a SLAS client for each B2C Commerce instance that requires access to Shopper APIs:
-
Log in to the SLAS Admin UI using your Account Manager credentials.
-
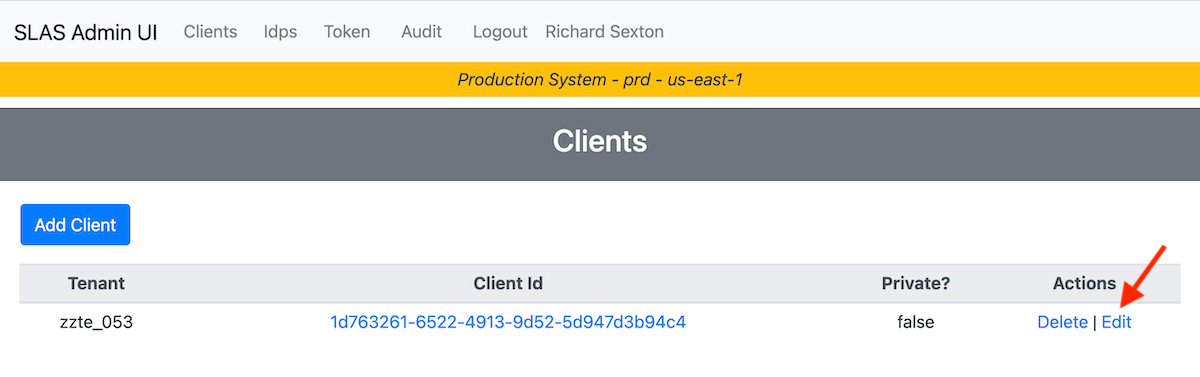
From the top navigation, click Clients.
-
Click Add Client.
-
Click Choose Tenant… and select a B2C Commerce instance.
-
Select an app type with the “Which App Type will be used?” field:
- Choosing PWA Kit or SFRA or Mobile creates a public client (no secret generated).
- Choosing BFF or Web App creates a private client (secret generated automatically).
-
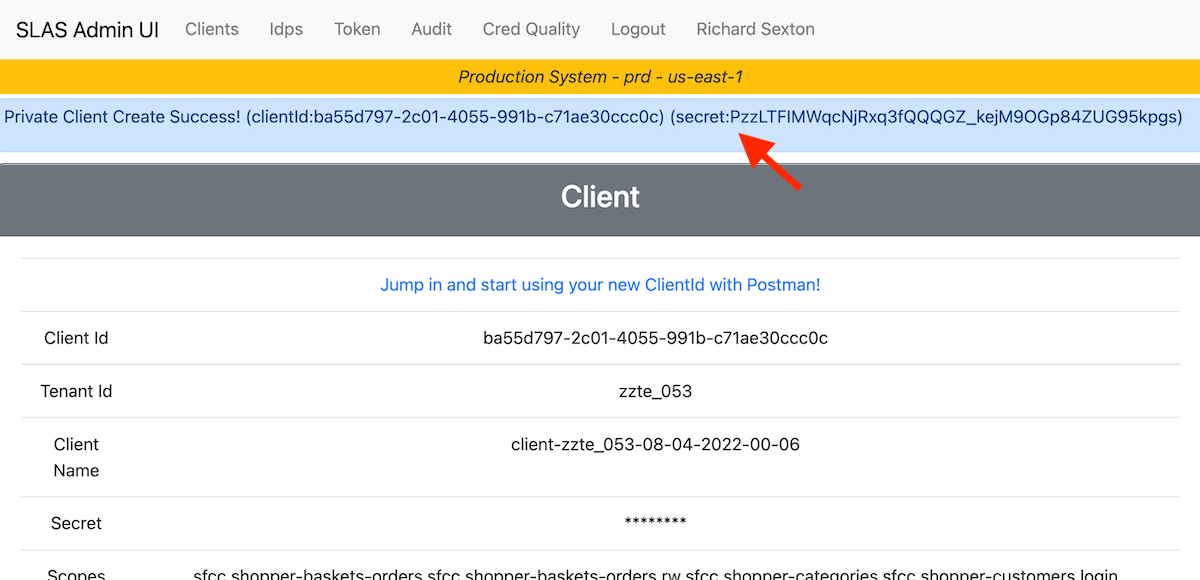
Click Submit.
Now use your SLAS client to request an access token for Shopper APIs.
If your app type is BFF or Web App (private client), the automatically generated secret is displayed at the top of the results page.
To initialize an Agentforce session, obtain a SLAS shopper access token that includes the sfcc.shopper-agents.rw scope, and then call the Shopper Agents API with the sessionInitKey received at session start.
The Shopper Agent API starts the Agentforce session and associates it with the shopper context that sessionInitKey references. It doesn’t move profile or basket data. Any access to shopper data continues via standard Shopper APIs, governed by your SLAS token’s scopes.
A secret can only be displayed once for security reasons, so be sure to copy it and save it in a secure location whenever you create a client for a BFF or Web App.
To generate a new secret for an existing client:
- From the top navigation, click Clients.
- Click the Edit link next to the client ID that you created earlier.
- Change the app type to PWA Kit or SFRA or Mobile.
- Click Save.
- Click the Edit button.
- Change the app type back to BFF or Web App.
- Click Save.
- Copy the secret at the top of the results page.
If you’re planning to do a phased rollout of a PWA Kit experience, you must also create a redirect URI and associate it with your API client.
To create the redirect URI, replace PLACEHOLDER_HOSTNAME and PLACEHOLDER_SITE_ID in the following string with actual values for your B2C Commerce instance:
To associate the redirect with your API client, follow these steps in the SLAS Admin UI:
-
From the top navigation, click Clients.
-
Click the Edit link next to the client ID that you created earlier.
-
In the redirect field, append a
|character followed by the redirect URI that you just created.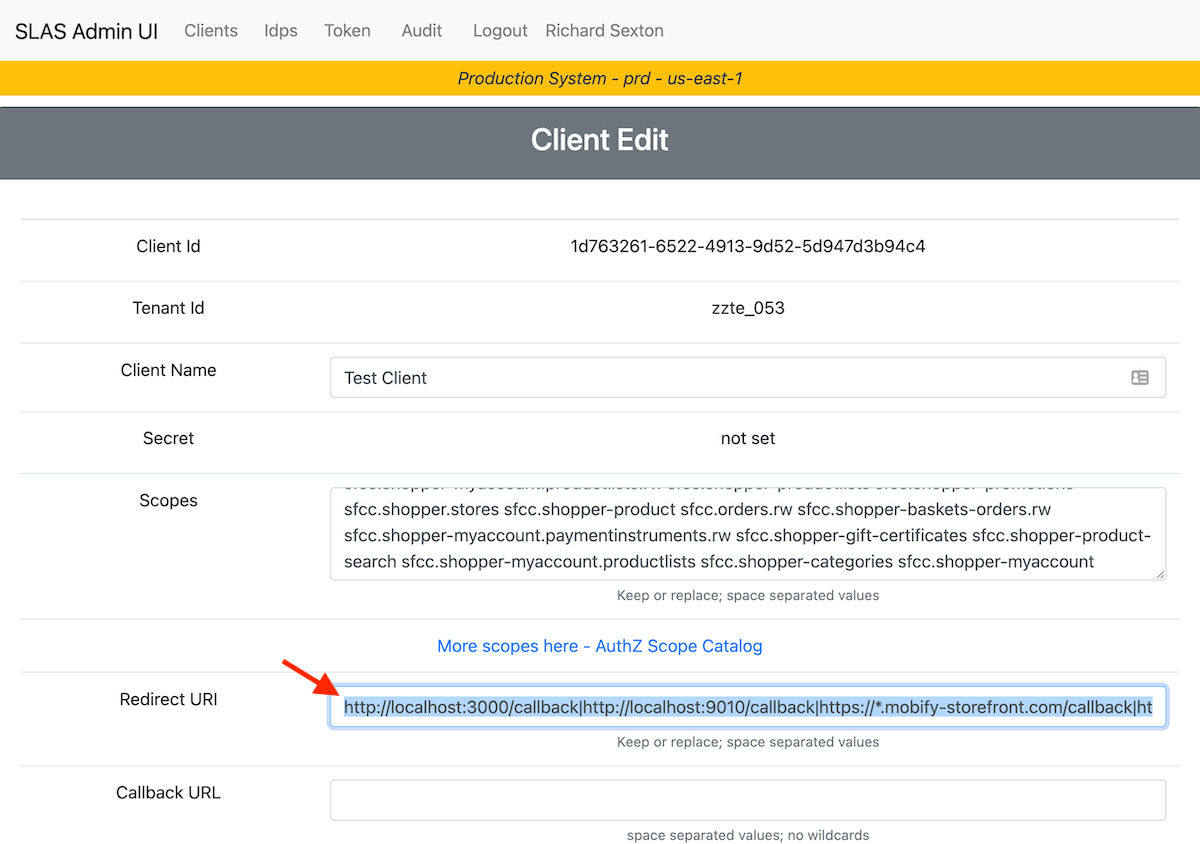
-
Click Save.
If you already created your SLAS clients using the SLAS Admin UI, skip this section.
The SLAS Admin API offers an alternative to the SLAS Admin UI that makes it easier to automate SLAS administration tasks, such as creating public and private clients. The API also provides access to a wider range of configuration options.
To access the SLAS Admin API, use the SLAS Admin UI to get an admin token:
- Log in to the SLAS Admin UI.
- Click Token from the top navigation.
- Click Copy Admin Token to Clipboard. (The token will expire after 30 minutes.)
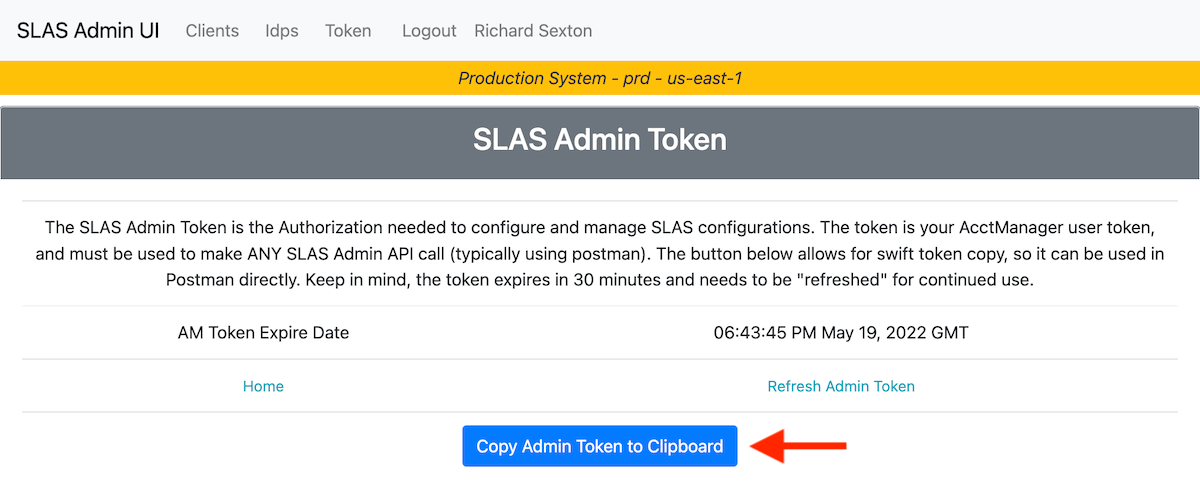
An admin token is not the same as a SLAS access token. An admin token can only be used to access the SLAS Admin API, not Shopper APIs.
To form your API requests correctly, it helps to set some environment variables first.
If you’re not using a Unix-based operating system, adapt the commands for setting environment variables or manually replace the variables later in the curl command provided.
To store the admin token, replace {clipboard_contents} in the following command by pasting the token that you just copied from the SLAS Admin UI:
Before running the next series of commands, replace zzte, 053, and kv7kzm78 with your realm ID, instance ID, and shortcode. To learn more about these identifiers, including how to look them up in Business Manager, see the Base URL and Request Formation guide.
Now that your environment variables are set, start making requests to the SLAS Admin API. To create a SLAS tenant (or update an existing one) and associate it with a B2C Commerce instance, make a request to the tenants endpoint like this:
To create a SLAS client using the SLAS Admin API, you must provide some additional configuration information, starting with a client ID.
The client_id is a universally unique identifier (UUID) for each tenant that the SLAS service requires. There are several ways to generate a UUID, but go to uuidgenerator.net and click Copy at the top of the page. The identifier must follow the UUID version 4 format: 36 characters long, including 3 hyphens.
To store the client ID in an environment variable for your API requests, replace f58d60fd-9230-4ed7-90a4-ee11b5e7f27b in the following command with the UUID that you generated:
If you’re creating a private client, you also must create a secret (a password) for your SLAS client. We recommend using a password manager to generate and store the secret.
To store the secret in an environment variable for your API requests, replace D*HHUrgO2%qADp2JTIUi in the following command with your secret:
You can also create and store your client ID and secret in Account Manager. For detailed instructions, see Add an API Client in the B2C Commerce documentation.
For creating both public and private clients, you must provide JSON data in the request body that controls important settings for SLAS:
- Use the
channelsarray to associate the SLAS client with one or more channels. A channel is what we call the string used to identify a particular ecommerce site. - The
scopesarray lists all the API families that the SLAS API has access to. Note that SLAS is capable of handling a maximum of 30 Custom Object scopes. For details, see Shopper Custom Objects API. - The
redirectUriarray allows specific URIs for redirects. Wildcard characters (*) are supported for hostnames.
In the example requests provided, the request body includes common settings that you can customize for your application.
To create a public SLAS client, run this command:
Since the request is for setting up a public client, no client secret is required.
Don’t use the sfcc-shopper-context.rw scope with a PUBLIC Client because it offers fewer protections and could potentially enable malicious actors to access Shopper Context enabled promotions. It is highly recommended to use sfcc-shopper-context.rw scope with a private client.
To create a private SLAS client, run this command:
Now that you know how to set up SLAS clients, it’s time to make some API requests! Learn how to formulate your API requests with the last guide in the Get Started series: Base URL and Request Formation.
To learn more about using public SLAS clients and private SLAS clients to access the Shopper APIs, see the SLAS guides.
For more technical details on the capabilities of the SLAS APIs, explore the API specifications in the Reference section:
To learn how to access the SCAPI Admin APIs, see Authorization for Admin APIs.