Configure a Hybrid Storefront with Plugin SLAS
Phased rollouts of headless technologies are possible for users of the Storefront Reference Architecture (SFRA) and PWA Kit. For example, you can deploy a new experience for product pages using Progressive Web App (PWA) Kit and keep the checkout flow on SFRA until the next phase of your headless transition. This phased approach helps you get started sooner, expedites business outcomes, and minimizes potential disruption from a “big bang” style cutover to headless.
To create a seamless user experience, use session bridging and eCDN routing rules to enable PWA Kit to power one set of pages and SFRA to power another.
To learn more about using Einstein Activities in a phased headless context, see Einstein Activities for Phased Headless Rollouts.
Although SiteGenesis is not officially supported, there is a Site Genesis + Composable POC built by the community.
Only existing customers can access some of the links on this page. Visit Salesforce Commerce Cloud GitHub Repositories and Access for information about how to get access to the repositories.
- With B2C Commerce version 25.3, Hybrid Authentication (Hybrid Auth) replaces Plugin SLAS. For more information, see Hybrid Authentication.
- We highly recommend migrating to Hybrid Auth so that you can take advantage of the improved performance and streamlined workflow.
- The instructions in this guide describe how to combine PWA Kit and SFRA flows, and the same instructions can be adapted for SiteGenesis using this proof of concept. Please note that implementations using Sitegenesis with Composable Storefront aren’t officially supported.
When you implement a hybrid storefront, you must perform the following configuration for a complete and successful build and a seamless shopper experience. The following steps are executed in multiple infrastructure layers, including your SFRA build, Business Manager, PWA Kit, and your CDN layer:
The tasks involved in a hybrid implementation with Plugin SLAS include:
- Set Up SLAS for PWA Kit (Required).
- Set Up Session Bridging (Required).
- Configure Routing (Required). See Also CDN APIs for Phased Headless Rollouts.
- Install the Redirect Cartridge (Recommended).
- Make Other Changes to PWA Kit Projects (Required).
- Set up Hybrid Locally (Required).
- Review SCAPI Hybrid Storefront Basket Best Practices (Recommended).
- Get analytics Using Einstein Activities for Phased Headless Rollouts (Optional).
The first step in creating a phased headless rollout is to set up your PWA Kit application to use Plugin SLAS (if you haven’t already). Follow the instructions in our Set Up API Access guide. Plugin SLAS extends authentication for guest users and registered shoppers using the Shopper Login and API Access Service (SLAS).
When setting up SLAS, you’ll want to decide whether you set up a SLAS public client or a SLAS private client as this will affect some of the setup steps that follow. If you are setting up a SLAS private client, follow the steps in Use A SLAS Private Client to get set up.
All PWA versions prior to PWA Kit 3.5 support only SLAS public clients.
- Use Plugin_SLAS for hybrid deployments with the PWA Kit to ensure formal support. Custom headless web applications are possible but not formally supported. Consider using B2C Commerce APIs directly for specific use cases.
- Read all constraints and configuration instructions in the Plugin SLAS README.
If your Plugin SLAS installation is on version 7.0.0 or later your PWA Kit project must be generated using or be fully upgraded to version 2.7.1 or later of the Retail React App template.
To enable a phased headless rollout with SFRA, you must install the Plugin SLAS cartridge. Complete installation instructions are provided in the Plugin SLAS README for the cartridge.
In addition to session bridging, the Plugin SLAS cartridge allows you to implement other shopper-friendly features, such as 90-day user sessions and basket persistence.
Refer to the table to make sure you’re using compatible versions of the Plugin SLAS cartridge and PWA Kit.
| Plugin SLAS | PWA Kit | retail-react-app | commerce-sdk-react | Notable Changes |
|---|---|---|---|---|
| v7.4.0 or later | v3.8.0 or later | v5.0.0 or later | v3.1.0 or later | - Hybrid Stability upgrade & Remove OCAPI /sessions call from PWA Kit. |
| v7.3.0 | v3.7.0 | v4.0.0 | v3.0.0 | - SLAS Private Client Support |
| v7.0.0 - v7.2.0 | v2.7.1 - v2.9.0 | N/A | N/A | - PWA Kit v2.x is not supported with Plugin SLAS v7.3.0 or later |
For more details about the notable features, see the Plugin SLAS Release Notes under the Plugin SLAS Releases.
Important Considerations for SLAS Cartridge Users
The Plugin SLAS cartridge makes multiple calls to various APIs, which can impact storefront performance. Before adding the cartridge to a production storefront, compare the performance of your storefront with and without the cartridge to decide if it’s right for you.
The cartridge also introduces a redirect under the following conditions:
- When a shopper logs in
- When a shopper’s session cookie has expired
Currently, the cartridge only replaces direct login to the B2C Commerce system where the credentials are stored within Salesforce.
When used with the wishlists plugin, guest wishlists aren’t transferred on login to the registered user.
Before using the cartridge, review the issues page on GitHub.
Because the Plugin SLAS cartridge is designed for SFRA, additional code must be written to use it with SiteGenesis. A SiteGenesis implementation can use code from the cartridge at various points in the shopper authentication and authorization flows.
Because the cartridge uses the B2C Commerce Web Service Framework to handle SLAS API calls, a SiteGenesis implementation can make requests to the web services implemented by the cartridge. These web services include guest login, registered customer login, token refresh, logout, and merging the guest basket. The cartridge also implements a service to merge API sessions and storefront sessions.
A SiteGenesis implementation can also use a custom hook (app.plugin.slas.login) to implement login for guests and registered users with SLAS. Examine the custom code in the cartridge’s onSession hook in dw.system.request.onSession to see how it replaces the Script API with SLAS for shopper login.
For a working example, see Site Genesis + Composable POC.
Enabling shoppers to seamlessly navigate between pages powered by different storefront architectures requires using a technique called session bridging. Session bridging uses cookies to share shopper refresh tokens and session tokens across different systems.
The key to unlocking session bridging is SLAS, a new standards-based solution for authentication and authorization that can be accessed through HTTP requests. Shopper authentication with SLAS is based on OpenID Connect and authorization for B2C Commerce’s Shopper APIs is based on OAuth 2.
When a shopper browses a headless storefront, you use SLAS to request an access token and a refresh token and store them as cookies on the shopper’s browser. As the shopper transitions from an SFRA page to a PWA Kit page (or vice versa), the cookies with the access token and refresh token are sent along with the HTTP request and PWA Kit/SFRA use these to inherit the same session from the other.
For more session bridging information and examples, see the Session Bridging Overview.
Plugin SLAS manages B2C Commerce sessions (associated with a dwsid) as well as SLAS sessions (associated with an access_token). Session bridging links dwsid and access_token to the same shopper session.
Plugin SLAS uses the SLAS Session Bridge (API: getSessionBridgeAccessToken), which:
- Is used by Plugin SLAS for New Guest Login only
- Doesn’t generate a new
dwsidafter session-bridging hence the storefront doesn’t require a re-render and can be sent a 200 OK response - For session bridging details and authorization with SCAPI, see:
To make session bridging possible with PWA Kit, you must modify the code in commerce-api/auth.js that handles API authorization to use cookies instead of local storage.
If your PWA Kit project was generated with version 2.7.x of the Retail React App template, you can uncomment this line of code in auth.js, to switch to CookieStorage for storing tokens. This is required for managing sessions between SFRA and PWA Kit sites.
You must also modify the code in commerce-api/auth.js that calls the session-bridge API after shopper login. To do so, you must uncomment this line of code in auth.js.
To save you time, we’ve created an alternate version of the file with all the changes in place and made it available on GitHub through a public gist.
If your PWA Kit project was generated with version 3.0.0 or later of the Retail React App template, the previous changes are enabled by default and no further code changes are required.
The authorization flow starts with the refresh token. If the refresh token cookie is available, the PWA Kit app exchanges the refresh token for an access token. Otherwise, the app starts an authorization code grant flow, as defined by the OAuth 2.1 standard. It also follows the proof key for code exchange (PKCE) flow.
When SLAS grants the new access token and the new refresh token, the app stores them in cookies. Then the app makes a POST request to OCAPI’s create session endpoint (/session). This endpoint creates a session that is used by SFRA. The app stores the session token in a cookie.
Cookies created by the PWA Kit app:
cc-nx-g- SLAS guest shopper refresh tokencc-nx- SLAS registered shopper refresh tokentoken- SLAS access tokendwsid- Demandware session id
The call to OCAPI session-bridge after shopper login on PWA Kit pages is required to notify the SFRA pages whenever the authentication state of the shopper changes on PWA Kit pages. Whenever the shopper’s auth state changes, PWA Kit sends the new access_token in /sessions call for session bridging and receives a new dwsid. The dwsid cookie value is updated with the one received in the /sessions response.
PWA Kit v3.4.0 and earlier
PWA Kit maintains a copy of the refresh token in the LocalStorage, which is compared to the refresh token key and value stored in CookieStorage before each request. If the tokens differ, PWA Kit invalidates the current session and triggers the authorization flow again to keep sessions in sync with SFRA.
Changes in PWA Kit v3.5.0 (commerce-sdk-react@1.4.0)
We’ve updated the logic used to invalidate PWA Kit sessions based on shopper’s auth state in SFRA in a phased launch setup. SFRA now stores the SLAS access*token in a cookie with key cc-at*{siteId}. When a shopper navigates from SFRA to PWA Kit this cookie is shared with PWA Kit. This cookie can either hold the actual access_token value from SLAS if a valid access token is available. If not, the value of the cookie is set torefresh. If a valid access_token is seen, PWA Kit replaces the current value of access_token with the value ofcc-at*{siteId}cookie. Ifcc-at*{siteId}is set torefresh, PWA Kit triggers a refresh_token login flow to get a new access_token.
You may notice multiple cc-at_{siteId} cookies like cc-at_RefArch and cc-at_RefArch_2. If the access_token is large it is broken down into multiple chunks and is concatenated back together when the access_token is being read by PWA Kit.
See getAccessToken() for implementation details.
B2C Commerce looks at the clickstream of the session associated with the dwsid. An empty clickstream indicates a new session and onSession is triggered.
A new or a changed value of the dwsid cookie does not directly imply the session is new.
In a phased launch setup, PWA Kit calls /sessions OCAPI endpoint to bridge B2C Commerce and SLAS sessions whenever the login state of the shopper changes to notify SFRA of the login state change. The /sessions endpoint returns a new value for dwsid which is associated with the newly bridged session and hence has an empty clickstream. This triggers onSession when a shopper navigates to the SFRA site.
If a shopper repeatedly hops between PWA Kit and SFRA sites, you may notice the dwsid value changes but it may still be associated with an ongoing B2C Commerce session or may have a non-empty clickstream. In this situation, onSession hook is not triggered.
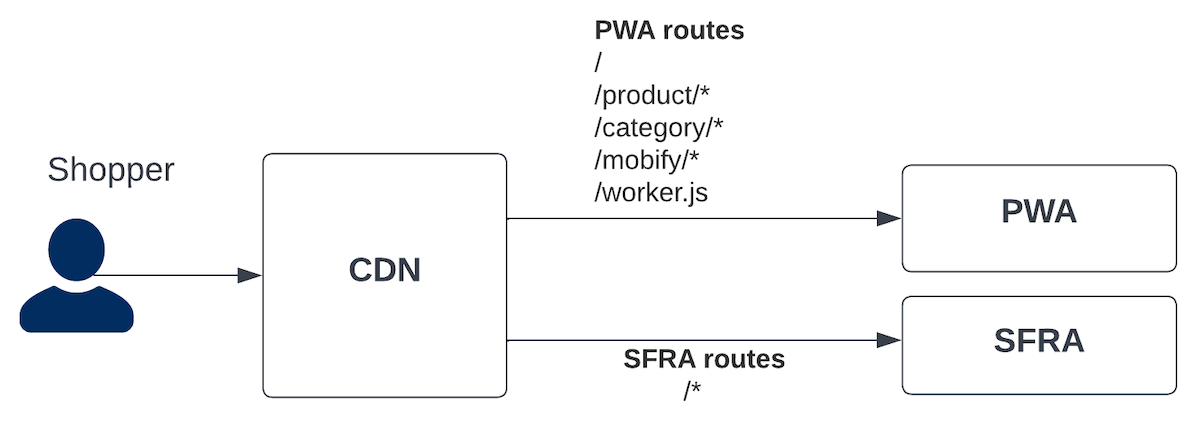
To ensure a seamless user experience during a phased rollout, use a content delivery network (CDN) to route traffic to two different origins: the Managed Runtime (MRT) environment and your B2C Commerce instance.
Imagine the following scenario:
You have an existing SFRA storefront running on www.mystorefront.com. You know the benefits of headless architecture and want to leverage PWA Kit to deliver performant and engaging experiences. At the same time, you want to minimize risk to the schedule, so you choose a phased approach to rolling out your PWA Kit storefront.
You configure the CDN to send page requests at the top of the funnel to PWA Kit: home page (/), the category listing page (/category), and the product details page (/product). These PWA Kit pages are deployed to a Managed Runtime environment running on mystorefront.mobify-storefront.com. When the shopper decides to make a purchase, the CDN redirects the shopper to the existing SFRA checkout page running on www.mystorefront.com.
For more information about routing traffic to MRT, see:
To handle traffic routing, you can choose the embedded CDN (eCDN) solution from Salesforce (and powered by Cloudflare) or choose a CDN from a different vendor.
To help design your origin rules, gather a comprehensive list of routes for PWA Kit pages. For a PWA Kit project based on the Retail React App template, the routes are listed in app/routes.jsx. Because the server-side rendering system for PWA Kit uses internal routes for proxies and static assets, you must also include /mobify/* in the routing rules.
For our example scenario, the following routes must be configured in your CDN:
Build an origin rule that includes all the PWA Kit routes on your list to forward the request to the Managed Runtime environment (mystorefront.mobify-storefront.com in our example scenario).
The following diagram shows the eCDN configuration for the example scenario that we described earlier:
To use eCDN to route traffic to Managed Runtime, use the Commerce API endpoint createMrtRules. You can also Configure MRT Routing Rules in Business Manager.
The API supports routing traffic to Managed Runtime using Cloudflare Rule Expressions. It supports a subset of the available fields in the Rules language. The following fields are supported:
http.hostto match with the host namehttp.request.uri.pathto match against the request pathhttp.request.urito match against both the request path and query stringhttp.cookieto match against cookies
You can request 100 individual rules per instance on proxy zones and 100 individual rules in total shared between dev/prod instances on legacy zones.
- The eCDN is available for production and development (PIG) instances. On-demand sandbox (ODS) instances also include an eCDN for hybrid routing, configured through the Business Manager eCDN UI. See Set Up Hybrid on On-Demand Sandbox (ODS) Instances Using eCDN.
- Staging instances must be onboarded to eCDN using the eCDN API. For more information, see Configure eCDN for Staging on the B2C Commerce Infocenter and this article from the Rhino Inquisitor blog.
- The eCDN doesn’t support routing based on geolocation.
For detailed eCDN implementation details, see CDN Routing Rules for Hybrid Implementations.
By default, the Retail React App template for PWA Kit projects has a different URL routing pattern than SFRA. For example, the URL path for a product detail page in the Retail React App is /products/{productId}. With SFRA, the pattern is /{categoryId}/{productId}.
We recommend that you change the routing patterns in your PWA Kit storefront to match your SFRA site. If you can’t match the URL patterns for a specific page (like the product listing page when the category ID isn’t available in the URL), use the Redirect Cartridge to set up redirects that close the gap. Complete installation instructions are provided in the README for the cartridge.
To complete the setup process for a phased headless rollout, you must make a few more changes to your PWA Kit project.
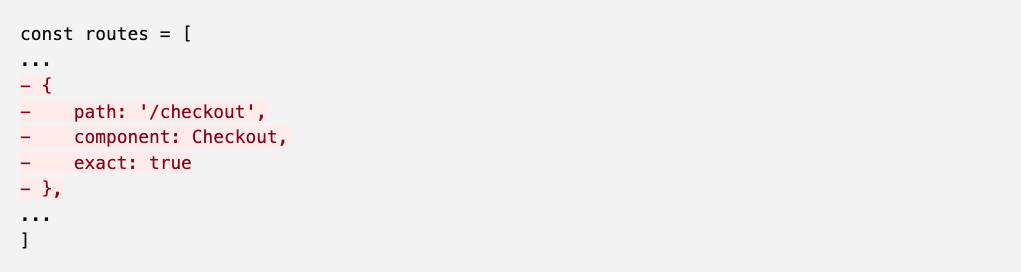
By default, PWA Kit uses the History API for navigation. When a shopper clicks a link made with React Router’s <Link> component, it triggers a soft navigation to the component matching the path in the route object defined in app/routes.jsx. To link to a non-PWA Kit page (one powered by SFRA, for example), you must remove any route matching the URL pathname from app/routes.jsx.
For example, if your PWA Kit project was generated with version 2.7.x or version 3.x of the Retail React App template without using extensibility: remove checkout from the routes array.
If your PWA Kit project was generated with version 3.x of the Retail React App template using extensibility, you can override the overrides/app/routes.jsx file to filter out links to non-PWA Kit pages using javascript.
We’ve created an example override of the overrides/app/routes.jsx file with all the changes in place to filter out /cart and /checkout routes and made it available on GitHub through a public gist.
Lastly, update the PWA catch-all route (/*) in app/routes.jsx. Replace the PWA <PageNotFound /> component with a redirect to the default origin.
Notice the dependency on window.location.href in the useEffect hook for handling the catch-all (*) route. We recommend restricting the useEffect to run only when the page URL changes. This restriction prevents duplicate concurrent requests to SFRA pages in cases where a shopper tries to switch between PWA Kit and SFRA sites as it might result in session inconsistencies.
We highly recommend testing your hybrid setup in a local environment. For local development on localhost, eCDN isn’t available, so use your own reverse-proxy or CDN to split traffic between PWA Kit and SFRA/SiteGenesis.
For deployed on-demand sandbox (ODS) instances, don’t use a reverse proxy—use eCDN instead, the same way you do on production. See Set Up Hybrid on On-Demand Sandbox (ODS) Instances Using eCDN.
We have created a sample Node.js app that can be used to develop and test hybrid deployment shopper flows across PWA Kit and SFRA/SiteGenesis. Setup, configuration, and testing instructions for setting up reverse-proxy are mentioned in the README for the repo.
This demo video shows the steps to set up phased rollouts on SIG instances.
You can configure your ODS to use an alias’s configuration that is similar to your production configuration. This can help to keep your local and production setups identical. For instance by configuring your sandbox such that your hybrid site is available at the / URI ensures that URLs sent by pwa-kit don’t need to be translated to include the site ID. This is usually how a production site is configured.
To enable aliases in Business Manager, follow instructions in this module for Salesforce B2C Commerce Hostname Aliases on Trailhead.
You can configure your PWA Kit routes configuration to prefix all outgoing URLs (for example, those intended for SFRA) to include the /s/SiteID prefix. This ensures that your instance receives controller URLs in a manner normally used on sandboxes without needing to explicitly configure hostname aliases. Note that this may not be appropriate for production configuration so you may want to have a different catch-all route for production vs sandbox deployments.
To configure route prefixes, update the PWA catch-all route (/*) in app/routes.jsx or overrides/app/routes.jsx.
- Hybrid Implementation Guidance
- Hybrid Stability Upgrade for PWA Kit Version 3.8.0
- Hybrid Stability Upgrade for PWA Kit Version 2.x
- Hybrid Authentication