Passwordless Login with One-Time Passwords using Callback URI
Use the Shopper Login and API Access Service (SLAS) to send 8-digit, time-based one-time passwords (OTPs) to your shoppers for authentication. For an overview of other passwordless login methods, see Passwordless Login.
Only existing customers can access some of the links on this page. Visit Salesforce Commerce Cloud GitHub Repositories and Access for information about how to get access to the repositories.
SLAS passwordless login tokens expire after 10 minutes.
To understand how passwordless login with SLAS works, let’s look at an overview of the process.
The shopper must have an existing B2C Commerce or third-party IDP account, and must log in with a username and password prior to using passwordless login. Otherwise, you can call the authorizePasswordlessCustomer endpoint with the register_customer query parameter set to true. See Register a Customer with Passwordless Login.
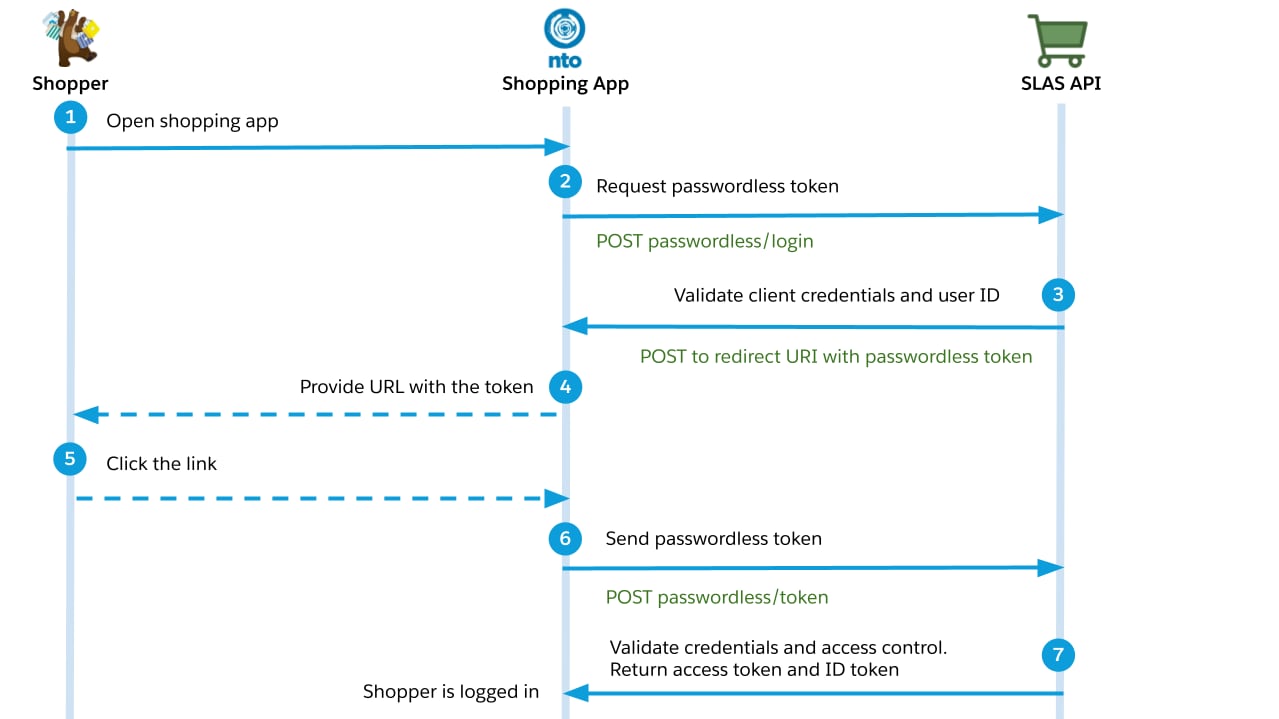
- The shopper opens the app and logs in.
- The shopper requests a passwordless login.
- Your app calls the authorizePasswordlessCustomer endpoint and provides a callback URI.
- SLAS makes an HTTP POST request to your callback URI, including the shopper’s contact information and an eight-digit time-based one-time password (TOTP) that can be used to authenticate the shopper.
- The app sends TOTP to the shopper over email, SMS or another mechanism.
- The shopper provides the TOTP to the app either by clicking a link or entering the it manually.
- Your app calls the getPasswordLessAccessToken endpoint to authenticate the shopper and get a SLAS access and refresh token.
After a successful passwordless login (including TOTP validation), SLAS updates the last-login timestamp on the shopper’s B2C Commerce customer profile and increments the version of the customer profile object. This behavior applies starting with the 26.6 B2C Commerce release.
- The access token can be used to make authorized requests on behalf of the shopper.
- A publicly accessible callback URL, such as an B2C Commerce instance, Managed Runtime environment, or your own server. If you don’t have a public callback URL, use a service like Webhook.site for testing purposes.
- A mechanism to share the passwordless token to the shopper, such as email or SMS.
- A SLAS private client configured to work with passwordless login.
Include a secret value, such as an unguessable query string parameter, in your callback URL to validate that requests are from the SLAS web service.
If you haven’t already created a SLAS private client, follow the instructions in Authorization for Shopper APIs to create one and return to this guide. Only private clients can be used for passwordless login.
To configure a private client for passwordless login, follow these steps in the SLAS Admin UI:
- From the top navigation, click Clients.
- Click the Edit link next to the client ID that you created earlier.
- In the Scopes field, add
sfcc.pwdless_login. - In the Callback URL field, enter the callback URI that you prepared earlier.
Unlike the Redirect URL field, the Callback URL field doesn’t support wildcards. Always include the full URL for a callback, including the protocol.
- To use 6-digit TOTPs for passwordless login, password reset, and WebAuthn authorization, select Six Digit TOTP?. If unselected, the default TOTP length is 8 digits. This setting can only be configured for an existing client.

- Save your changes.
Imagine you’re building passwordless login flow for a storefront hosted at www.example.com. The shopper begins the flow by entering their username and requesting a passwordless login over email.
Request the authorizePasswordlessCustomer endpoint:
The user_id parameter must be the shopper’s actual login credential, profile.credentials.login. Although the login credential can be an email address, it is not guaranteed to be the same as profile.email.
SLAS makes a HTTP POST request to the provided callback URI. The request body is a JSON payload:
It contains both an email address and a phone number that belongs to the customer. The value of phone is set to the value of phoneMobile in the B2C Commerce system. If phoneMobile is not available, SLAS uses the value of phoneHome or phoneBusiness instead.
The value of token is the TOTP to send to the shopper.
- Your callback must validate that the secret value is present in the requested URL.
- SLAS makes the POST call to the given
callback_uriwithout adding additional headers or parameters. If thecallback_urineeds additional headers, such as an authorization header, you must have a “proxy” in place between SLAS and thecallback_urithat can add any additional headers or parameters as needed.
If you don’t receive the callback from SLAS:
- Verify that your callback URL is publicly accessible. You must use a publically accessible URL because SLAS can’t reach localhost or private IP addresses.
- Verify that your firewall allows requests from SLAS. Requests from
*.demandware.netURLs are blocked. - If your callback URL is a B2C Commerce instance with site status set to
Online (Protected), verify that you have disabled the protection to get the callback.
Refer to the steps in Verify the SLAS Password Action Callback.
Your app should send the TOTP to the shopper over email or SMS.
The token is good for up to ten minutes. If the token expires, you must restart the passwordless login flow.
The shopper must provide the TOTP to your app, either by following a link or manually entering it.
Request the getPasswordLessAccessToken endpoint to exchange the TOTP for an access token:
The optional login_id parameter is used for stronger validation using login_id + pwdless_login_token (TOTP).
The access token (Shopper JWT) returned by SLAS can now be used to make calls to the Shopper APIs!