External Actions
After you create a marketing app extension, you can create and configure an external action to use in Engagement Studio programs. External Actions relies on Salesforce invocable actions to work. You can use any supported standard invocable action, install one from AppExchange, or create a custom action. Here’s an overview of what’s required to create and use an external action.
- Create, install, or select an invocable action that meets your use case.
- Create and configure the external action.
- Activate the action.
- Use the action as a step in Engagement Studio programs.
Keep these considerations in mind when using External Actions.
- Before you work with external actions, review the considerations in Salesforce Help.
- Standard and custom external actions often require you to edit the schema in Marketing Setup.
- To protect your data, we recommend that you use only invocable actions that are created with Transport Layer Security (TLS).
- If you’re using a supported standard or custom invocable action, you can edit the schema for the action to specify the fields that appear in Engagement Studio.
- You can map input fields to HML merge fields so that they populate data from Account Engagement when the action executes.
- Include the
Properties,View, andRequiredsections in every action schema, even if there are no values in a section. - We recommend that you remove unnecessary fields from the View and Properties section of the action schema. Don’t remove fields from the Required section.
- Changing or editing an action can affect all the Engagement Studio programs that the action is used in.
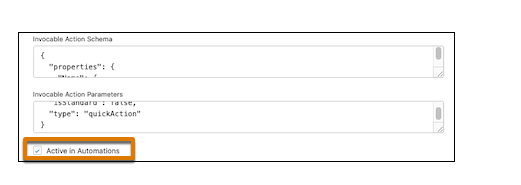
- To trigger actions, the
IsActivefield on the action type and extension must be set totrue. To set theIsActivefield, select Active in Automations on each action type record in Setup.
To create external actions via Tooling API, authenticate via Salesforce OAuth. You can also create external actions in Setup.
Make sure to also set up authentication for Account Engagement in the third-party system that executes your external action. We recommend using an authentication (auth) provider and a named credential.
External actions require a standard or custom invocable action. Before you configure an external action, create the invocable action for your use case. Invocable actions can be created through any of these methods:
You can also use any of the supported standard invocable actions or install an action from a managed package.
If you’re creating a custom invocable action, here are a few recommendations.
- Build retry logic into your invocable action. External Actions don’t automatically retry when there’s a response delay from a third-party service. To allow time for retries, target a response time of 2 seconds.
- For APEX invocable actions, use custom exceptions to provide error messages and avoid actions silently failing. You can also use a custom object to record the errors for an action.
To use APEX invocable actions, including actions in Flow Builder, edit the APEX class to grant access to the B2BMA integration user. If your invocable action doesn’t use APEX, skip this section.
- From Setup, in the Quick Find box, enter APEX, and then select APEX Classes.
- Find your APEX class, and then click Security.
- Select B2BMA Integration User and then use the arrows to add the user to the Enabled Profiles column.
- Save your changes.
If your invocable action was created via Flow Builder, you must also edit the permission set for the B2BMA Integration to give them access to flow.
We recommend that you create and edit external actions from Marketing Setup. Work with your Salesforce admin to create the action. Then, come back here to learn how to edit the action’s schema for use in Engagement Studio. See Add an External Action to a Marketing App Extension.
When you create an external action in Marketing Setup and select an invocable action, the schema field is automatically populated. The schema is written in JSON and controls what appears when someone adds the action as a step in Engagement Studio. It also controls what happens when the action executes.
Action types also include a Parameters field for the invocable action. To ensure the action functions properly, don’t edit this field.
Schemas have three main sections:
- Properties: Fields in this section define how the action behaves. All the fields that you include in the other sections must also be present in this section.
- View: Fields in this section are editable in the Engagement Studio step.
- Required: Fields in this section are mandatory for the invocable action to work. You can’t remove any fields that appear in this section by default.
All three sections must be present for the action to function properly, regardless of whether there are field values in each one.
From Marketing Setup, open a marketing app extension, and then edit an action type. We recommend expanding the Invocable Action Schema field for easier editing.
If the invocable action you’re using was installed from a managed package, the schema can’t be edited.
You can specify default values for fields in the Properties section. If a field is also in the View section, the value you specify is editable when the action is added in Engagement Studio. If the field appears only in the Properties section, it’s a static default that appears when the action executes.
Supported data types include number and string.
- To create a boolean field, use the
numberdata type and set the maximum value to1. The system casts this configuration to a boolean field when it executes the action. - If your invocable action uses an integer, change the data type in the external action schema to
number. The system casts this configuration to an integer when it executes the action.
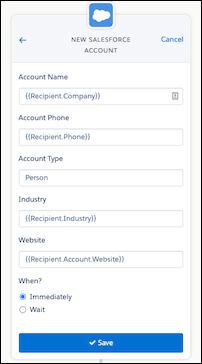
In this example, we set a default value for the Source field to show as Account Engagement.
To make a field editable in Engagement Studio, include the field in the View section.
Use HML merge fields to populate fields in the action. Map fields that appear in the schema to HML merge fields that fit your needs.
In this example, we use the HML field {{Recipient.FirstName}} and map it to the firstname field in the schema. When the action executes to register a prospect for our webinar, it passes the prospect’s first name from Account Engagement to the webinar provider.
For more information about HML merge fields and Account Engagement data, see Handlebars Merge Fields in Account Engagement.
Fields in the View section are displayed to marketing users when they add the action in Engagement Studio. To define which fields are editable in Engagement Studio, add or remove fields from this section.
In this example, we want our marketing users to enter the business unit ID and the campaign ID when they add our action to an Engagement Studio program.
To make optional fields mandatory for your external action, add them to the Required section. To make fields visible to marketers, you must also add them to the View section. For example, if you want marketers to provide the campaignID when they add the action in Engagement Studio, include that field in both the Required and View sections.
You can add fields to the Required section, but don’t remove any fields that are already present. Those fields are necessary for the invocable action to work.
To reduce clutter and make your action easier to use, remove any fields you don’t need from the Properties and View sections. To ensure the invocable action executes properly, don’t remove fields from the Required section.
After your action is configured the way you want it, select Active in Automations on the record and save your changes.
When an action is activated, it’s available to use when you add an action step in Engagement Studio with the inputs you specified in Step 4.
In general, we recommend creating and editing external actions from Marketing Setup. However, you can create actions using Tooling API.
To add an action type to your marketing app extension, send a POST request to the MarketingAppExtAction endpoint.
To configure the action, define the invocable action and schema fields. Use the ActionSelector field to identify your invocable action, then provide the fields and values for the action schema.
- Include all the fields required for your action to execute in the Required section. Add any additional fields that you want marketers to provide values for when they add the step in Engagement Studio.
- Define default values for fields in the Properties section. Use HML merge fields to automatically populate fields with Account Engagement data.
- Add fields to the View section that you want to be editable in Engagement Studio.
To activate your action for use in Engagement Studio, set the IsActive field to true. The associated Marketing App Extension must also be active for automations.
For more information about editing action schemas, see the Customize an External Action section of this guide.
A successful request returns a 201 Created response that contains information about the request.