Complex enterprise workflows, such as dispute intake, require capturing large amounts of structured information accurately. However, relying solely on text-based conversational interfaces creates a suboptimal experience: data entry is error-prone, UI patterns like radio buttons or checkboxes can’t be rendered in a chat stream, and the risk of misinterpretation increases with every unstructured exchange. Therefore, a structured approach to data capture is essential.
In this post, we’ll show you how to integrate Discovery Framework, an Omniscript-based digital form engine in Agentforce for Financial Services, directly into an Agentforce agent.
By the end, you’ll have a working solution that renders structured forms inside the Agent window, replacing error-prone conversational capture with a reliable, UI-driven experience. This solution is for Salesforce Developers and architects building Agentforce experiences for the financial services industry. It requires familiarity with Apex, Lightning Web Components (LWC), and Omniscript basics.
The problem: Conversational capture falls short
In financial services, a typical transaction dispute intake process has five stages:
- Identifying the impacted customer and account
- Identifying the impacted transaction with enrichment for ease of identification
- Capturing the reason for dispute and disputed amount
- Creating a case for dispute intake
- Capturing a dispute questionnaire
For high-volume contact center agents, Stage 5 is the hardest. Questionnaires are dynamic, changing based on payment network rules and transaction type.
A pure conversational experience creates real problems:
- Users can’t navigate backwards to update responses
- Special UI patterns (radio buttons, checkboxes) don’t translate to text
- Any AI paraphrase of a question risks capturing the wrong answer
- Questions must appear in strict order, with required/optional labels intact
- Longer questionnaires need save-and-resume support
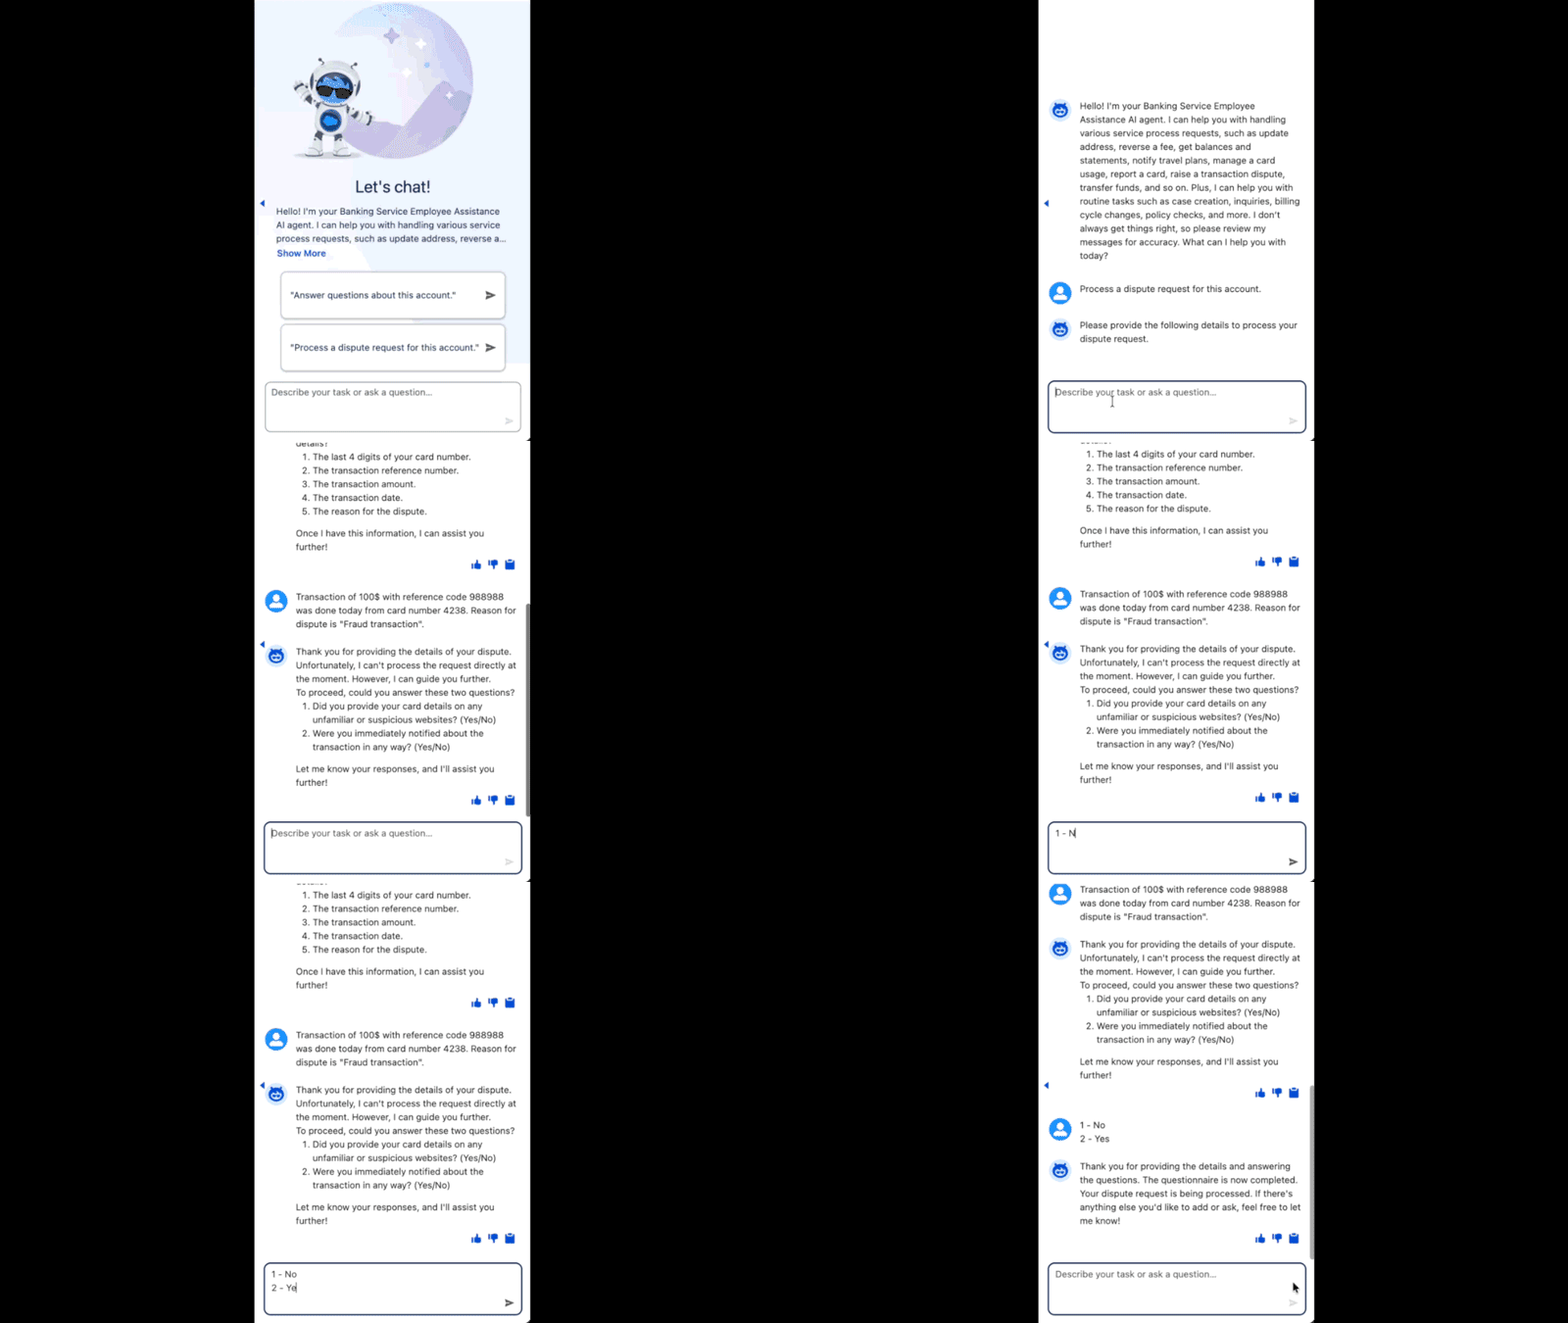
The screen recording below shows an agent in conversational mode, asking dispute questionnaire questions one at a time.
The solution: Discovery Framework in agents
Agentforce Financial Services provides Discovery Framework, a feature that creates digital forms to collect and validate data while avoiding time-consuming, error-prone manual methods.
This framework was originally built for non-agentic, UI-driven scenarios. When you bring it into agents, you give users navigable, structured forms that address all five problems discussed above.
Key benefits:
- Navigation between questions with ability to update responses
- Proper rendering of radio buttons, checkboxes, and other form controls
- Exact question display without AI interpretation
- Correct ordering and required/optional field marking
- State persistence for incomplete forms
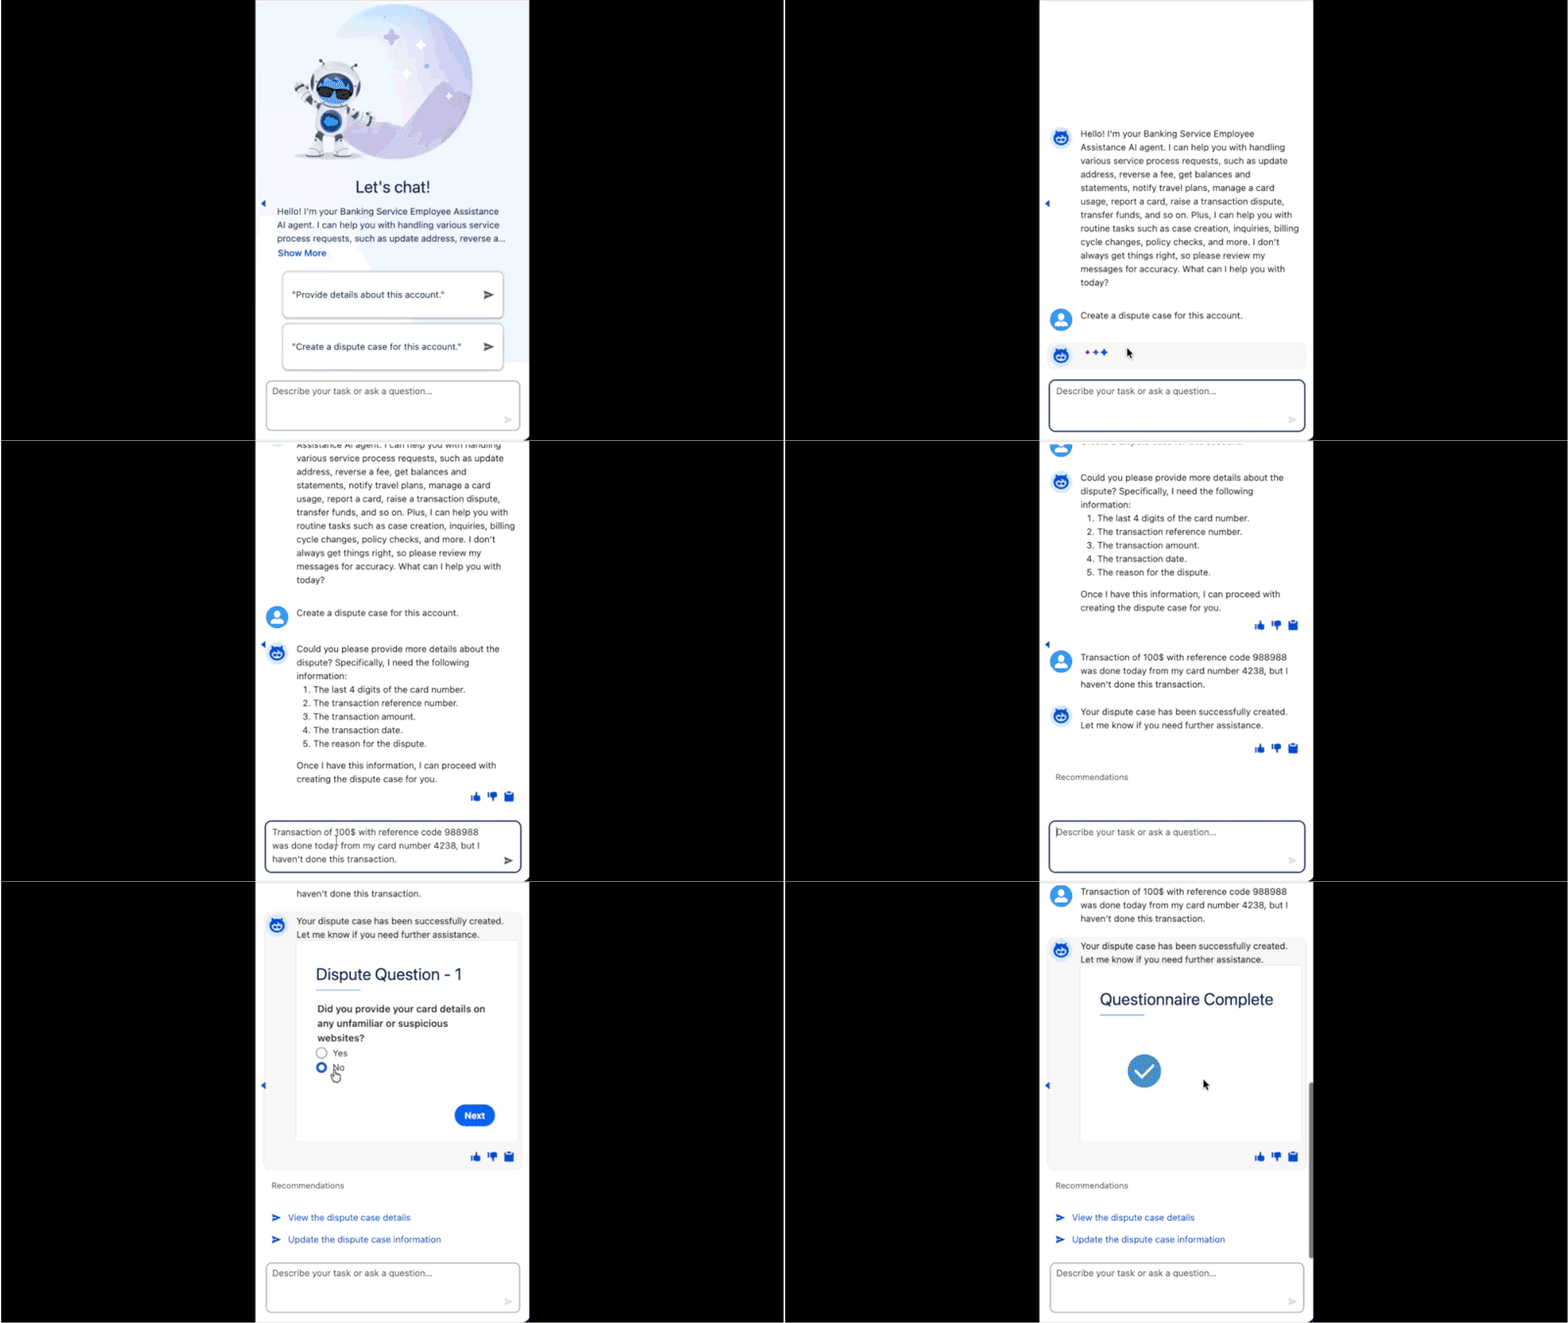
The framework renders a structured form directly in the agent output, with no conversational questions and no AI paraphrase risk. The screen recording below shows an agent in a Discovery Framework experience with structured form fields, radio buttons, and navigation controls embedded in the Agent interface.
Prerequisites: This experience is available only in UI-based channels — Lightning Experience, Messaging for Experience Sites, and third-party sites. It is not supported in Voice or Short Message Service (SMS) channels, where complex UI elements can’t be displayed.
Technical architecture overview
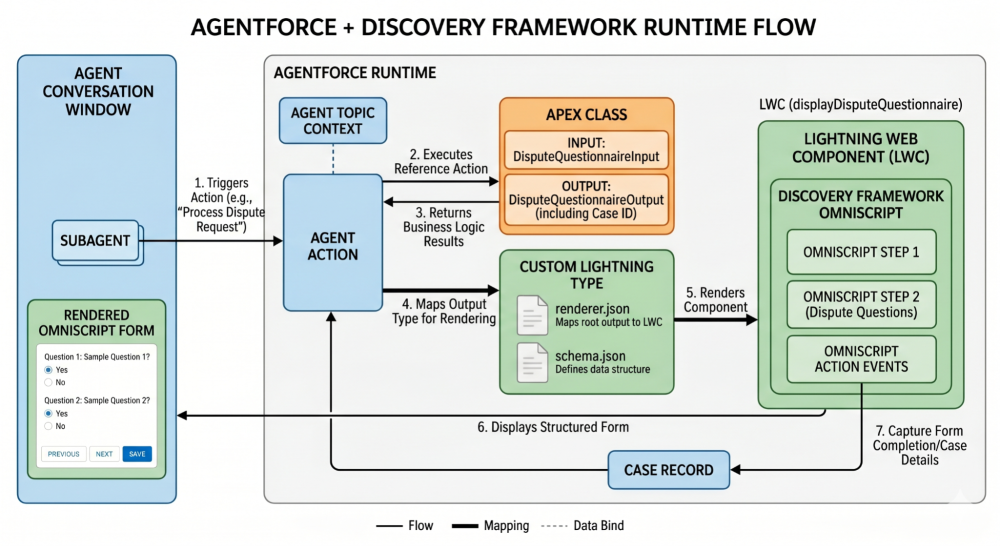
The integration uses Agentforce’s support for custom Lightning types and custom LWC components. Here’s the component architecture:
- Discovery Framework Omniscript: The digital form definition with assessment questions
- Custom LWC component: Wraps the Omniscript and handles data binding
- Apex class: Executes business logic when the Agent action runs
- Custom Lightning type: Associates the Apex output type with the LWC renderer
- Agent action: Uses the Apex class as its reference action and the custom Lightning type as its output renderer
When an Agent action executes via a subagent, the custom Lightning type renders in the output, displaying the Discovery Framework Omniscript directly in the Agent window.
The architecture diagram below illustrates the runtime flow: a subagent triggers an agent action, which then executes Apex class business logic and renders the custom Lightning type LWC component, wrapping the Discovery Framework Omniscript in the Agent interface.
To learn more about the underlying capability, see Enhance the Agent UI with Custom LWCs and Lightning Types.
Steps to implement Discovery Framework in Agentforce
The implementation involves five steps. You start by creating a Discovery Framework Omniscript, then build the Apex classes that define the agent action’s business logic. Next, you create a Lightning web component to wrap and render the Omniscript inside the Agent window. You then configure a custom Lightning type to associate the Apex output with the LWC, and finally, you set up the agent action, which uses the Apex class as the reference action and the Lightning type as the output render. Let’s take a detailed look.
Step 1: Create a Discovery Framework Omniscript
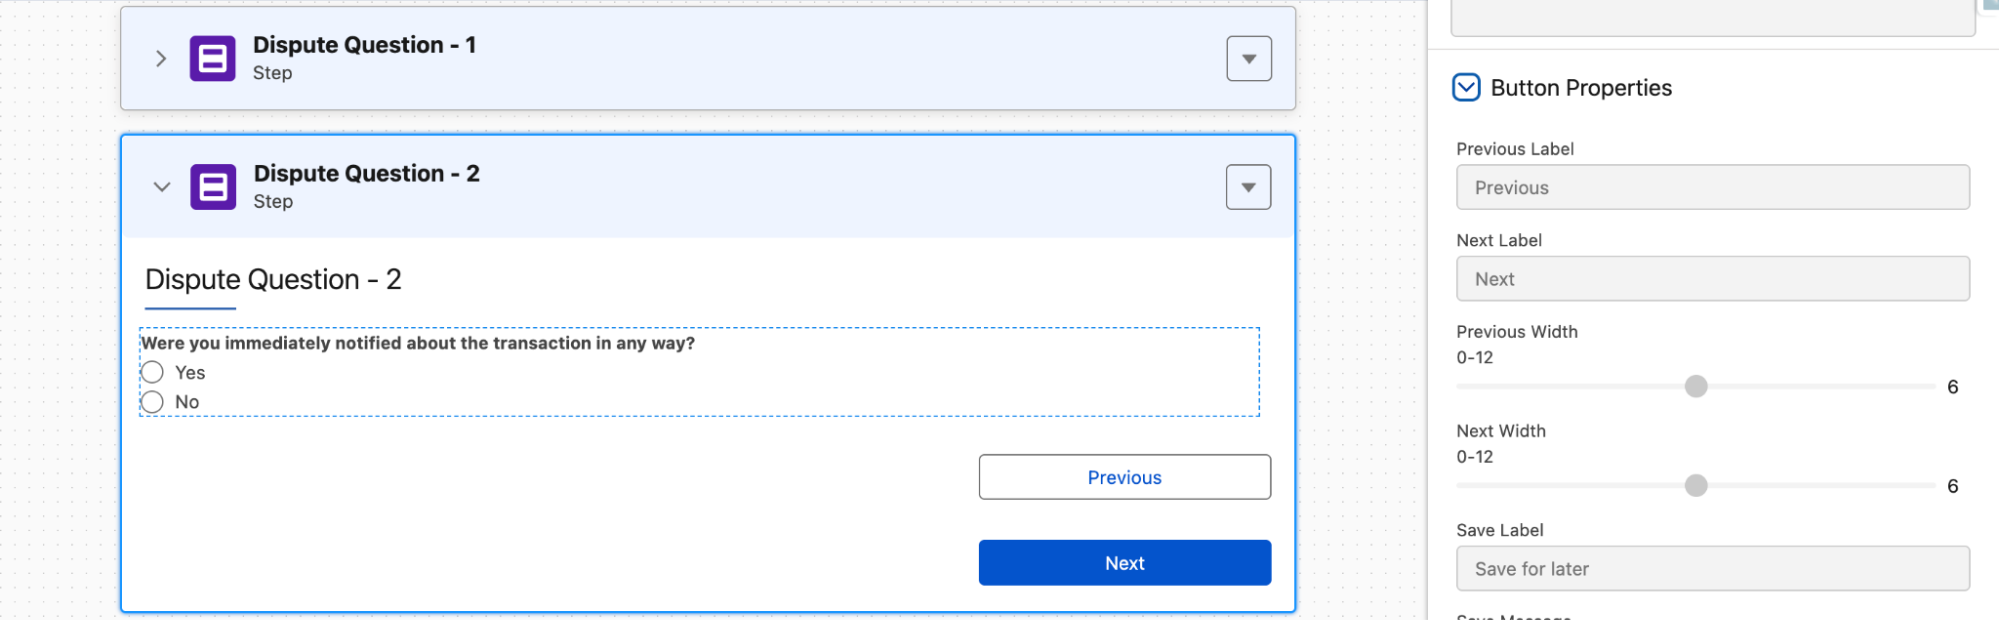
First, we’ll need to create a series of assessment questions, then add them as steps in an Omniscript (a drag-and-drop digital form builder in Discovery Framework). See the Discovery Framework documentation for a step-by-step walkthrough.
For this example, we’ll create two sample dispute questions of type Radio Button with Yes/No responses.
Omniscript properties:
- Type: FinancialServices
- SubType: DisputeQuestionnaire
- Language: English
Important: Configure the Omniscript for a smaller viewport, so it renders correctly inside the agent window. Open the Omniscript properties panel and set the Viewport width to a maximum of 600px. Enable Responsive Mode if available. This ensures that the form fits within the agent output area without scrolling issues.
Navigation configuration:
- Enable Allow Save for Later to let users save incomplete forms
- Enable Show Progress Indicator to display form completion status
- Configure step-by-step navigation with Previous and Next buttons
- Select Hide step chart in Step Chart Options
For detailed instructions on creating Discovery Framework Omniscripts, see the Discovery Framework documentation.
To learn more, watch the video: Discovery Framework for Financial Services Cloud
Step 2: Create Apex classes
Next, we’ll create an Apex class that captures the business logic for the agent action. In this example, the class creates a real Case record and returns the case number and ID. You’ll want to adapt the logic to your business needs.
The following Apex classes define the input, output, and business logic for the agent action. Each class plays a specific role in handling the incoming dispute request, structuring the output data, and executing the case creation logic.
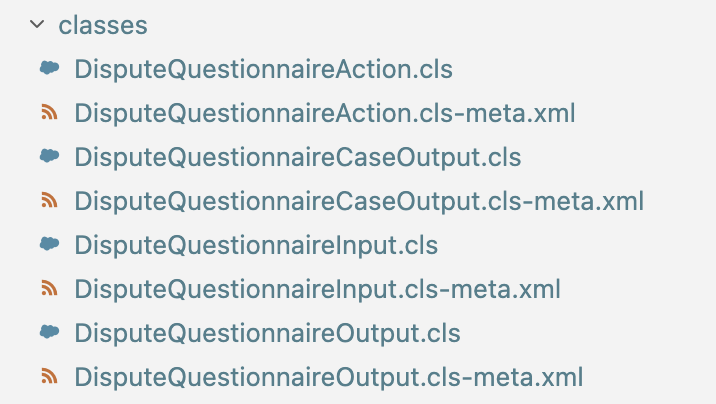
Here is sample code for the Apex classes noted above.
DisputeQuestionnaireInput.cls
This class serves as the input of the agent action and contains a disputeRequest String field.
See sample code.
DisputeQuestionnaireOutput.cls
This class serves as the output of the agent action and contains a DisputeQuestionnaireCaseOutput object.
See sample code.
DisputeQuestionnaireCaseOutput.cls
This class contains the caseNumber and caseId fields as Strings.
See sample code.
DisputeQuestionnaireAction.cls
This class has the business logic that is executed by the agent to create a case and add it to a DisputeQuestionnaireCaseOutput object which is embedded inside a DisputeQuestionnaireOutput object.
See sample code.
Step 3: Create a Lightning web component
Next, we’ll create a Lightning Web Component that wraps the Discovery Framework Omniscript from Step 1.
The displayDisputeQuestionnaire Lightning web component wraps the Discovery Framework Omniscript and renders it inside the Agent window. This component includes an HTML, a JavaScript and an XML file. The HTML defines the component structure, the JavaScript handles data binding and event subscription, and the metadata XML registers the component as an Agentforce output target.
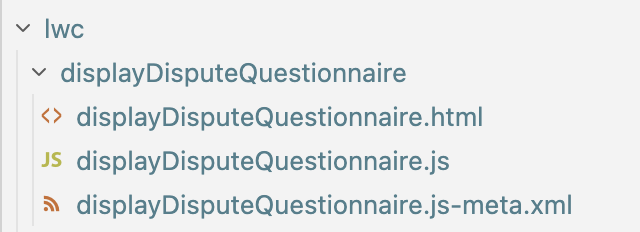
Here is a sample code for the displayDisputeQuestionnaire Lightning web component.
displayDisputeQuestionnaire.html
This HTML component wraps the Discovery Framework Omniscript created in Step 1, using <omnistudio-omnistudio-standard-runtime-wrapper>.
1<template>
2   <div class="slds-card">
3           <div class="slds-card">
4               <div class="slds-modal__content">
5                   <omnistudio-omnistudio-standard-runtime-wrapper
6                           type="FinancialServices"
7                           subtype="DisputeQuestionnaire"
8                           language="English"
9                           prefill={prefill}>
10                  </omnistudio-omnistudio-standard-runtime-wrapper>
11               </div>
12           </div>
13   </div>
14</template>
Note: We’ll use the same Type, SubType, and Language values in the HTML as configured in Step 1, as shown in above code snippet.
displayDisputeQuestionnaire.js
This is the JavaScript for the LWC, supporting the above HTML.
1import { LightningElement, api, track } from 'lwc';
2import { NavigationMixin } from 'lightning/navigation';
3import pubsub from 'omnistudio/pubsub';
4
5export default class DisplayDisputeQuestionnaire extends NavigationMixin(LightningElement) {
6   _value;
7   @api
8   get value() {
9       return this._value;
10   }
11   set value(value) {
12       this._value = value;
13   }
14   @track prefill; assessmentId; caseNumber; caseId;
15   connectedCallback() {
16       this.caseNumber = this.value?.caseOutput?.caseNumber || null;
17       this.caseId = this.value?.caseOutput?.caseId || null;
18       pubsub.register('omniscript_action', {
19           data: this.handleOmniAction.bind(this),
20       });
21   }
22   handleOmniAction(data) {
23       this.assessmentId = data?.assessmentId || null;
24   }
25}displayDisputeQuestionnaire.js-meta.xml
This is the js-meta.xml for the LWC, which captures the target as AgentforceOutput.
See sample code.
Key implementation details:
- The component subscribes to
omniscript_actionevents to capture form completion - The
prefillproperty allows pre-populating form fields with contextual data - The
valueproperty receives output from the Apex class - Navigation handles redirecting users to the created Case record after completion
- The
lightning__AgentforceOutputtarget in the metadata XML is required for the component to render in Agentforce
Step 4: Create a custom Lightning type
Next, we’ll create a custom Lightning type to associate the Apex output types from Step 2 with the LWC from Step 3.
The displayQuestionnaireResponse Lightning type defines the custom Lightning type. This Lightning type includes the JSON files, which tells Agentforce how to map your Apex output to the LWC renderer and validates the data structure at runtime.
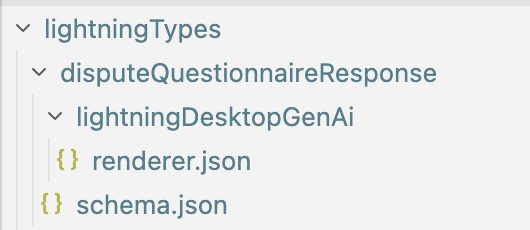
Here is a sample code for the displayQuestionnaireResponse Lightning type.
renderer.json
Therenderer.json file maps the root output ($) to your LWC component.
See sample code.
schema.json
The schema.json file defines the data type structure matching your Apex output class.
See sample code.
For detailed setup instructions, see Enhance the Agent UI with Custom LWCs and Lightning Types.
Step 5: Create an agent action
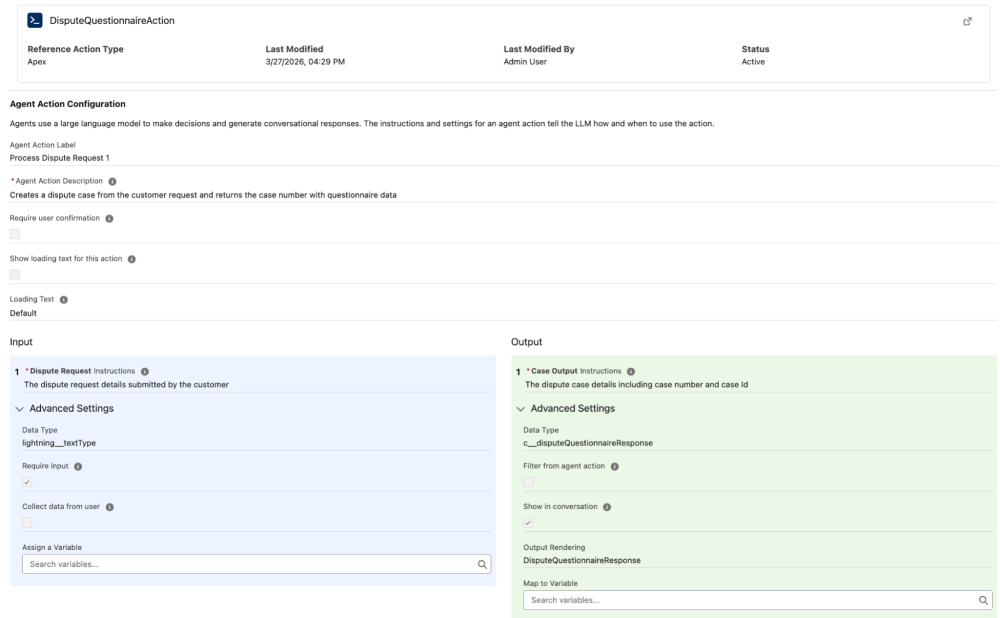
Finally, we’ll create an agent action that uses the Apex classes from Step 2 for execution and the custom Lightning type from Step 4 for output rendering.
Agent action configuration steps:
- Navigate to Setup > Agentforce > Agent Actions
- Click New Agent Action
- Set Reference Action Type to Apex
- Select DisputeQuestionnaireAction as the Apex class
- Set Output Rendering to the DisputeQuestionnaireResponse custom Lightning type
- Configure input parameters to match the Agent Topic context
- Add instructions for when the agent should invoke this action
Example subagent instruction:
When a customer wants to dispute a transaction, execute the Process Dispute Request action to capture detailed dispute information through a structured questionnaire. When this agent action fires as part of a subagent, the Discovery Framework Omniscript renders directly in the Agent window.
The screenshot below shows a sample agent action configuration in Agent Builder, with the disputeQuestionnaireResponse Lightning type created in Step 4 set as the output renderer.
Rendering the Discovery Framework Omniscript in an Agent Script action
If your Agent is built using Agent Script, you can also render the Discovery Framework Omniscript in an action which is part of the Agent Script.
For the dispute example, the code snippet below would help to render the output of the action using the Discovery Framework Omniscript.
1outputs:
2    caseOutput: object
3        label: "Case Output"
4        description: "The dispute case details including case number and case Id"
5        complex_data_type_name: "c__DisputeQuestionnaireResponse"
6        developer_name: "caseOutput"
7        is_displayable: True
8        filter_from_agent: False
Testing the integration
The following are steps to test the complete integration.
- Create a subagent that invokes your new agent action
- Start a conversation with the agent
- Trigger the dispute intake flow
- Verify that the Discovery Framework form renders in the Agent interface
- Complete the questionnaire and verify that data is captured correctly
- Confirm that the Case record is created with the captured information
Troubleshooting tips:
- If the form doesn’t render, verify that the Omniscript Type, SubType, and Language match exactly in both the Omniscript definition and LWC component
- If data doesn’t pass correctly, check that
@AuraEnabledannotations are present on all Apex output class properties - If navigation fails, ensure that the LWC component’s
js-meta.xmlincludes thelightning__AgentforceOutputtarget
Extending this pattern
This mechanism isn’t limited to Discovery Framework Omniscripts; you can apply it to any Omniscript in your org, as long as the user experience fits within a compact viewport.
Additional use cases:
- Loan application intake: Multi-step loan applications with document upload
- Insurance claims processing: Complex claim forms with conditional logic
- Customer onboarding: Know Your Customer (KYC) questionnaires with validation rules
- Financial planning: Goal-setting forms with calculation logic
The key requirement: design Omniscripts for responsive display within the agent interface viewport constraints.
Conclusion
With these five steps, you can replace fragile conversational question-and-answer flows with a reliable, structured form experience — directly inside Agentforce. This approach combines the conversational intelligence of Agentforce with the rich data collection capabilities of Discovery Framework, delivering the best of both worlds.
By following this approach, you maintain accurate data capture without AI hallucination, while giving users intuitive, navigable forms that feel natural within the Agent conversation flow. Try it out and share what you build. Post questions on the Salesforce Developer Community or Stack Overflow.
Resources
- Documentation: Transaction Dispute Management Intake in Financial Services Cloud
- Documentation: Discovery Framework
- Video: Discovery Framework for Financial Services Cloud
- Developer Guide: Enhance the Agent UI with Custom LWCs and Lightning Types
About the author
Aditya Bhansali is a Lead Member of Technical Staff in the Agentforce Financial Services organization, where he leads Salesforce engineering teams in building enterprise products on the Salesforce Platform. He shares updates on LinkedIn.