Agentforce is conversational by default. Users type a message and the agent responds with text. This works great for most use cases, but many enterprise workflows demand more. Businesses need forms with dropdowns, input validation, and structured output, and they need it right inside the agent conversation.
Custom Lightning types (CLTs) meet this need. They let you render Lightning Web Components (LWC) directly within Agentforce experiences in Lightning Experience, Enhanced Chat v2, and Experience Builder. You can collect structured input through a custom form and display results as rich, styled cards or in your own custom-designed user interface. CLTs are also the foundation of Headless Experience Layer, announced at TDX 2026, which extends rich agentic UI beyond Salesforce — to Slack, ChatGPT, and more. Define Once, Deploy Anywhere, Secure Everywhere — that’s the headless experience layer vision. Building with CLTs today means you’re already working with the primitives that power the next generation of multi-surface agentic experiences.
This post walks through how to work with CLTs in Agent Script to render a rich experience within Agentforce. All code examples come from the Agent Script Custom Lightning Type example recipe.
What are custom Lightning types in Agentforce?
Custom Lightning types create a bridge between your Agent Script, your actions backed by Apex or flows, and your LWC components. They override the default text-based UI with custom LWC components for both input and output.
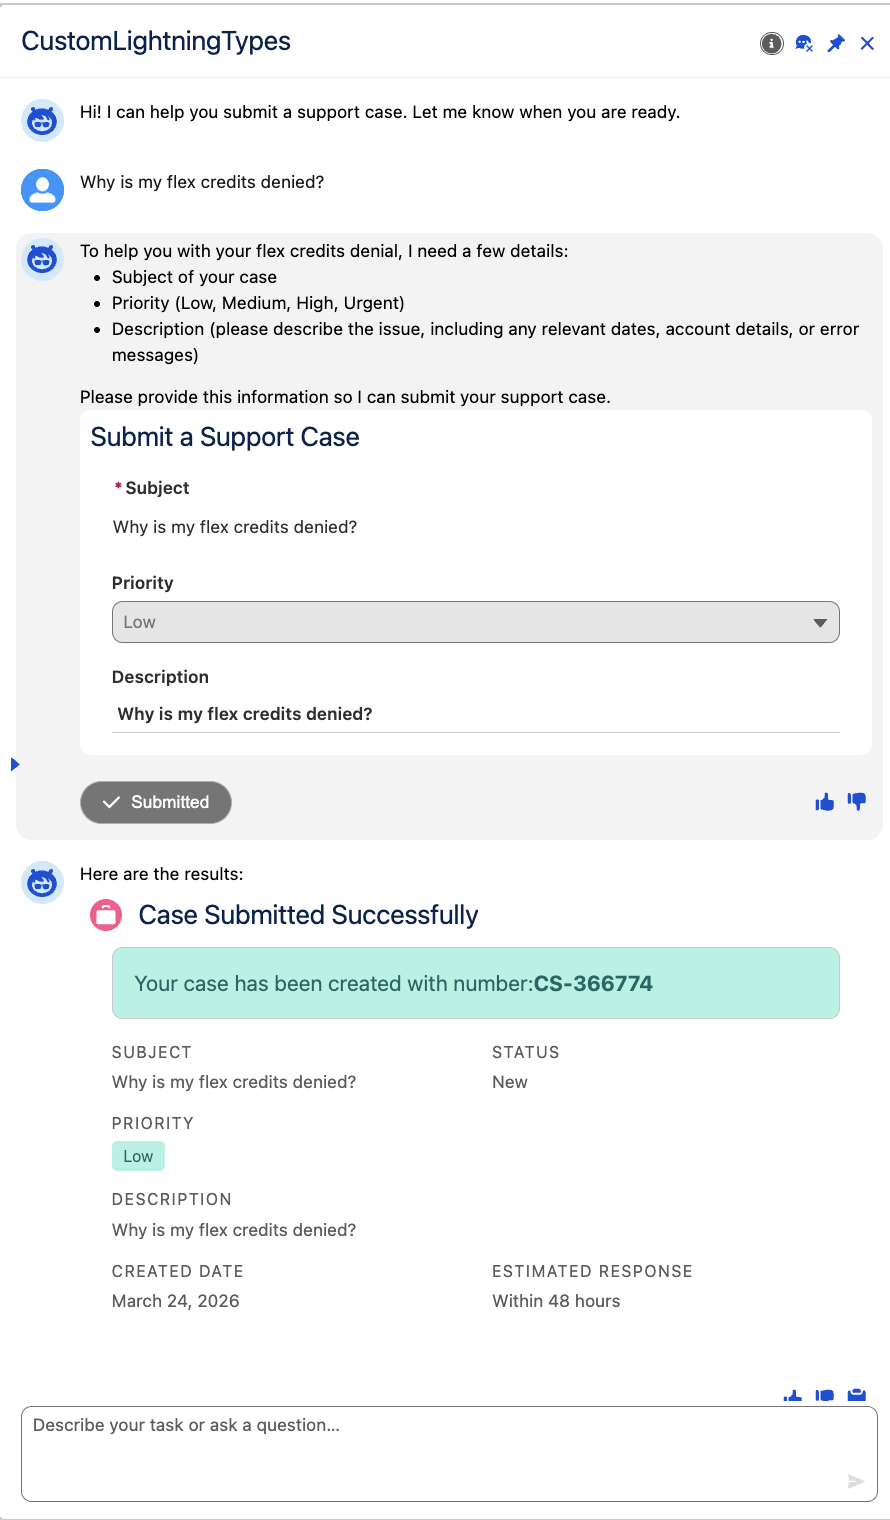
Below is an example of custom Lightning types in action within the Agentforce experience.
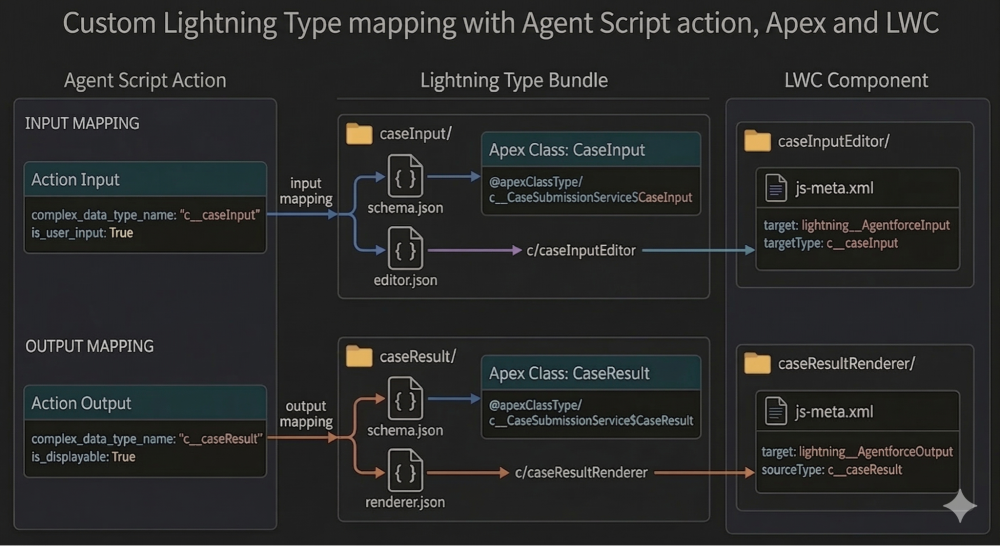
The connection flows through three layers:
- Agent Script declares which action parameters need custom UI
- A Lightning Type Bundle maps each parameter type to an Apex data shape and an LWC component
- An LWC renders the user interface inside the conversation
This three-layer wiring enables you to keep a clean separation of concerns. Your Agent Script handles orchestration, Apex handles the data shape definition and the business logic, and LWC handles the final user experience.
The following diagram shows how a custom Lightning type is mapped with Agent Script and LWCs.
The following sections describe how to build and wire this connection step-by-step.
Step 1: Prepare and deploy your Apex and LWC
Defining the Apex data shape
Each CLT needs an Apex class that defines the data structure. Use inner classes within your service class, with each field annotated with @InvocableVariable. The Lightning Type Bundle references these inner classes as the schema source.
1public class CaseInput {
2    @InvocableVariable(label='Subject' required=true)
3    public String subject;
4
5    @InvocableVariable(label='Priority')
6    public String priority;
7
8    @InvocableVariable(label='Description')
9    public String description;
10}
One important detail: the wrapper class field names must exactly match the action parameter names from your Agent Script. If your action input is called case_data, the request wrapper field must also be named case_data. A mismatch here silently breaks the entire CLT connection.
View the code: See the full CaseSubmissionService.cls for the complete Apex implementation including the request/response wrappers.
Building the editor and renderer LWC
The editor LWC collects user input inside the chat. Two things make it work with Agentforce: the meta XML must target lightning__AgentforceInput with a targetType matching the CLT name, and the component must dispatch a valuechange event whenever the user modifies the form.
1<target>lightning__AgentforceInput</target>
2 <targetType name="c__caseInput" />
The valuechange event payload field names must match the Apex CaseInput class fields. The platform listens for this event to capture and forward the form data to your Apex action.
Here is the simple example snippet showing the valuechange event in practice:
1import { LightningElement } from 'lwc';
2
3export default class CustomCaseForm extends LightningElement {
4    // Local state variables for the form
5    subject = '';
6    priority = 'Medium';
7    description = '';
8
9    // Handler triggered when the user types in the Subject input
10    handleSubjectChange(event) {
11        // 1. Update the specific field that changed
12        this.subject = event.target.value;
13
14        // 2. Dispatch the FULL state of the form
15        this.dispatchFormState();
16    }
17
18    // You would have similar handlers for Priority and Description...
19
20    // Centralized method to dispatch the complete current state
21    dispatchFormState() {
22        this.dispatchEvent(
23            new CustomEvent('valuechange', {
24                detail: {
25                    value: {
26                        // ALWAYS include all fields to match the Apex CaseInput class
27                        subject: this.subject,
28                        priority: this.priority,
29                        description: this.description
30                    }
31                }
32            })
33        );
34    }
35}
The renderer LWC displays the result card after the action completes. It targets lightning__AgentforceOutput with a sourceType (not targetType). The component receives the full result object via @api value and uses getters to render the fields with Salesforce Lightning Design System styling.
1<target>lightning__AgentforceOutput</target>
2<sourceType name="c__caseResult" />
View the code: See the full caseInputEditor and caseResultRenderer components in the repo.
Wiring Lightning type bundles
The Lightning Type Bundle is a folder containing JSON configuration files. The schema.json file points to your Apex inner class using $ syntax. For example, c__CaseSubmissionService$CaseInput references the CaseInput inner class.
1{
2    "title": "Case Input",
3    "lightning:type": "@apexClassType/c__CaseSubmissionService$CaseInput"
4}
A second file tells the platform which LWC component to render. Input types use an editor.json file. Output types use a renderer.json file. The "$" root key means “override the UI for the entire type”.
1{
2    "editor": {
3        "componentOverrides": {
4            "$": { "definition": "c/caseInput" }
5        }
6    }
7}
View the code: See the complete Lightning Type Bundle files in the repository
Step 2: Create the agent action asset
The GenAiFunction is the metadata layer that registers your action with Agentforce. Without it, Agentforce cannot resolve your CLT bindings. Every CLT-based action needs a corresponding GenAiFunction in the genAiFunctions folder.
The function metadata XML points to your Apex invocable class:
1<GenAiFunction xmlns="http://soap.sforce.com/2006/04/metadata">
2    <developerName>Submit_Case</developerName>
3    <invocationTarget>CaseSubmissionService</invocationTarget>
4    <invocationTargetType>apex</invocationTargetType>
5    <masterLabel>Submit Case</masterLabel>
6</GenAiFunction>
Alongside this XML, you define input and output schema JSON files. These schemas declare the lightning:type for each parameter, which is how the platform knows to look up your Lightning Type Bundle.
The input schema marks case_data as a user input with the CLT type c__caseInput:
1{
2    "properties": {
3        "case_data": {
4            "lightning:type": "c__caseInput",
5            "copilotAction:isUserInput": true
6        }
7    }
8}
The output schema marks case_result as displayable with the CLT type c__caseResult:
1{
2    "properties": {
3        "case_result": {
4            "lightning:type": "c__caseResult",
5            "copilotAction:isDisplayable": true
6        }
7    }
8}
See the full GenAI Function files in the repository.
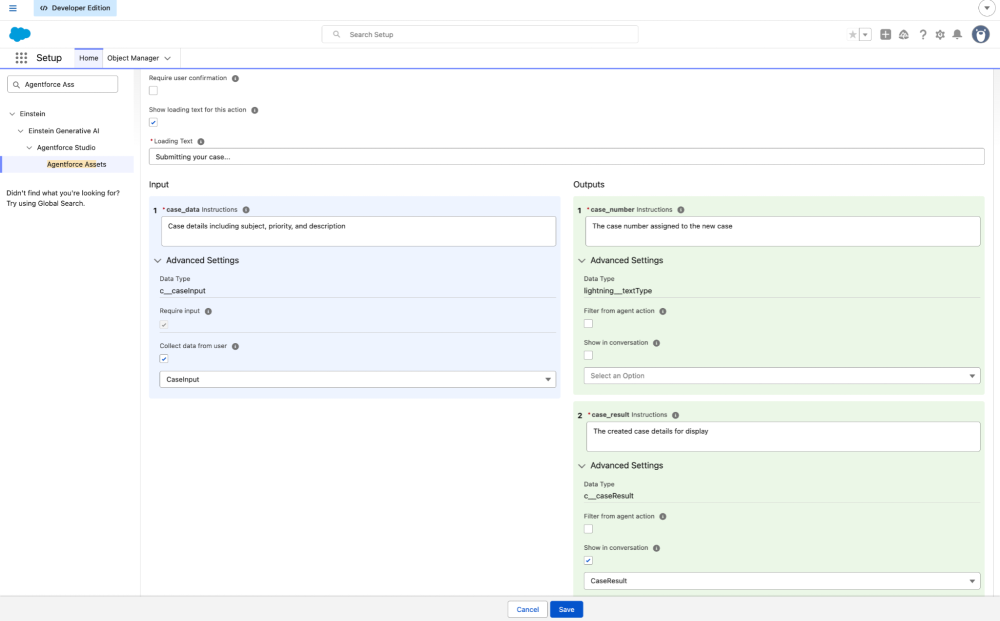
You can build the Agent action metadata directly in the Salesforce user interface.
To do this, navigate from Setup to Agentforce Assets, then select Actions and create a new agent action by following below steps.
- Setup → Agentforce Assets → Click on Actions → Click on New Agent Action
- Fill in the agent action details like Inputs and Outputs description and data types.
- Ensure you are setting up the Input Rendering and Output Rendering with the right custom Lightning types
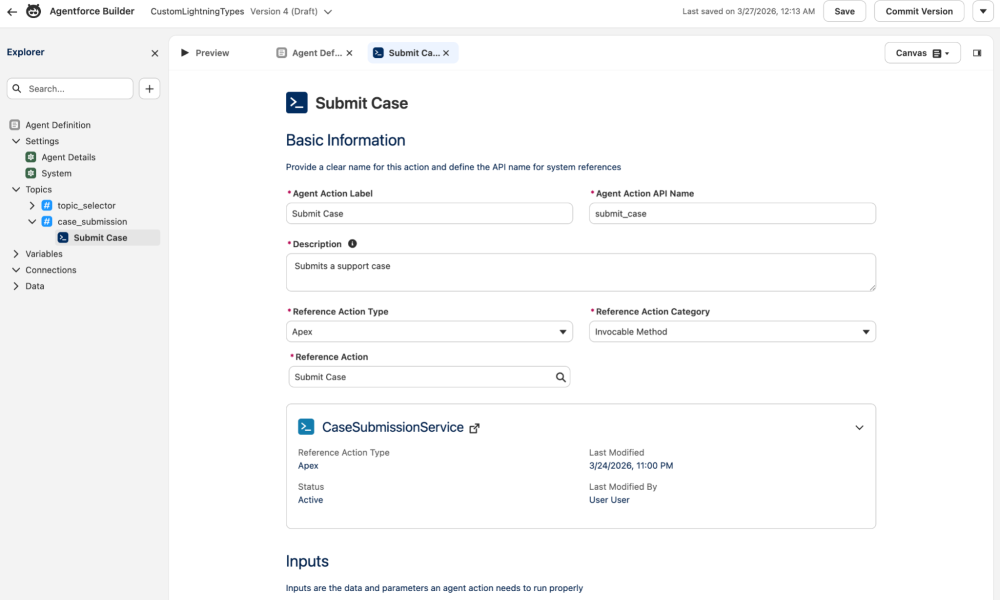
Step 3: Define the action in Agent Script
While the following sections cover action definition via metadata in detail, the Agentforce Builder UI enforces proper naming constraints automatically and is the recommended starting point for most teams.
Everything hinges on the action definition in your Agent Script. Two properties control CLT rendering: complex_data_type_name links a parameter to a Lightning type, and is_user_input or is_displayable tells the platform to render the custom component.
1actions:
2   submit_case:
3      inputs:
4         case_data: object
5            is_user_input: True
6            complex_data_type_name: "c__caseInput"
7      outputs:
8         case_result: object
9            complex_data_type_name: "c__caseResult"
10            is_displayable: True
11      target: "apex://CaseSubmissionService"
12      source: "Submit_Case"
Notice the source property at the bottom. This is a critical piece that connects Agent Script to an Agentforce action (represented as GenAiFunction in the metadata as discussed in step 2). The value “Submit_Case" must match the developer name of a GenAiFunction metadata file in your project.
Triggering the CLT editor in Agent Script
One detail that is easy to miss: your Agent Script subagent instructions must include the user_input keyword when calling the action. This tells the platform to render the CLT editor component instead of collecting input through plain text.
1reasoning:
2   instructions: ->
3      | Call {!@actions.submit_case} action's user_input tool to collect the case details.
Without this phrase, the platform falls back to text-based input collection. The user_input keyword is what activates the entire CLT editor rendering pipeline.
Important note: In Agent Script the subagent’s action name and the subagent reasoning action name should be exactly the same.
View the code: See the full instructions for the Agent Script in the repository.
The alignment checklist
CLTs require precise naming across multiple files. If any link in the chain breaks, the platform silently falls back to the default text UI with no error message. The following table shows what must stay aligned:
| What | Where | Must Match |
|---|---|---|
| Type name | Agent Script complex_data_type_name | Lightning type folder name |
| Source name | Agent Script source | GenAI Function developerName |
| Apex class | Lightning type schema.json | Inner class in your service |
| LWC name | editor.json or renderer.json | Your LWC component name |
| LWC target | Meta XML targetType / sourceType | Lightning type name |
| Wrapper fields | Apex request/response classes | Agent Script action parameter names |
Check these connections first when debugging. The silent fallback behavior makes misalignment hard to spot.
Conclusion
Custom Lightning types bring the power of Lightning Web Components into Agentforce conversations. You can collect precise, validated data through custom forms and present results in rich, branded cards, all without leaving the Agentforce experience.
The key pieces are the Agent Script action definition and the action in the Agentforce assets, the Lightning Type Bundle, and the LWC components. Each layer has a specific job, and the naming alignment across all four layers is what makes the whole system work.
This pattern opens up new possibilities for building enterprise-grade agent experiences. Forms with dropdowns and validation, structured result cards with conditional styling, and multistep workflows can all be rendered inline within the conversation.
The complete working example is available in the Agent Script Recipes repository under the customLightningTypes recipe. Clone the repo, deploy to a scratch org or Developer Edition org, and start building your own CLT-powered Agentforce agents.
Resources
About the authors
Mohith Shrivastava is a Principal Developer Advocate at Salesforce with 15 years of experience building enterprise-scale products on the Agentforce 360 Platform. Mohith is currently among the lead contributors on Salesforce Stack Exchange, a developer forum where Salesforce Developers can ask questions and share knowledge. You can follow him on LinkedIn.
Parvinder Singh is a Senior Forward Deployed Engineer at Salesforce with deep expertise in Agentforce and Agent Script, specializing in building intelligent, customized agent experiences for enterprise customers. He is passionate about sharing developer insights with the community and bringing practical, field-tested patterns to life through hands-on content.