Step 5 - Create Flow Elements
Create the Flow Builder elements to set the actions that the flow executes.
- On the flow you created in Step 4 - Create the Screen Flow, click the + button, search and select the Get Records element.
- Configure the Get Records element:
- Label: Get Current Contact Record
- Data Source: Salesforce Object
- Object: Contact
- Filter Contact Records:
- Field: Contact ID
- Operator: Equals
- Value: +New Resource:
- Resource Type: Variable
- API Name:
recordId - Data Type: Text
- Under Availability Outside the Flow, select Available for input and Available for output.
- Click Done.
- Click Save to save the Get Records element.
- Name your flow (for example, Document AI Flow for Resumes).
- Click Save to save the element.
- After the Get Current Contact Record element, click the + button, search and select the Get Records element.
- Configure the Get Content Document Link Record element:
- Label: Get Content Document Link Record
- Data Source: Salesforce Object
- Object: Content Document Link
- Filter Content Document Link Records:
- Field: LinkedEntityId
- Operator: Equals
- Value:
recordId
- Sort Order: Descending
- Sort By: SystemModstamp
- How Many Records to Store: Only the first record
- How to Store Record Data: Choose fields and assign variables (advanced)
- Select Variable to Store Content Document Link Fields:
- Record: +New Resource
- Resource Type: Variable
- API Name:
ContentDocId - Data Type: Text
- Under Availability Outside the Flow, select Available for input and Available for output.
- Click Done.
- Where to Store Field Values: In separate variables.
- Select Variables to Store Content Document Link Fields:
- Field: ContentDocumentId
- Variable: ContentDocId
- Click Save to save this element.
- After the Get Content Document Link Record element, click the + button, search and select Get Records.
- Configure the Get Content Document Name element:
- Label: Get Content Document Name
- Data Source: Salesforce Object
- Object: ContentDocument
- Filter Content Document Records:
- Field: ContentDocumentId
- Operator: Equals
- Value:
ContentDocId
- How Many Records to Store: Only the first record
- How to Store Record Data: Choose fields and assign variables (advanced)
- Select Variable to Store Content Document:
- Record: + New Resource
- Resource Type: Variable
- API Name:
fileName - Data Type: Text
- Under Availability Outside the Flow, select Available for input and Available for output.
- Click Done.
- Where to Store Field Values: In separate variables.
- Select Variables to Store Content Document Fields:
- Field: Title
- Variable: fileName
- Click Save to save this element.
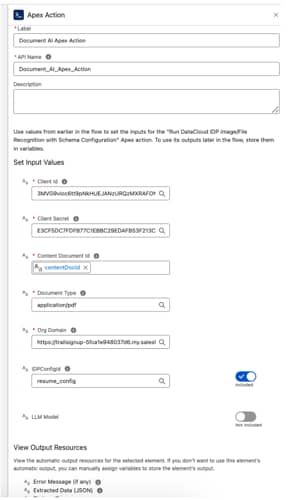
This action invokes the Document AI Apex action you created in Step 3 - Create Apex Classes.
- After the Get Content Document Name element, click the + button, search and select Action.
- Search and select the Apex class you created: de_DataCloudIDPFlowAction.
- Give the action a descriptive label (for example, Document AI Apex Action).
- Set the input parameters:
- Client ID: Your consumer key from Prerequisite 1 - Create and Configure an External Client App.
- Client Secret: Your client secret from Prerequisite 1 - Create and Configure an External Client App.
- Content Document ID:
ContentDocId - Document Type:
application/pdf(default) - Enter Org Domain: Your domain URL with the
https://prefix from Prerequisite 2 - Retrieve Your Salesforce Domain URL. - IDP Config: Ensure it’s toggled to included and enter
resume_config(or the API name you used in Step 1: Create a Document AI Configuration to Process Resumes).
- Click Save to save this element.
This action invokes the prompt template you created in Step 2 - Create a Prompt Template in Prompt Builder.
- After the Document AI Apex Action element, click the + button, search and select Action.
- Search and select the second Apex class you created in Step 3 - Create Apex Classes: de_ExtractDocumentAIDetails.
- Configure the action:
- Label: Handle JSON Output
- Set Input Values:
- Document AI JSON or Raw Data: Select the output from the previous Apex action (Outputs from Document AI Apex Action) and then select Extracted Data (JSON).
- Prompt Template API Name: Enter the ID of the prompt template you created in # Step 2 - Create a Prompt Template in Prompt Builder.
- Set the input parameters:
- Document AI JSON and Raw Data: Output from the previously defined Apex action (element 4).
- Prompt template API Name: The ID from the prompt template created in Create a New Prompt Template.
- Click Save to save this element.

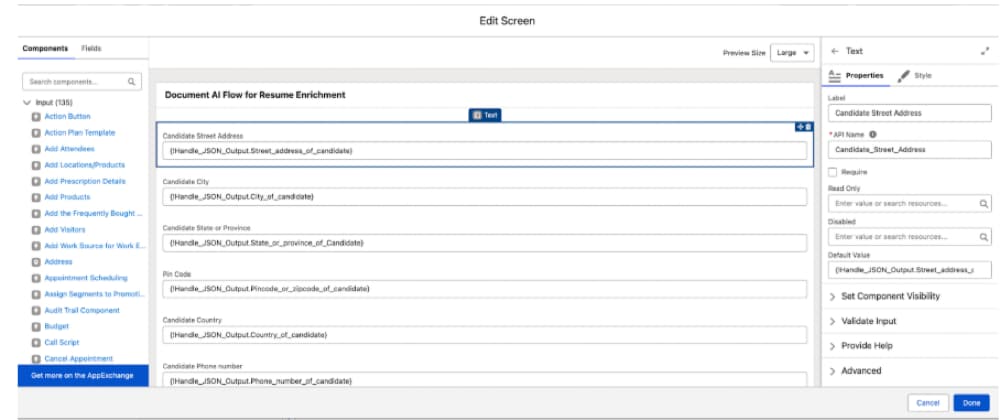
With this flow element, you can review and edit the extracted data before it updates the Contact record.
-
After the Handle JSON Output element, click the + button, find and select Screen.
-
Select Screen.
-
In the Components tab, find and select Text.
-
In the Properties tab, set the component label, for example: First Name.
-
Under Default Value find and select the corresponding Apex value from the second Apex class you created: Extract Resume Details with Document AI. For example: Outputs from Handle_JSON_Outout > First_name.
-
Click Finish.
-
Repeat steps 3-5 for each component.
Label Map to Apex value First Name (from Apex output) Last Name (from Apex output) Email Address (from Apex output) Phone Number (from Apex output) Street Address (from Apex output) City (from Apex output) State or Province (from Apex output) Country (from Apex output) Pin Code or Zip Code (from Apex output) Summary of Qualifications (from Apex output) -
After you have on your screen a text field for each of these items, click Done.
-
After the Screen** element, click the + button.
-
Find and select Update Records.
-
Configure the element:
- Label: Update Contact Record
- How to Find Records to Update: Specify conditions to identify records, and set fields individually
- Object: Contact
- Filter Contact Records:
- Field: Contact ID
- Operator: Equals
- Value:
recordId
- Set Field Values for the Contact Record: Map each field in the table to the corresponding output from the Screen element. For example: For Mailing City Select Raw Output from Document AI > City.
Contact Field Screen / Source Value MailingCity City MailingState State or Province MailingCountry Country MailingStreet Street Address MailingPostalCode Pin Code or Zip Code Description Summary of Qualifications Email Email Address MobilePhone Phone Number -
Click Save to save the element.
-
Click Activate to make the flow available for use.

- Step 6 - Add the Flow as a Quick Action Button on Contact Page — Add the Enrich from File button to the Contact page and test.