Use CLI to Deploy Tableau Next Assets from Sandbox to Production
This document provides a comprehensive guide for deploying Tableau Next Assets between Salesforce orgs, such as from a sandbox to a production environment, by using the Salesforce Command-Line Interface (CLI) and Visual Studio Code (VS Code).
This deployment process uses the Metadata API and Salesforce DX project structure to manage and transfer Tableau Next assets, which include workspaces, visualizations, and dashboards.
The guide covers:
- Authorization of your Salesforce orgs with the CLI.
- Project set up in VS Code.
- The creation and structure of manifest files (
package.xml) to specify the assets for deployment. - The commands to retrieve the asset metadata from the source org and deploy it to the target org.
- Creating and downloading the manifest file for the data kit.
- Deploying the data kit first to make sure that data dependencies are present.
- Deploying the Tableau Next Assets themselves.
Complete these prerequisites:
- Create a deployment connection between the production org and the sandbox org. See Authorize a Deployment Connection.
- Install VS Code, Salesforce Extension for Visual Code, and the Salesforce CLI. See Installation Instructions.
To deploy Tableau Next Assets, make sure that you have these user permissions:
- Data Cloud Architect permission set
- Tableau Next Admin permission set
- Approve Uninstalled Connected Apps user permission
- Metadata API Edit Access
Before you can run commands to retrieve asset metadata from your org, you must authorize your CLI environment.
Authorize an org by running the sf org login web CLI command and entering your credentials in the browser that automatically opens.
For example, run this command from the command line (not from the VS Code terminal):
sf org login web --alias sandbox --instance-url https://your-org.my.salesforce.com
This command uses the –-alias flag to specify a simple name, like sandbox, for the Salesforce org. After you’ve connected and authorized the org, you can use the alias rather than the full org URL for deployment commands.
To verify and view connected org, run this command in VS Code:
sf org list
Open your VS Code desktop app and follow the given steps to create a Salesforce DX project:
- Open the VS Code Command Palette (
⇧⌘P) and enter SFDX: Create Project. - Press Enter to use a standard project template.
- Add a project name and press Enter.
- Select the directory where you want to create your project and click OK.
- In the new project, create a folder for the package manifest files. For example,
manifests.
A manifest file is an XML file that specifies the Tableau Next assets that you want to retrieve from one org and deploy into another org.
In the manifests folder, create an XML file with the code below. In this guide, we refer to this file name as manifest.xml.
The syntax of a manifest file includes three primary elements: types, members, and name. The version element is required. All of these elements are included in the parent Package element.
Example manifest.xml File
This example shows a manifest file with the 6 Tableau Next assets for version 65.0 of Salesforce:
- Two workspaces:
Winter_2025andWinter_2025. - Three visualizations:
Fall_Sales_2025,Projections, andOpportunities. - One dashboard:
Spring_Plan_2026.
Package Block
Each Package block includes one or more types blocks and a version element.
For the xmlns attribute, specify the soap.sforce.com namespace as shown in the example.
version Element
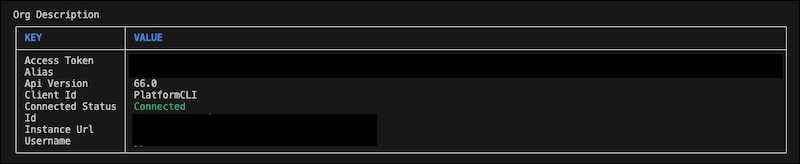
The version element must contain the version of Salesforce used to create the newest assets in your manifest file. Because versioning is backwards-compatible, we recommend putting the current version of your Salesforce org in this element. To determine the version of Salesforce for your org, run the sf org display -o <org_alias> command:
Syntax
sf org display -o <org_alias>
Example
sf org display -o sandbox
The command returns org information, including the current API version.
types Block
The types block takes one or more members elements and a name element. Each types block corresponds to one of three Tableau Next asset types: AnalyticsWorkspace, AnalyticsVisualization, or AnalyticsDashboard.
Here’s an example of a types block that specifies an API name of Winter_2025 for members that is an asset type, AnalyticsWorkspace:
members Element
Each members element specifies the API name, like workspace1, for the specific asset that you want to deploy. You can have multiple members elements in a types block, each specifying a different API name.
API Name
The API name is the asset name generated by Salesforce when the asset is created. To retrieve the API name, open the asset in Tableau Next and copy the name from the end of the URL. For example, this URL opens workspace Winter 2025:
https://org-name.lightning.force.com/tableau/workspace/Winter_2025
The API name for the Winter 2025 workspace is Winter_2025.
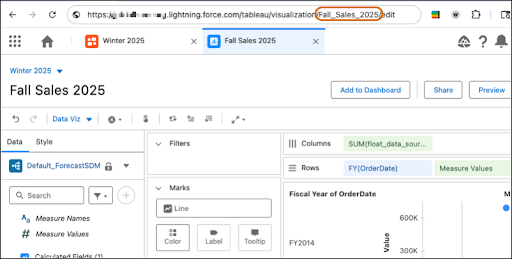
As shown here, this URL opens the visualization, Fall Sales 2025:
https://org-name.lightning.force.com/tableau/visualization/Fall_Sales_2025
The API name for Fall Sales 2025 is Fall_Sales_2025.
name Element
The name element specifies the type of asset. For example, AnalyticWorkspace. Each types block contains only one name element.
There are three types of Tableau Next assets that you can specify in the XML. This table lists the asset type and the corresponding name that is specified in the name element:
| Asset Type | name |
|---|---|
| Workspace | AnalyticsWorkspace |
| Visualization | AnalyticsVisualization |
| Dashboard | AnalyticsDashboard |
This procedure describes how to deploy Tableau Next assets that don’t require data kit customizations.
After you’ve created your manifest file, you can use it to retrieve the asset metadata from the source org.
Run the sf project retrieve start command in VS Code:
Syntax
sf project retrieve start --manifest <path_to_manifest_file_name> -o <source_org_alias>
Example
sf project retrieve start --manifest manifests/manifest.xml -o sandbox
The command creates metadata files for each asset specified in the manifest file.
VS Code writes these metadata files into your project at the ../force-app/main/default path.
Now that all metadata files are in your project folder, you can deploy them to the destination org.
Before you can deploy the project to the destination org, you must Authorize Your Org.
Run the sf project deploy start command in VS Code:
Syntax
sf project deploy start --manifest <path_to_manifest_file_name> -o <target_org_alias>
Example
sf project deploy start --manifest manifests/manifest.xml -o prod
The command creates the Tableau Next assets in the target org by using the metadata files for each asset specified in the manifest file.
If your Tableau Next assets rely on DMOs, DLOs, or semantic models, you may need to deploy those data assets from the sandbox to the production environment. If these assets exist in the production environment and are the latest production versions of the assets used to create the Tableau Next assets in your sandbox environment, then you don’t need to deploy them.
If you’re deploying Tableau Next assets that require a data kit, deploy the data kits first. After you verify that the data kits are deployed and contain the same data used to generate the Tableau Next assets, then deploy the Tableau Next assets.
Use this process to create a standard data kit for a managed package. For more information about creating data kits, see Use CLI to Deploy Changes from a Sandbox to Data Cloud.
-
In your Developer Edition org, go to Data Cloud Setup.
-
Under Developer Tools, click Data Kits.
-
Click New.
-
Name the data kit and add an optional description, such as what it contains.
-
For Data Kit Type, select DevOps.
-
Save your changes.
-
Add one or more Data 360 features by clicking Add in the appropriate section, then configure the data kit details.
-
Review the Publishing Sequence. You must ensure your assets reflect the following sequence, at a minimum:
- Semantic Models
- Workspaces
- Visualizations
- Dashboards
This is due to the dependency sequencing for data kits. Visualizations have dependencies on semantic models and workspaces, and dashboards have dependencies on visualizations. The default sequence is based on each asset’s creation date, which may not suitable in all cases. For more information, see Create and Publish a Standard Data Kit.
If you don’t review and update the publishing sequence, data kit deployment will fail.
-
Save your changes.
- In your Developer Edition org, go to Data Cloud Setup.
- Under Developer Tools, click Data Kits.
- Select the data kit that you want to deploy.
- On the top right of the page, click the dropdown arrow, and then click Download Manifest File.
This downloads a manifest file,package.xml, to your computer.
Before you can retrieve the data kit, you must Authorize Your Org.
-
Rename
package.xml, the manifest file that you downloaded, to match your file naming scheme for the sandbox deployment project, for example,manifest\_datakit.xml. -
In VS Code, add
manifest\_datakit.xmlto themanifestsfolder in your project. -
Run the
sf project retrieve startcommand in VS Code.
Syntaxsf project retrieve start --manifest <path_to_manifest_file_name> -o <source_org_alias>Example
sf project retrieve start --manifest manifests/manifest_datakit.xml -o sandboxThe command creates metadata files for each asset specified in the manifest file.
VS Code writes these metadata files into your project under the../forc-app/main/defaultpath.
Now that all metadata files are in your project folder, you can deploy them to the destination org.
Before you can deploy the project to the destination organization, you must Authorize Your Org.
Run the sf project deploy start command in VS Code:
Syntax
sf project deploy start --manifest <path_to_manifest_file_name> -o <target_org_alias>
Example
sf project deploy start --manifest manifests/manifest_datakit.xml -o prod
The command creates the data kit assets in the target org by using the metadata files for each asset specified in the manifest file.
After you’ve verified that the data kits are deployed and contain the same data used to generate the Tableau Next assets, then deploy the Tableau Next assets.