Use CLI to Deploy Changes from a Sandbox to Data 360
As a Salesforce developer, you can move your Data 360 metadata and process definitions for Data 360 features between sandbox orgs or between production orgs. To accomplish this, you use a temporary sandbox org that has Data 360 enabled and provisioned.
- Deploy the data from the production org to the temporary sandbox org.
- Deploy those changes from the temporary sandbox to a sandbox linked to the new production org.
- Push the changes from the linked sandbox into the new production org.
- Add the feature metadata that you want to deploy to a DevOps data kit.
- After the metadata is in the data kit, retrieve it into a Salesforce DX project manifest.
- Finally, you can deploy the metadata to the production org.
When you deploy changes from a sandbox, you can deploy them back to the production org or to another sandbox. This process involves multiple steps in both Data 360 and the Salesforce Platform. Bookmark this page or keep it open in a separate window to refer to this topic.
For simplicity, this topic uses the term “production,” which can refer to the production org from which the sandbox was created.
Make sure to complete these prerequisites before you create and start working on a Salesforce DX project.
- Create a deployment connection between the production org and the sandbox org. See Authorize a Deployment Connection.
- Install VS Code. See Install Salesforce Extensions Visual Studio Code.
- Install the Salesforce CLI. See Install Salesforce CLI.
- Install the Salesforce Extension Pack (Expanded) for VS Code. See Salesforce Extension Pack (Expanded).
-
Open the VS Code editor and from VS Code Command Palette, run
SFDX: Create Project with Manifest. See Create Project. -
In the
sfdx-project.jsonfile, specify the login URL for the production org, which is https://login.salesforce.com. -
In the
sfdx-project.jsonfile, specify the login URL for the sandbox org, which is https://test.salesforce.com.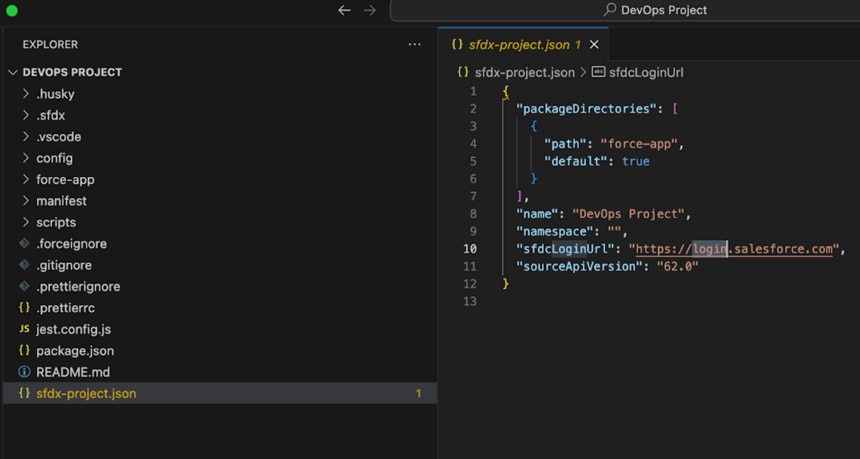
- Authorize the sandbox org and the production org to work with your Salesforce DX project. See Authorize your Production Org.
- Go to Data Cloud Setup and create a data space in the sandbox org and the production org. See Create a Data Space.
Note: In Data Cloud Setup, make sure that the data space with the same prefix name exists in both the sandbox org and the production org.
- In your sandbox org, go to Data Cloud Setup and create a data kit. See Create a Data Kit.
- For Data Kit Type, select DevOps.
- Add Data 360 components that you want to deploy from the DevOps data kit and review the publishing sequence for these components. The components that you can add include data streams, data lake objects, calculated insights, and data graphs. See Data 360 in a Sandbox.
- In your sandbox org, under Developer Tools, click Data Kits.
- Select the DevOps data kit, and then click Download Manifest. To download the manifest file programmatically, use the get data kit manifest Connect REST API endpoint.
Thepackage.xmlfile that you downloaded contains all the metadata entities related to the DevOps data kit. Use thispackage.xmlfile in your Salesforce DX project to retrieve the data kit metadata.
Sample package.xml file for a data kit.
-
To retrieve the DevOps data kit metadata into the sandbox org, run the
sf project retrieve start --manifest manifest/package.xmlcommand. After this command completes, you see new project folders that contain the data kit metadata. Consider uploading the entire project to GitHub or any other source control system. This practice helps with version control, collaboration, and ensures that your project is backed up and accessible to your team. -
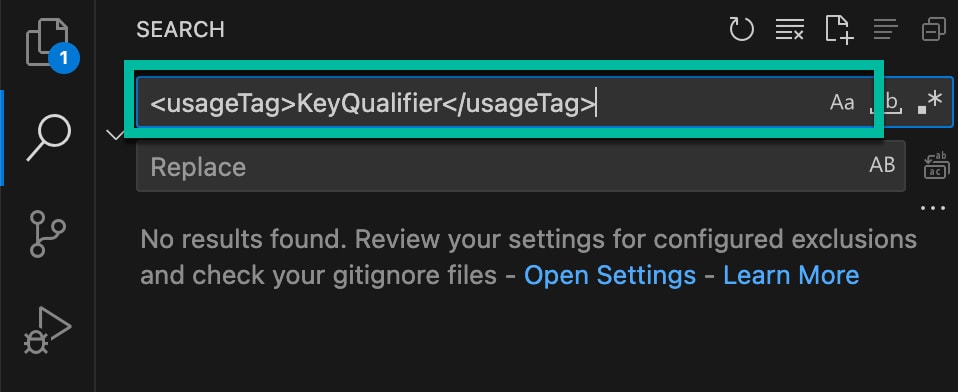
Important:
Don’t skip this stepUnix users, execute these commands to delete any key qualifier files related to the project.
If you’re a Windows user, search for key qualifier files in your project directory. Manually delete those files and their references from the project.
- To start the deployment, run:
sf project deploy start --manifest package.xml.See project deploy start. - To check the deployment status, click Deployment History. After the data kit deploys in the production org, you can see the data kit, including all of its data stream bundles, data models, and calculated insights. The metadata and process definitions from your sandbox org data kit are deployed in your production org.
Review this information to resolve any deployment failures.
Missing FieldSrcTrgtRelationship Reference for DMO Relationship
This error occurs during deployment when you try to deploy data model objects (DMOs) that have relationships defined, but the required FieldSrcTrgtRelationship metadata, which links the source and target fields of these relationships, is either missing or contains invalid references. Locate all XML files mentioned in the error within your SFDX project and manually delete those XML files. Then reattempt the deployment.
Missing FieldSrcTrgtRelationship Metadata
This error occurs when your deployment fails because a required FieldSrcTrgtRelationship definition can’t be found.
To fix this, you must retrieve the missing FieldSrcTrgtRelationship files from your source org. Here are two ways that you can do it:
Option 1: Retrieve specific relationships by using org browser
- In your Salesforce DX project, open the org browser.
- Go to the Field Source Target Relationships folder.
- Find and retrieve only the specific relationship files mentioned in the error message.

Option 2: Retrieve relationships by using package.xml manifest file
- In your terminal, run the
sf project retrieve start --manifest manifest/package.xmlcommand to retrieve metadata. - Open your
package.xmlfile and add the missingFieldSrcTrgtRelationshipnames within thetag for FieldSrcTrgtRelationship. Example:
-
If your project includes any key qualifier files related to these DMOs or relationships, make sure to delete them. Refer to Step 6
-
Now, you can reattempt the deployment of your data kit to your target org.
Unable to Deploy Data Lake Object (DLO) Schema Changes
This error occurs during data kit deployment when the target org contains fields that are missing from the source org’s DLO. To resolve this problem, synchronize schemas between the source and target orgs before deploying.
Note: Keep sandbox and production schemas synchronized before data kit deployments to prevent schema mismatch errors.
Inactive Connectors After Deployment
This error occurs when your deployment completes, but some of the deployed connectors are in an inactive state in the target (production) org. While connection configurations are replicated, the sensitive authorization data is not copied during a sandbox refresh or certain deployment types.
To resolve inactive connector issues, you must re-authorize them in the target (production) org.
- In your production org, go to Data Cloud and click Connectors.
- Identify connectors that show an Inactive status.
- Reauthorize the inactive connectors.
- Redeploy the data kit to ensure that all components are correctly linked and operational.
- Salesforce Help: Install and Configure DevOps Center
- Salesforce Help: Data 360 in a Sandbox
- Salesforce Help: Deploy Data 360 Changes from a Sandbox
- Data 360 Connect REST API: Get data kit manifest
- Data 360 Connect REST API: Deploy data kit components