


Force.com Platform Fundamentals
 j
j
No Results
Search Tips:
- Please consider misspellings
- Try different search keywords
Newer Version Available
Try It Out: Add Spaces Between Fields
When designing a page layout, you'll often want to distinguish or “pop” certain fields within a section. An easy and effective way to do this is by inserting blank spaces between fields. For example, in the Information section, inserting blank spaces below the first row in each column draws a user's eye to the most important information in the section, the position title and owner. We can also use blank spaces above the bottom row in each column to separate the Created By and Last Modified By fields from the critical position information. Let's give it a try!
- Select the Fields category.
- Drag the Blank Space user interface element from the palette to the page layout right below the Position Title field.
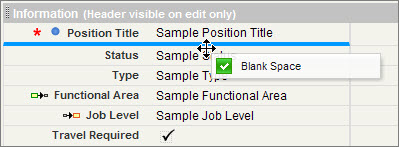
As with the Section user interface element, the Blank Space user interface element is never grayed-out in the palette when you drag it to the page layout because the element can be reused as many times as you want.
- On the palette, select the Blank Space user interface element again and drag it below the Owner field.
- Add two more blank spaces to the page layout, one above the Created By field and the other above the Last Modified By field.
Before we move on, you should be aware that if you accidentally navigate away from the page layout before saving your work, your changes will be lost. Rather than tempting fate, let's do a quick save of the work that we've done so far.
- Click Quick Save in the toolbar above the palette, or press CTRL+S if you prefer using keyboard shortcuts.
The quick save feature allows you to save your changes and continue editing the page layout. Clicking Save in the toolbar also saves your work, but it takes you back to the page from which you accessed the page layout editor. We have a few more minor tweaks to make to our page layout, so we don't want to leave the page layout editor just yet.