


Force.com Platform Fundamentals
 j
j
No Results
Search Tips:
- Please consider misspellings
- Try different search keywords
Newer Version Available
Try It Out: Create a Dashboard
Now that we've got a set of reports to reference, we're ready to create a small Recruiting dashboard. To do so, we'll be working in the Reports tab.
First we need to create a folder to hold our dashboards. We’ll use the same steps that we used to create a folder to hold our reports.
- In the Reports tab, click
 next to the
Folders pane and choose New Dashboard Folder.
next to the
Folders pane and choose New Dashboard Folder. - In Dashboard Folder Label, enter Recruiting Dashboards. The Folder Unique Name field automatically populates with Recruiting_Dashboards.
- Click Save.
- Next to the Recruiting Dashboards folder, click
 and
select Share.
and
select Share. - At the top of the dialog, click Roles and Subordinates.
- Next to CEO, click Share.
- Make sure the level selected in the Access column is Viewer. This allows all users in your company to view this folder and the reports in it, but allows only administrators to modify the reports inside the folder or add new reports to it.
- Click Done to save our settings, and then click Close.
- On the Reports & Dashboards page, click New Dashboard.
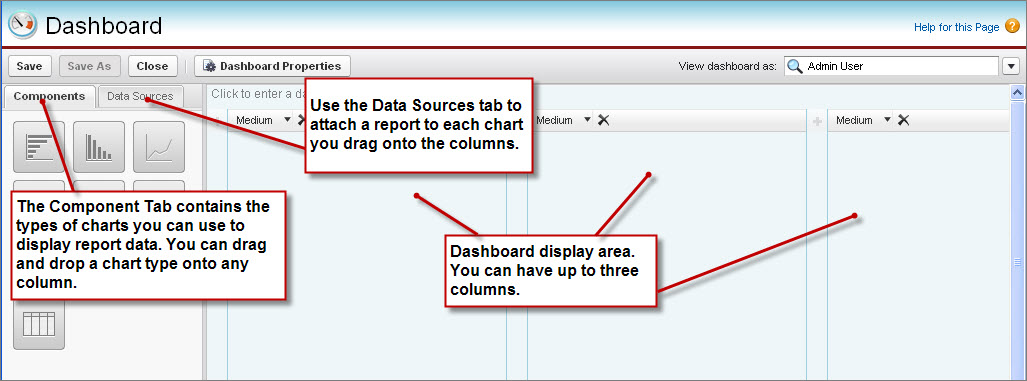
Once we specify the dashboard properties, we can add components.
- Click Dashboard Properties.
- In the Title field, enter Recruiting Dashboard.
- The Dashboard Unique Name field autopopulates with Recruiting_Dashboard.
- Select the Recruiting Dashboards folder to save it in.
- Click OK.
- For the dashboard description—the editable field near the top of the page—enter A snapshot of open positions, job applications, frequent interviewers, and recruiter performance.
Each dashboard has a running user, whose security settings determine which data to display in a dashboard. All users with access to the folder see the same data, regardless of their own personal security settings.
The running user's security settings only apply to the dashboard view. Once a user drills down into a source report or detail page off the dashboard, the user will view the data based on his or her normal security settings.
For example, suppose a system administrator with the “Modify All Data” permission is the running user for our recruiting dashboard. In this case, every recruiting-related record is counted in all of the report totals on our dashboard, including users who'd normally be restricted from viewing certain records (like those assigned to the Standard Employee profile). Although those users would be able to see the summary data for all records in the dashboard, if they navigated to the source reports, they'd see just the records they have access to.
When you're designing a dashboard, keep the dashboard's audience in mind. Ask whether any of the information is sensitive and how much you want them to see. If you do give a user access to dashboards that include more data than he or she normally has permission to view, be sure to communicate that they might see different values when they click through the dashboard to view the associated reports. And if you need to restrict a dashboard from certain users, just save it to a restricted-access folder.
Beyond the Basics
Did you know you can set up a dynamic dashboard that shows users data according to their own security settings?
Say you want to show the same set of dashboard components to different sets of users, each with a different level of visibility. You'd potentially have to set up dozens of dashboards with the right running user for each, and store them in separate folders. With dynamic dashboards, administrators can accomplish the same thing without having to create and maintain all those extra dashboards and folders. A single dynamic dashboard can display a standard set of metrics across all levels of your organization.
To find out more, see “Provide Individualized Views of a Dashboard” in the Salesforce Help.
For our recruiting dashboard, the data that we'll be showing in the dashboard isn't particularly sensitive. Consequently, we'll choose a system administrator as the running user, and save the dashboard to a public folder.
- In the View dashboard as field in the upper right of the screen, enter the name of your user, since you have system administrator privileges. This sets the running user for the dashboard.
We now have an empty dashboard that's ready to be filled with components.