Force.com Platform Fundamentals
 j
jNewer Version Available
Try It Out: Create an Approval Process
Now that we've finished our preparation, we're ready to define the approval process itself. The approval process definition acts as a framework for the approval steps and actions that we'll define later.
- From Setup, enter Approval Processes in the Quick Find box, then select Approval Processes.
- From the Manage Approval Processes For drop-down list, choose Position.
There are two different wizards that we can use to create a new approval process: a Jump Start Wizard and the Standard Setup Wizard. The Jump Start Wizard sets several default values for us and only requires input for the most crucial fields: the approval assignment email template, filter criteria to enter the approval process, and the designated approvers. The Standard Setup Wizard, on the other hand, allows us to configure every possible option for our approval process. We'll stick with the latter for now so we can take a look at all of the options that are available.
- From the Create New Approval Process drop-down button, choose Use Standard Setup Wizard.
- In the Process Name field, enter Approve New Position.
- In the Description field, enter Ensure that a manager approves any position that his or her employee creates, and that any position with a minimum salary of more than $150,000 is approved by the CEO.
- Click Next.
After entering the name and description, our next step is to specify the conditions that determine which positions need approval. As with workflow rules, we can do this by either defining a set of criteria or creating a formula. Let's define the criteria so that all positions created by a user other than the CEO must be approved by at least a direct manager.
- In the first row of filter criteria, select Current User: Role not equal to CEO.
- Click Next.
- From the Next Automated Approver Determined By drop-down list, select Manager.
The Manager field is a standard field on the User object that designates the user's manager. The field establishes a hierarchical relationship between users, which prevents you from selecting a user that directly or indirectly reports to his or herself. This manager will be the designated approver for the first step of our approval process.
Alternatively, you could have selected the Create New Hierarchical Relationship Field option in the drop-down list to define a new custom hierarchical relationship lookup field on the fly. The hierarchical relationship field type is specifically designed for the User object, and mimics the behavior of the standard Manager field by associating one user with another without indirectly associating that user to him or herself. For this approval process, though, the standard Manager field is perfect, so let's move on.
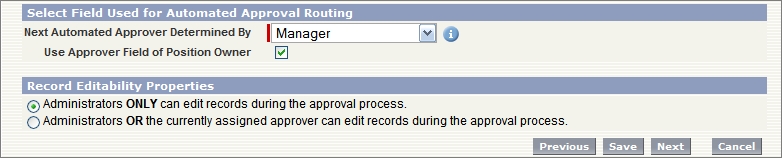
- Select the Use Approver Field of Position Owner checkbox.
The Use Approver Field of Position Owner checkbox becomes editable when you select Manager in the Next Automated Approver Determined By drop-down list. When you select this checkbox, the approval request is routed to the user specified in the Manager field on the record owner's user record. If you don't select this checkbox, the approval request is routed to the manager of the user submitting the record. In our case, we want to obtain approval from the position owner's manager, so select this checkbox.
- In the Record Editability Properties area, choose Administrators ONLY can edit records during the approval process.
Record editability allows you to specify whether a record that's been submitted for approval can be edited by the approver before being approved. Since we don't want managers to change the positions that a hiring manager or recruiter creates without alerting the owner, we'll only let administrators perform edits while a record is in our approval process.
- Click Next.
- In the Approval Assignment Email Template lookup field, select Recruiting App: New Position Requires Approval.
- Click Next.
Our next step in defining the approval process is specifying which fields should be displayed on the Approval page layout, which the approver sees when he or she approves or rejects a record. Each approval process has its own page layout, and, unlike other page layouts, the Approval page layout can only be configured from within its approval process.
- Move the following fields from Available Fields to Selected Fields.
- Position Title
- Owner
- Hiring Manager
- Type
- Location
- Hire By
- Job Description
- Min Pay
- Max Pay
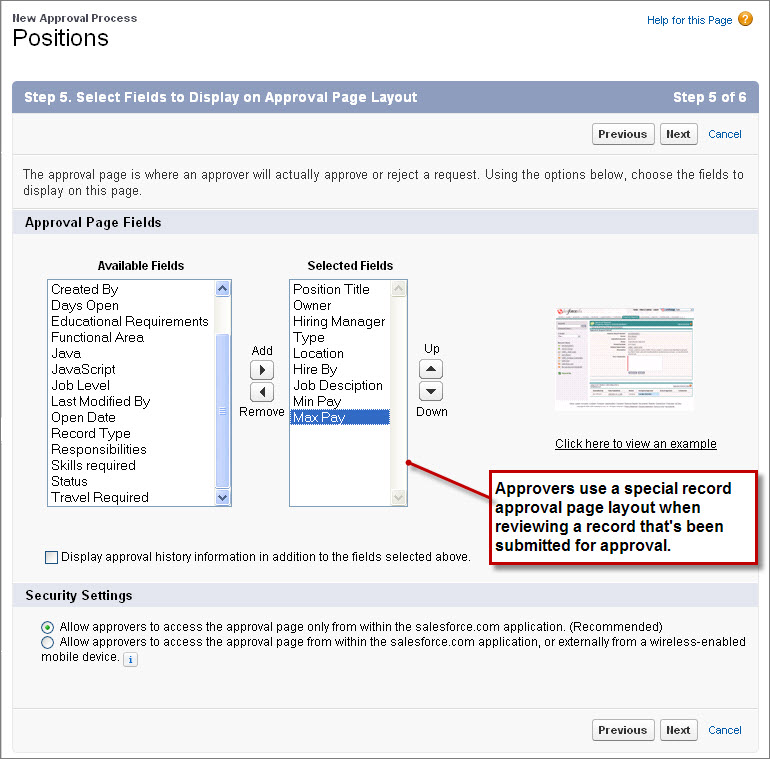
On this page we can also specify whether approval history information should be displayed on the Approval page layout. This information shows whether this record was submitted for approval in the past, who the designated approvers were, and whether it was approved or rejected.
- Select Display approval history information in addition to the fields selected above.
Finally, before leaving this page, we can specify security settings to determine whether approvers can access an external version of the approval page from any browser, including those on mobile devices, without logging in to Salesforce. Unless it's a mandatory requirement for your approvers, it's better not to choose this option because you won't be able to add approval steps that let users manually select the next approver. We'll leave the default choice selected for now.
- Click Next.
The last page of the New Approval Process wizard allows us to choose who should be allowed to submit position records for approval. Again, we'll just leave the default Position Owner selected, because there's no reason for another user to have this power.
The last two options on this page allow us to place the Approval History related list on all Position page layouts and give users the ability to recall pending approval requests after they've submitted them. The Approval History related list is the same history related list that we included on the Approval page layout, so we'll also include it on the Position detail page. From this related list users can also click the Recall Approval Request button to withdraw their pending approval requests. If we didn't enable this last option, only administrators would have access to the Recall Approval Request button.
- Select Add Approval History Related List to All Position Page Layouts.
- Select Allow submitters to recall approval requests.
- Click Save.
Phew! We've finished defining the framework for our approval process, but we won't be able to activate it until we've given it some steps and some actions to fire when records are actually approved or rejected. Let's move on to those now.
- Select Yes, I'd like to create an approval step now.
- Click Go!