Force.com Platform Fundamentals
 j
jNewer Version Available
Introducing Compact Layouts
Now that we’ve seen how page layouts end up looking in Salesforce1, let’s talk about another way we can customize how our Salesforce data appears on a mobile device. Compact layouts are used to display a record’s key fields at a glance. Using compact layouts, we can indicate which fields should appear in a record’s highlights area. These layouts were designed with touchscreen mobile devices in mind, where space is limited and users need to find important information quickly.
We can customize which fields appear in the highlights by customizing that object’s compact layout. However, creating a custom compact layout isn’t required. If we don’t create one, Salesforce1 will use a read-only, predefined system default compact layout. For custom objects, this system default includes the record’s name. In the case of our Position object, the system default compact layout displays Position Title.
Try It Out: Create a Compact Layout
Let’s give our mobile users some more context in the highlights.
- In the full Salesforce site, from Setup, enter Objects in the Quick Find box, then select Objects.
- Click Position.
- In the Compact Layouts related list, click New.
- In Label, enter Position. Press TAB to automatically populate Name.
Now it’s time to select the fields we want to include in the compact layout. We can include up to ten fields, but only four of those will appear in the record highlights on a mobile device. Notice that the list of available fields doesn’t completely match the list of fields we created for the Position object. Only field types that are supported in compact layouts appear here. Compact layouts don’t support text areas, long text areas, rich text areas, and multi-select picklists.
It’s also important to know that if a user doesn’t have the field-level security for a field that’s included in a compact layout, the user will not see the field’s value in the compact layout. For example, if we included Min Pay in this compact layout, and a user without access to that field was viewing a position record on her mobile phone, the compact layout would display a blank value for Min Pay.
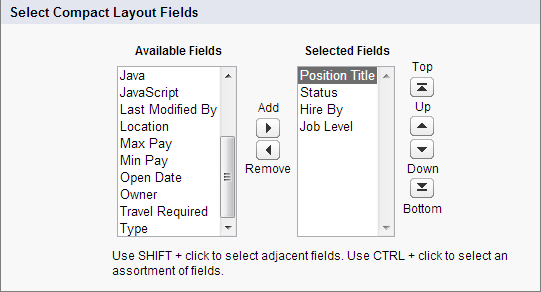
- Select these fields for the compact layout, then click the Add button. You can select and add them individually
or select them as a group using CTRL-click.
- Hire By
- Job Level
- Position Name
- Status
- Using the Up or Down buttons, adjust the list so that the fields are in this order: Position Title, Status, Hire By, Job Level.
- Click Save.
Try It Out: Assign the Primary Compact Layout
Before this compact layout will appear on our mobile device, we need to assign it to our users. Unlike with page layouts, where you can assign a different layout to each profile, one compact layout is applied to all users. Let’s assign this new compact layout so our users will see more than just the position’s title.
- Click Compact Layout Assignment.
- Click Edit Assignment.
- In the Primary Compact Layout drop-down list, select Position.
- Click Save.
Now let’s test it out on our mobile device. The changes we just made should be reflected immediately in Salesforce1.
- Launch Salesforce1, and log in if you haven’t already.
- From the navigation menu, tap .
- Tap a recent position to open it.
Beyond the Basics
If you have record types associated with an object, you can override the primary compact layout assignment and assign specific compact layouts to different record types. If you don’t set any record type overrides, all record types use the object’s primary compact layout by default.
To find out more about compact layouts and record types, see “Assign Compact Layouts to Record Types” in the Salesforce Help.
Look at What We’ve Done
As you can see, now the record highlights displays the fields we selected in our custom compact layout. Now, instead of just the position title, we also see its status, when it must be filled, and what kind of job it is.
Notice that Position Title is more dominant than the other three. This is the primary field. When designing your own compact layouts, be aware that the first field in the Selected Fields list is the primary field in the highlights.

Things are going to get even more interesting in the next chapter. We'll add a few more custom objects to track things like candidates, job applications, and reviews, and then we'll enhance our Recruiting app even further by defining how our objects relate to one another. Before you know it, we're going to have an incredibly powerful Web application, all implemented with a few clicks in the platform.