Force.com Platform Fundamentals
 j
jNewer Version Available
Try It Out: Create Approval Steps
- One or more designated approvers
- Optional filter criteria, so that only records that meet certain conditions will require approval at that step
- Optional step approval actions that execute regardless of the outcome of the whole approval process
- Optional step rejection actions that execute regardless of the outcome of the whole approval process
- Optional step recall actions that execute if the record is recalled
For our New Position approval process, we'll need to define two steps—one that requires approval from the record submitter's manager for all new position records, and one that requires additional approval from the CEO for position records with minimum salaries in excess of $150,000. Let's define the first step for all new position records now.
- From Setup, enter Approval Processes in the Quick Find box, then select Approval Processes.
- In the Inactive Approval Processes related list, click Approve New Position.
- In the Approval Steps related list, click New Approval Step.
In this first step, we want the approval request to go to the Position owner's manager:
- In the Name field, enter Manager Approval.
- In the Description field, enter Every new position record must be approved by the Position owner's manager.
- In the Step Number field, enter 1.
The Step Number field specifies the order in which multiple steps should be processed. By assigning this as Step 1, it will be the first to execute when the approval process is triggered.
- Click Next.
The Specify Step Criteria area allows us to define the criteria or create a formula that filters the records that require approval during this step. Because we've already filtered out position records that are owned by the CEO from the whole approval process, this step does not need any additional filtering.
- Click Next.
Finally, we have to select the assigned approver for this step, and specify whether his or her delegate is allowed to approve the request as well. Because this is the Manager Approval step, it clearly makes sense to accept the default option of Automatically assign using the custom field selected earlier. (Manager). However, because position records aren't particularly sensitive, it's okay for managers to assign delegated approvers. So managers who go on vacation, or who receive large quantities of approval requests, can share their work with another employee.
- Select The approver's delegate may also approve this request.
- Click Save.
Having completed our first approval step, we're faced with another choice: to create optional approval or rejection actions for this step, or to return to the approval process detail page. While we ultimately need to specify final approval and rejection actions that occur when the approval process ends one way or the other, there's nothing in particular that needs to happen after this first step that we can't specify elsewhere. Let's return to the detail page for our approval process and define our second approval step for positions with minimum salaries of more than $150,000.
- Select No, I'll do this later. Take me to the approval process detail page to review what I've just created.
- Click Go!.
- In the Approval Steps related list, click New Approval Step.
Once again we're back in the New Approval Step wizard, but this time it includes a summary of the previous step that we created. This helps us to remember where we are in our approval process.
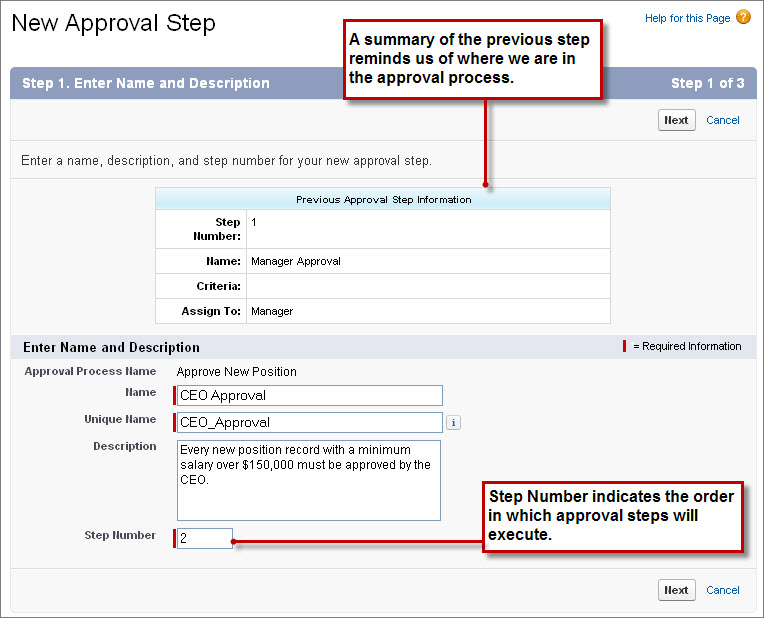
- In the Name field, enter CEO Approval.
- In the Description field, enter Every new position record with a minimum salary over $150,000 must be approved by the CEO.
- In the Step Number field, enter 2.
- Click Next.
For this approval step, we only want to send positions with a minimum salary over $150,000 to the CEO. Additionally, we want to exclude any records that the CEO has already approved (for example, because one of the CEO's direct reports created the record).
- Select the Enter this step if the following radio button, then choose criteria are met from the drop-down list.
- In the first row of filters, enter Position: Min Pay greater or equal 150000.
- In the second row of filters, enter Current User: Manager not equal to Cynthia Capobianco (the acting CEO in Universal Containers Role Hierarchy).
- Click Next.
Finally, we need to select the approver (the CEO), and specify what should happen if he or she rejects this request.
- Select the Automatically assign to approver(s) radio button.
- In the drop-down list below the radio button, select User, click the lookup icon (
 ), and choose the name of the CEO in your organization (Cynthia
Capobianco).
), and choose the name of the CEO in your organization (Cynthia
Capobianco).
We're keeping this approval process fairly simple, but if we wanted to, we could use the Add Row and Remove Row links to send the approval request to multiple approvers in this step. We could also select Related Users in the first drop-down list in the row to add an approver who is listed in fields on the submitted record. For example, since this is an approval process for Position records, we could add the position's hiring manager to the list of approvers.
- Below the Add Row and Remove Row links, select Approve or reject based on the FIRST response.
If this step was requesting approval from multiple users, the radio buttons below the Add Row and Remove Row links would determine whether the approval request needed unanimous approval, or if the record would be approved or rejected based on the first user to respond to the request.
- Select The approver's delegate may also approve this request.
The next section allows us to specify what to do with the record if it's rejected at this step. Because the position record is locked from editing during the approval process, it makes the most sense to perform the final rejection.
- Select Perform all rejection actions for this step AND all final rejection actions. (Final Rejection).
- Click Save.
Once again, we're faced with a choice to define approval or rejection actions for this particular step. Let's circumvent those, and return to the approval process detail page to define our initial submission, final approval, and final rejection actions for the whole process.
- Select No, I'll do this later. Take me to the approval process detail page to review what I've just created.
- Click Go!