Salesforce Security Guide
 j
jNewer Version Available
Create a Login Flow
| Available in: both Salesforce Classic and Lightning Experience |
| Available in: Enterprise, Performance, Unlimited, and Developer Editions |
| User Permissions Needed | |
|---|---|
| To open, edit, or create a flow in the Cloud Flow Designer: | “Manage Force.com Flow” |
When a user’s profile is associated with a login flow, the user is directed to the flow as part of the authentication process. The login flow screens are embedded in the standard Salesforce login page. During the authentication process, these users have restricted access to the login flow screens. At the end of a successful authentication and completion of the login flow, the user is redirected to the organization. Otherwise, an explicit action can be defined within the flow to deny access.
- Direct the user to log in with additional credentials, such as a time-based one-time password (TOTP).
- Force the user to log out.
- Direct the user to a page with more options.
You can also build login flows that direct users to customized pages, such as forms to gather more information, or pages providing users with additional information.
Build Your Own Login Flow
Use the following process to build your own login flow.
-
Create a new flow using the Flow Designer and Apex.
For example, you can design a custom IP-based two-factor authentication flow that requires a second factor of authentication only if the user is logging in from outside of the corporate Trusted IP Range. (To find or set the Trusted IP Range, from Setup, enter Network Access in the Quick Find box, then select Network Access.)The flow should contain the following.
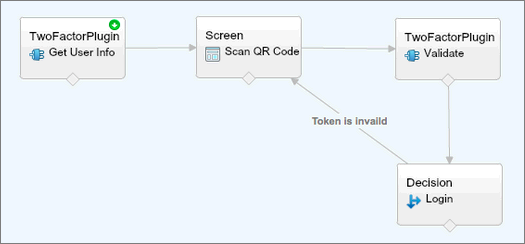
- A new Apex class defining an Apex plugin that implements from the (Process.Plugin) and uses the Auth.SessionManagement class to access the time-based one-time password (TOTP) methods and services. The new Apex class for the plugin generates a time-based key with a quick response (QR) code to validate the TOTP provided by the user against the TOTP generated by Salesforce.
- A screen element to scan a QR code.
- A decision element to handle when the token is valid and when the token is invalid.
Within the flow, you can set input variables. If you use the following specified names, these values will be populated for the flow when it starts.
Name Value Description LoginFlow_LoginType The user type, such as Chatter Community external user LoginFlow_IpAddress The user’s current IP address LoginFlow_LoginIpAddress The user’s IP address used during login, which can change after authentication LoginFlow_UserAgent The user agent string provided by the user’s browser LoginFlow_Platform The operating system for the user LoginFlow_Application Application used to request authentication LoginFlow_Community Current Community, if this login flow applies to a Community LoginFlow_SessionLevel The current session security level, Standard or High Assurance LoginFlow_UserId The user’s 18-character ID. During the flow, you can assign the following, pre-defined variables values for specific behavior.Name Value Description LoginFlow_FinishLocation A Text value. Provide a string that defines where the user goes after completing the login flow. The string should be a valid Salesforce URL (the user cannot leave the organization and stay in the flow) or relative path. LoginFlow_ForceLogout A Boolean value. Set this variable to true to log the user out, immediately, and force the user to exit the flow. - Save the flow.
- Activate the flow.
- Connect the login flow to a profile.