Force.com Platform Fundamentals
 j
jNewer Version Available
Try It Out: Build an Email Template
- From Setup, enter Email Templates in the Quick Find box, then select Email Templates.
Here you should see a list of all the email templates that have already been defined for your organization, including several sample templates from Salesforce.
- Click New Template.
We can choose to create a text, HTML, or custom email template. HTML and custom email templates are the same except that HTML templates allow you to specify a letterhead to give your email the same look and feel as other emails from the same source.
To keep things simple, we'll stick with a plain-text email for now.
- Select Text, and click Next.
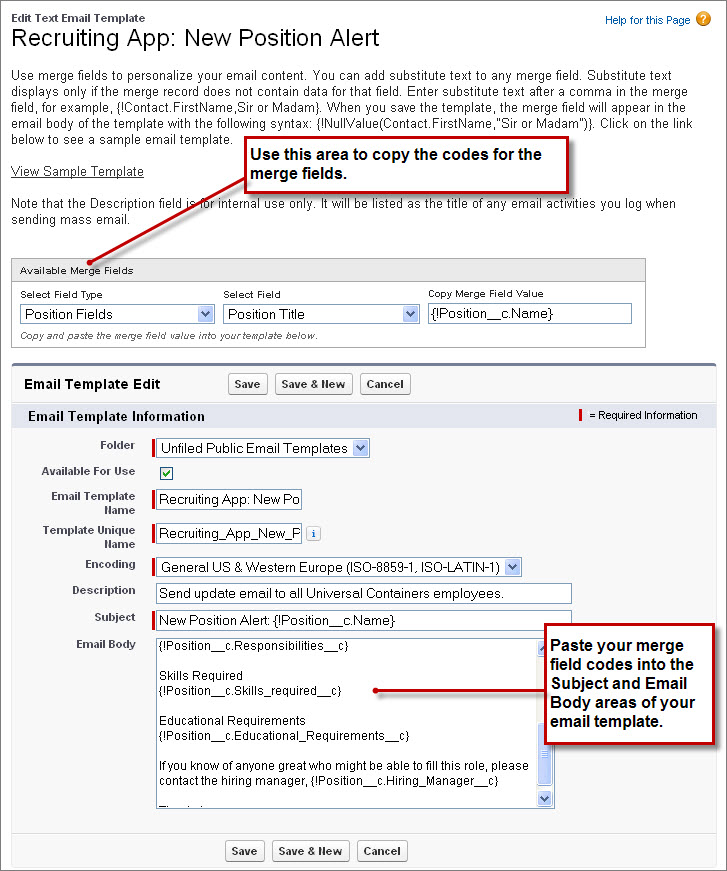
The New Template page lets us define the email template itself. The area near the top is where we'll generate the merge field codes for the fields in the email template below it, so let's skip past it for now and start with the Folder drop-down list.
- In the Folder drop-down list, choose Unfiled Public Email
Templates.
The Unfiled Public Email Templates folder is a standard, public folder available in every organization. By keeping the email template in a public folder, it'll be available to other users who have permission to view and edit email templates.
- Select Available For Use.
This option will make our email template available when we create our email alert action.
- For Email Template Name, enter Recruiting App: New Position Alert.
- For Encoding, accept the default of General US & Western Europe (ISO-8859-1, ISO-Latin-1).
- For Description, enter Send update email to all Universal
Containers employees.
Now we get to the heart of our email template—the email's subject and body text.
- For Subject, enter New Open Position Alert:.
We want to put the title of the new position in the subject of our email, so we'll need to use our first merge field here, just after the colon in our subject. To get the proper code, we'll have to go back to the merge field area near the top of the page.
- In the Select Field Type drop-down list, choose Position
Fields.
Although there are many objects to choose from in the Select Field Type drop-down list, because we're creating an email template for a workflow rule, we're limited to the fields for the object that will be associated with that workflow—in our case, Position. That's because the workflow rule that uses this email template won't know about any records other than the position record that triggered the workflow rule. If we put in fields from another object, they'd be left blank in our email.
Now let's grab the field we want.
- In the Select Field drop-down list, choose Position Title.
In the Copy Merge Field Value text box, a merge field code appears for Position Title. We can copy and paste it to the end of our subject line so the subject now looks like: New Open Position Alert: {!Position__c.Name}. When an email is generated from this template, {!Position__c.Name} will be replaced with the relevant position title.
Easy, right? Now let's finish the remainder of our email.
- In the email body, enter the following
text.
1There's a new position open at Universal Containers! 2 3Title: {!Position__c.Name} 4Functional Area: {!Position__c.Functional_Area__c} 5Location: {!Position__c.Location__c} 6 7Job Description 8{!Position__c.Job_Description__c} 9 10Responsibilities 11{!Position__c.Responsibilities__c} 12 13Skills Required 14{!Position__c.Skills_Required__c} 15 16Educational Requirements 17{!Position__c.Educational_Requirements__c} 18 19If you know of anyone great who might be able to fill this role, please contact the hiring manager, {!Position__c.Hiring_Manager__c}. 20 21Thanks! - Click Save.
That's it for our email template. Now that it's done, we just need to create the email alert that uses our new email template.
- From Setup, enter Email Alerts in the Quick Find box, then select Email Alerts.
- Click New Email Alert.
- For Description, enter Email New Position Alert. Press TAB to automatically fill in the unique name.
- For Object, select Position. This associates the email alert with the position object.
- Next to the Email Template field, click the lookup icon (
 ), and select
Recruiting App: New Position Alert.
), and select
Recruiting App: New Position Alert. - In the Recipient Type Search field, choose Role and Subordinates.
- In the Available Recipients list, select Role and Subordinates: CEO and click Add.
- Skip the remaining fields and click Save.
Nice job! Now we’re ready to create a new process with an email alert action.