Salesforce1 Mobile App Developer Guide
 j
jTry It Out: Create a Compact Layout
As with page layouts, there are separate compact layouts for each object. By default, each object derives its record highlight fields, preview cards, and action-related feed items from the predefined set of fields in the object’s read-only, system default compact layout. You can create custom compact layouts on an object-by-object basis. After you create one or more custom compact layouts, you set one as the primary compact layout for the object. The primary compact layout is then used as the new default for that object.
We’ll create a custom compact layout, and then set it as the primary compact layout for the Merchandise object. Our new compact layout is used to render important merchandise record fields first in Salesforce1 for the Acme Wireless mobile technicians.
- From the Force.com app menu, select Warehouse.
- Click the Merchandise tab.
- Click New.
- For Merchandise Name, enter iPhone 6.
- For Price, enter 599.
- For Quantity, enter 10.
- Click the Warehouse lookup, then select Oaklandia.
- Set the Condition to Refurbished.
- Click Save.
Currently, the Merchandise object uses its system default compact layout, which only has the Merchandise Name field assigned. Here’s what our iPhone 6 record looks like in Salesforce1:
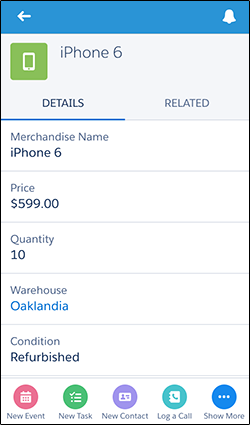
Let’s add more fields alongside that “iPhone6” so our mobile users can see more pertinent information right at the top of the Merchandise record pages.
- Navigate to the Merchandise custom object in Setup. From the Compact Layouts related list, click New.
- In the Label field, enter Customized Compact Layout.
-
Select these fields for the compact layout, and then click
Add.
When on site, these are the most important fields for our mobile technicians to see. You can select and add them individually or select them as a group using CTRL-click.
- Condition
- Merchandise Name
- Price
- Quantity
- Using the Up or Down buttons, adjust the list so that the fields are in this order: Merchandise Name, Quantity, Condition, Price.
-
Click Save.
Now we need to set our compact layout as the primary.
-
Click Compact Layout Assignment.
You can see that the primary compact layout is set to the System Default here. We need to change that.
- Click Edit Assignment.
- Select the compact layout you just created to use as the primary compact layout.
- Click Save.
We’ve customized a compact layout for the Merchandise object. Now let’s see what its related information page looks like in Salesforce1.