Lightning Communities Developer Guide
 j
jNewer Version Available
Create a CMS Connection
Read Before Using CMS Connect to make sure you’re ready to connect to your CMS.
- Go to Community Workspaces.
- Click CMS Connect.
- Click New CMS Connection (if no connections have been created yet in your community) or New.
- For Name, enter a friendly name for the connection. The name shows up in your CMS workspace and other internal areas. (An API name is created for the connection behind the scenes, based on the name you enter.)
- Select your CMS source: AEM, Drupal, SDL, Sitecore, Wordpress, or Other.
- For your server URL, enter the full path to your CMS server, such as: https://www.example.com.
- For Root Path, enter the path to the directory that your CMS content is in. You can include
placeholders for language and component. For example, a root path to content in AEM might
look like this:
content/mywebsite/{language}/{component}
- If your CMS source is AEM and your HTML content is set up with personalization, you can use that personalized content in your community. To do that, enable Use Personalization. See Personalize Your CMS Content for details on setting up personalization.
- To include CSS, click Add CSS to add one or more URLs to your CSS files. If your CSS is scoped, you can specify it in the Scope field. Stylesheets load in the order listed. Use the up and down arrows to change the order.
- To include JavaScript, click Add Script to add one or more URLs to your JavaScript files. Scripts load in the order listed. Use the up and down arrows to change the order.
- To connect JSON content such as blogs, click Add JSON and enter a name, type, and path for each JSON component you want to add. See Set Up JSON in Your CMS Connection (Beta) for details.
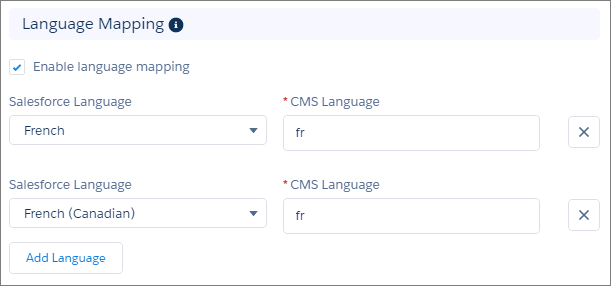
- If your content has multiple languages, select Enable language
mapping. See Set Up Language Mapping in Your CMS Connection for more information on
setting up language mapping.
In the Salesforce Language dropdown, English is selected by default. To map English, for CMS Language, enter the directory name of your English language folder from AEM. For example, enter en.
To add more languages, click Add Language. For each language that you add from your CMS, make sure it’s enabled in your Builder Settings.
If you want to map languages from your community that you don’t have in your CMS, you can define what language the CMS content should display in. For example, if your community has French and French Canadian enabled, you can set it up like this, so the French Canadian community displays French content:
- Click Save.