ISVforce Guide
 j
jNewer Version Available
Create a Connected App
| Available in: both Salesforce Classic and Lightning Experience |
| Connected Apps can be created in: Group,
Professional, Enterprise, Performance, Unlimited, and
Developer Editions Connected Apps can be installed in: All Editions |
| User Permissions Needed | |
|---|---|
| To read, create, update, or delete connected apps: | Customize Application AND either Modify All Data OR Manage Connected Apps |
| To update all fields except Profiles, Permission Sets, and Service Provider SAML Attributes: | Customize Application AND either Modify All Data OR Manage Connected Apps |
| To update Profiles, Permission Sets, and Service Provider SAML Attributes: | Customize Application AND Modify All Data |
| To install and uninstall connected apps: | Customize Application AND either Modify All Data OR Manage Connected Apps |
| To install and uninstall packaged connected apps: | Customize Application AND either Modify All Data OR Manage Connected Apps AND Download AppExchange Packages |
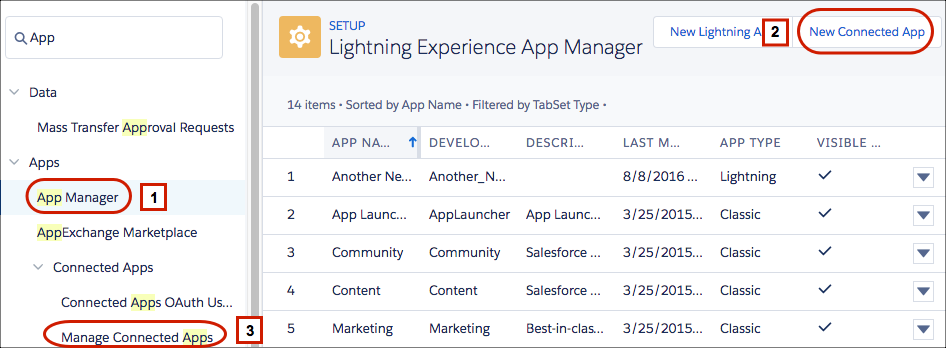
- In Lightning Experience, you use the App Manager to create connected apps. From Setup, enter App in the Quick Find box, then select App Manager (1). Click New Connected App (2).
- In Salesforce Classic, from Setup, enter Apps in the Quick Find box, then select Apps (under ). Under Connected Apps, click New.
You can create a connected app without specifying authorization, canvas, or mobile settings. This kind of connected app behaves like a “bookmark” to the specified URL that appears in the user’s App Launcher and the dropdown app menu. Enter basic information and provide a start URL in the Web App Settings. If the destination requires authentication, the service hosting the destination URL prompts users to provide login credentials when they navigate to it.
- Consumer Key: A value used by the consumer to identify itself to Salesforce. Referred to as client_id in OAuth 2.0.
- Consumer Secret: A secret used by the consumer to establish ownership of the consumer key. Referred to as client_secret in OAuth 2.0.
Basic Information
- Enter the connected app’s name. This name is displayed in the App Manager and on its App Launcher tile.
- Enter the API name used when referring to your app from a program. It defaults to a version of the name without spaces. Only letters, numbers, and underscores are allowed, so if the original app name contains any other characters, edit the default name.
- Enter the contact email for Salesforce to use when contacting you or your support team. This address isn’t given to Salesforce admins who install the app.
- Enter the contact phone for Salesforce to use in case we want contact you. This number isn’t given to Salesforce admins who install the app.
- Enter a logo image URL to display your logo on the App Launcher tile. It
also appears on the consent page that users see when authenticating. The URL
must use HTTPS. Use a GIF, JPG, or PNG file and a file size that’s
preferably under 20 KB, but at most 100 KB. We resize the image to 128
pixels by 128 pixels, so be sure that you like how it looks. If you don’t
supply a logo, Salesforce generates one for you using the app’s initials.
- You can upload your own logo image by clicking Upload logo image. Select an image from your local file system that meets the size requirements for the logo. When your upload is successful, the URL to the logo appears in the Logo Image URL field. Otherwise, make sure that the logo meets the size requirements.
- You can also select a logo from the Salesforce samples by clicking Choose one of our sample logos. The logos include ones for Salesforce apps, third-party apps, and standards bodies. Click the logo you want, and then copy and paste the URL into the Logo Image URL field.
- You can use a logo hosted publicly on Salesforce servers by uploading an image as a document from the Documents tab. View the image to get the URL, and then enter the URL into the Logo Image URL field.
- If you have a web page with more information about your app, provide an info URL.
- Enter a description up to 256 characters to display on the connected app’s App Launcher tile. If you don’t supply a description, just the name appears on the tile.
API (Enable OAuth Settings)
- If you’re setting up OAuth for applications on devices with limited input or display capabilities, such as TVs, appliances, or command-line applications, select Enable for Device Flow.
- Enter the callback URL (endpoint) that Salesforce calls back to your
application during OAuth. It’s the OAuth redirect URI.
Depending on which OAuth flow you use, the URL is typically the one that a user’s browser is redirected to after successful authentication. Because this URL is used for some OAuth flows to pass an access token, the URL must use secure HTTPS or a custom URI scheme. If you enter multiple callback URLs, at run time Salesforce matches the callback URL value specified by the app with one of the values in Callback URL. It must match one of the values to pass validation. Separate multiple callback URLs with line breaks.
The callback URL field has a limit of 2000 characters, cumulatively. If you enter several URLs and they exceed this limit, create another connected app to manage more callback URLs.
- If you’re using the JWT OAuth flow, select Use Digital Signatures. If the app uses a certificate, click Choose File and browse your system for the certificate.
- Under Selected OAuth Scopes, add all supported OAuth scopes to. These scopes
refer to permissions the user gives to the connected app while it’s running.
The OAuth token name is in parentheses.
- Access and manage your Chatter feed (chatter_api)
- Allows access to Chatter REST API resources only.
- Access and manage your data (api)
- Allows access to the logged-in user’s account using APIs, such as REST API and Bulk API. This value also includes chatter api, which allows access to Chatter REST API resources.
- Access your basic information (id, profile, email, address, phone)
- Allows access to the Identity URL service.
- Access custom permissions (custom_permissions)
- Allows access to the custom permissions in an org associated with the connected app. It shows whether the current user has each permission enabled.
- Allow access to your unique identifier (openid)
- Allows access to the logged-in user’s unique identifier for OpenID Connect apps.
- Full access (full)
- Allows access to the logged-in user’s data, and encompasses all other scopes. Full doesn’t return a refresh token. You must explicitly request the refresh_token scope to get one.
- Perform requests on your behalf at any time (refresh_token, offline_access)
- Allows a refresh token to be returned if the app is eligible to receive one. This scope lets the app interact with the user’s data while the user is offline. The refresh_token scope is synonymous with offline_access.
- Provide access to custom applications (visualforce)
- Allows access to Visualforce pages.
- Provide access to your data via the Web (web)
- Allows use of the access_token on the web. It includes Visualforce, which allows access to Visualforce pages.
- If you’re setting up OAuth for a client app that can’t keep the client secret confidential and must use the web server flow because it can’t use the user-agent flow, deselect Require Secret for Web Server Flow. We still generate a client secret for your app but this setting instructs the web server flow to not require the client_secret parameter in the access token request. If your app can use the user-agent flow, we recommend user-agent as a more secure option than web server flow without the secret.
- To control how the OAuth request handles the ID token, select
Include the ID token. If the OAuth request
includes the Allow access to your unique identifier
(openid) scope, the returned token can include the ID token.
- The ID token is always included in access token responses.
- With the primary ID token setting enabled, configure the secondary
settings that control the ID token contents in both access and
refresh token responses. Select at least one of these settings.
- Include Standard Claims
- Include the standard claims that contain information about the user, such as the user’s name, profile, phone_number, and address. The OpenID Connect specifications define a set of standard claims to be returned in the ID token.
- Include Custom Attributes
- If your app has specified custom attributes, include them in the ID token.
- Include Custom Permissions
- If your app has specified custom permissions, include them in the ID token.
- To allow users to be automatically logged out of the connected app service provider when they log out of Salesforce as an identity provider, select Enable Single Logout.
- If you selected Enable Single Logout, enter a single logout URL, which is where Salesforce sends logout requests when users log out of Salesforce. The single logout URL must be an absolute URL starting with https://.
- To configure asset token settings if you’re setting up your app to issue
asset tokens for connected devices, select Enable Asset
Tokens.
- Specify these settings.
- Token Valid for
- The length of time that the asset token is valid after it’s issued.
- Asset Signing Certificate
- The self-signed certificate that you’ve already created for signing asset tokens.
- Asset Audiences
- The intended consumers of the asset token. For example, the backend service for your connected device, such as https://your_device_backend.com.
- Include Custom Attributes
- If your app has specified custom attributes, include them in the asset token.
- Include Custom Permissions
- If your app has specified custom permissions, include them in the asset token.
- Specify the callback URL (endpoint). For example, https://your_device_backend.com/callback.
- Make sure that you select these OAuth scopes, which are required for
asset tokens.
- Access and manage your data (api)
- Allow access to your unique identifier (openid)
- Specify these settings.
If your org had the No user approval required for users in this organization option selected on your remote access before the Spring ’12 release, users in the org where the app was created are approved for the app. This option is selected to indicate the approval.
For connected apps, after you’ve created an app, we recommend that admins install the app, and then set Permitted Users to Admin-approved users. If the remote access option wasn’t originally selected, the option doesn’t show up.
Web App Settings
This section controls your app’s web settings.
- If you want to direct users to a specific location after they’ve authenticated, enter your app’s start URL. If you don’t enter a start URL, users are sent to the app’s default start page after authentication completes. If the connected app that you’re creating is a canvas app, skip this field. The Canvas App URL field contains the URL that gets called for the connected app.
- If your connected app uses a SAML service provider, select Enable SAML. Enter the entity ID, ACS URL, subject type, name ID format, and issuer, available from your service provider.
- To allow users to be logged out of the connected app service provider when they
log out of Salesforce as an identity provider, select Enable Single
Logout.

- If you selected Enable Single Logout, enter a single logout URL, which is the endpoint where Salesforce sends logout requests when users log out of Salesforce. The single logout URL must be an absolute URL starting with https://.
- Provide your SP with the Salesforce IdP SLO endpoint. The endpoint is listed in
your SAML Login Information as the Single Logout Endpoint. It’s also listed in
the SAML Metadata file as the Discovery Endpoint. The format for the endpoint is
https://<domain>.my.salesforce.com/services/auth/idp/saml2/logout,
where <domain> is your org’s My Domain name.

- Select the HTTP binding type for single logout. Your SP provides this information.
- Under SAML Service Provider Settings, select Enable Single Logout.
- If the service provider gave you a security certificate, select Verify Request Signatures. Browse your system for the certificate and upload it. The certificate is only necessary if you plan to initiate logging in to Salesforce from the service provider and the service provider signs its SAML requests.
- Optionally, select Encrypt SAML Response to browse your system for the certificate and upload it. Select an encryption method for encrypting the assertion. Valid encryption algorithm values are AES–128 (128–bit key), AES–256 (256–bit key), and Triple-DES (Triple Data Encryption Algorithm).
Custom Connected App Handler
Write a custom connected app handler in Apex to customize the behavior of the connected app. Create a class that extends the ConnectedAppPlugin Apex class, and associate it with the connected app. The class can support new authentication protocols or respond to user attributes in a way that benefits a business process.
- For Apex Plugin Class, enter the name of the Apex class you created to customize the behavior of the connected app.
- For Run As, select the name of the user to run the plugin as.
The plug-in runs on behalf of a user account. If the user isn’t authorized for the connected app, use the authorize method to do so. For more information, see the ConnectedAppPlugin class in the Apex Code Developer's Guide.
Mobile App Settings
Enter your mobile app settings in this section.
- Enter the mobile start URL to direct users to a specific location when the app is accessed from a mobile device. If you don’t enter a mobile start URL, users are sent to the start URL defined under Web App Settings. If the connected app you’re creating is a canvas app, you can skip this field. The Canvas App URL field contains the URL that gets called for the connected app.
- Select PIN Protect if your app supports PIN protection. This setting allows the admin to set the session timeout and PIN length for mobile applications after installing the connected app. PIN protection is supported by the Salesforce Mobile SDK (https://developer.salesforce.com/page/Mobile_SDK). You can also implement it manually by reading the mobile_policy object from the user’s Identity URL.
- For App Platform, specify the app platform.
- For Restrict to Device Type, specify the supported device form factors for the mobile app. If the app supports all form factors, don’t choose a value.
- For App Version, enter the version number of the mobile app.
- For Minimum OS version, enter the version required for the app.
- Select Private App to confirm that this app is for internal (non-public) distribution only. This setting is required because Apple doesn’t allow distribution of public mobile apps outside its App Store.
- If the mobile app is private, specify the location of the Mobile App Binary file. The format of the file is IPA for iOS, and APK for Android.
-
For iOS apps only:
- Specify the location of the Application Icon that is displayed while the app is being downloaded and installed on an iOS device.
- Specify the iOS Bundle Identifier.
- If the mobile connected app is a public app and you haven’t uploaded its binary file to Salesforce, enter the app binary URL.
- Your app is built with Salesforce Mobile SDK.
- Your app implements the Mobile SDK push notification protocol for your platform.
- You’re a registered developer with the mobile platform provider (Apple or Google).
- Your app is registered with Apple Push Notification Service (APNS) for iOS push notifications or with Google Cloud Messaging (GCM) for Android push notifications.
- You’ve implemented Apex handlers for push notifications.
- Select Push Messaging Enabled.
- For Supported Push Platform, select Apple.
- Select the Apple environment that is valid for your APNS push notifications certificate.
- For Certificate, select the .p12 certificate file that you received from APNS when you registered your app for push notifications (for example, appkey.p12).
- Enter the password for your .p12 certificate file.
- Select Push Messaging Enabled.
- For Supported Push Platform, select Android GCM.
- For Key for Server Applications (API Key), enter the key that you obtained during developer registration with Google.
- Deselect Push Messaging Enabled.
- Save the connected app, and then click Edit.
- Change App Platform and associated values in Mobile Settings to reflect the new platform.
- Reconfigure push notifications for the new platform.
Canvas App Settings
- Canvas apps that the org’s Salesforce admin installed.
- Canvas personal apps that users installed across orgs. Users access a canvas personal app from the Chatter tab, and are prompted to allow the app to connect to their Salesforce data. Users can choose to make an app a canvas personal app. For more information, see “Canvas Personal Apps” in the Force.com Canvas Developer’s Guide.
- If your connected app is exposed as a canvas app, select Force.com Canvas.
- Enter the canvas app URL to the third-party app. The user is directed to this URL when clicking the link to your canvas app.
- Select an access method. This method specifies how the canvas app initiates
the OAuth authentication flow.
- Signed Request (POST)—OAuth authentication is used, but when
Salesforce admins install the canvas app, they implicitly allow
access for users. Users aren’t prompted to allow apps to access
their user information. When you use this access method,
authentication is posted directly to the canvas app URL.
If your canvas app uses signed request authentication, don’t select Perform requests on your behalf at any time for the Selected OAuth Scopes.
- OAuth Webflow (GET)—OAuth authentication is used, and the user is prompted to allow apps to access their information. When you use this access method, the canvas app must initiate the OAuth authentication flow.
- Signed Request (POST)—OAuth authentication is used, but when
Salesforce admins install the canvas app, they implicitly allow
access for users. Users aren’t prompted to allow apps to access
their user information. When you use this access method,
authentication is posted directly to the canvas app URL.
- If you’re using SAML single sign-on (SSO) for canvas app
authentication, select the SAML Initiation Method
field. This field is enabled if you select Enable
SAML in the Web App Settings section. The options for this
field include the following.
- Identity Provider Initiated—Salesforce makes the initial request to start the SSO flow.
- Service Provider Initiated—Canvas app starts the SSO flow after the app is invoked.
- Under Locations, select where the canvas app appears to users.
- Chatter Feed—Canvas app appears in the feed. If selected, create a CanvasPost feed item and ensure that the current user has access to the canvas app.
- Chatter Tab—Canvas app appears in the app navigation list on the Chatter tab. If selected, the canvas app appears automatically.
- Console—Canvas app appears in the footer or sidebars of the Salesforce console. If selected, you must choose where the canvas app appears in a console by adding it as a custom console component.
- Layouts and Mobile Cards—Canvas app can appear on a page layout or a mobile card. If selected, choose where the canvas app appears by adding it to the page layout.
- Mobile Nav—Canvas app is accessible from the navigation menu in the Salesforce app.
- Open CTI—Canvas app appears in the call control tool. If selected, specify the canvas app in your call center’s definition file for it to appear.
- Publisher—Canvas app appears in the publisher. If selected, create a canvas custom quick action and add it to the global layout or to an object layout.
- Visualforce Page—Canvas app can appear on a Visualforce page. If you add an <apex:canvasApp> component to expose a canvas app on a Visualforce page, be sure to select this location for the canvas app. If you don’t, you receive an error.
- Select Create Actions Automatically to create a global action for your canvas app. To do so, select Publisher under Location. If you don’t, no global actions are created. You can also create the action later.
- If you implement your own Canvas.CanvasLifecycleHandler Apex class, provide the class name in Lifecycle Class. Providing a Canvas.CanvasLifecycleHandler Apex class lets you customize context information and add custom behavior to your canvas app.
- To let users install your app, select Enable as a Canvas Personal App. Chatter Tab is the only location that supports canvas personal apps. For details, see “Canvas Personal Apps” in the Force.com Canvas Developer’s Guide.