Lightning Platform Fundamentals
 j
jNewer Version Available
Try It Out: Define a “Days Open” Custom Formula Field
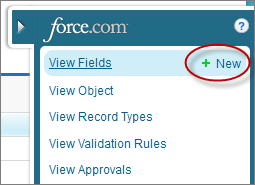
- From the Positions tab, click
 to open the quick access menu (if it isn't
open already).
to open the quick access menu (if it isn't
open already). - Hover over View Fields and click New.
- Select the Formula data type, and click Next.
Step 2 of the New Custom Field wizard appears.
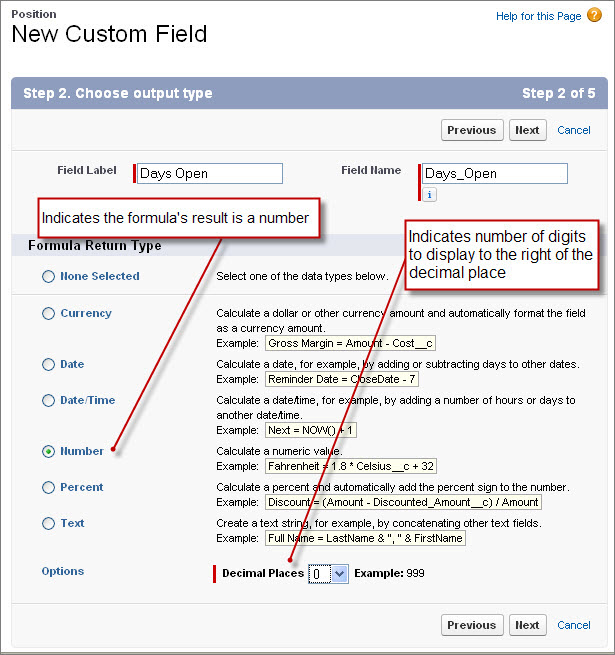
- In the Field Label field, enter Days Open. Field Name is populated automatically.
- Select the Number formula return type.
In this case, even though we're subtracting Date fields, we want to end up with just a regular numeric value.
- Change the Decimal Places value to 0, and click Next.
Now it's time to enter the details of our formula.
- Click the Advanced Formula tab, as shown in the following screenshot.
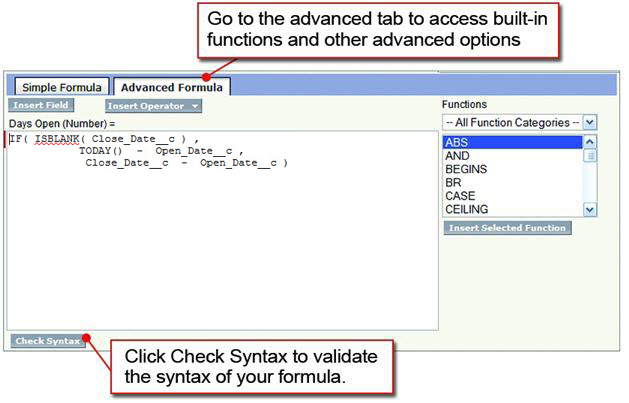
We want to use the Advanced Formula tab so we can access the platform's built-in functions through the Functions list on the right side.
- From the Functions list, double-click IF.
Our formula now looks like this:
Let's go ahead and define the logical test:
- Delete logical_test from the formula, but leave your cursor there.
- From the Functions list, double-click ISBLANK.
- Delete expression from the ISBLANK function you just inserted, but leave your cursor there.
- Click the Insert Field button. Two columns appear in an overlay.
- In the left column, select Position.
- In the right column, select Close Date.
- Click Insert.
Did you notice that you didn't have to remember to use the API name of the Close Date field? The platform remembered for you when it inserted the value. Our formula now looks like this:
Now, let's specify the value if our logical test evaluates to true:
- Delete value_if_true from the formula, but leave your cursor there.
- Press ENTER on your keyboard, and space over 10 spaces.
Adding the carriage return and spaces makes our formula more legible for others.
- From the Functions list, double-click TODAY.
- Click the Insert Operator button and choose Subtract.
- Click the Insert Field button.
- In the left column, select Position.
- In the right column, select Open Date.
- Click Insert.
We're getting closer—our formula now looks like this:
Finally, let's specify the value if our logical test evaluates to false:
- Delete value_if_false from the formula, but leave your cursor there.
- Press ENTER on your keyboard, and space over 10 spaces.
- Click the Insert Field button.
- In the left column, select Position.
- In the right column, select Close Date and click Insert.
- Click Insert Operator and choose Subtract.
- Click the Insert Field button.
- In the left column, select Position.
- In the right column, select Open Date and click Insert.
Our formula now matches our original:
Now that we've gone through those steps of the procedure, note that we could have just typed in the formula that we figured out in the last section. However, using the formula editor is a lot easier because you don't have to remember function syntax or API names of fields and objects. Let's keep going and finish up this field:
- Click Check Syntax to check your formula for errors.
- Select Treat blank fields as blanks, and click Next.
- Accept all remaining field-level security and page layout defaults.
- Click Save.
- On the Positions Fields page, scroll down to the Positions Custom Fields & Relationships section.
- Click Edit next to the new Days Open field.
- In the Description text box, enter The number of days a position has been (or was) open.
- Add an optional Help Text description if you wish.
- Click Save.