Lightning Communities Developer Guide
 j
jNewer Version Available
Personalize Your CMS Content
Some upfront effort is required to get personalization working in your community. You need to create and install a connector JSP page and expose it through an HTML page in AEM. The connector page contains the JSP with your website's personalization mapping logic. We provide the code for it in CMS Connector Page Code. You might need to add some code, depending on how you want to run scripts. Then provide the path to this connector page in AEM when you’re setting up the CMS connection in your community. In your CMS connection, you can also add a path to your JavaScript file if you want to run scripts dynamically inside the JSP file.
Ready to get started? Let’s dig in. (Take a power nap first, if you need to.)
Set Up Personalization and the Connector Page in AEM
- If you haven’t done so already, set up personalization using Client Context in AEM.
- Create personalization rules based on your segments and what you want them each to see. Create an experience for each segment.
- Determine which personalized content you want to host in your community. Each component in AEM has a default URL. Make a list of these URLs, along with the components they’re for. You’ll need these when you set up your CMS connection.
- Use the CMS connector page code to create a connector JSP page and expose it through an HTML page in AEM.
Enable Personalization in Your CMS Connection
-
Create a CMS connection (or edit an
existing one) where you want to host your personalized content.
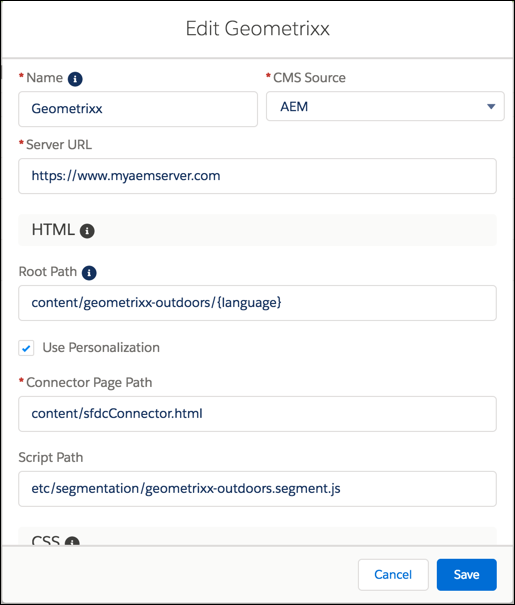
- Enable Use Personalization.
- In Connector Page Path, enter the path to the connector JSP page you installed in AEM.
- If you want your personalized content to run scripts dynamically, enter the path to your JavaScript file in Script Path.
- Click Save.
Enable Personalization in Your Page Components
- Navigate to Community Builder.
- To personalize a header or footer, click
 and select Settings. Select CMS
Connect. (Skip this and the next step if you don’t want to use a personalized
header or footer.)
and select Settings. Select CMS
Connect. (Skip this and the next step if you don’t want to use a personalized
header or footer.)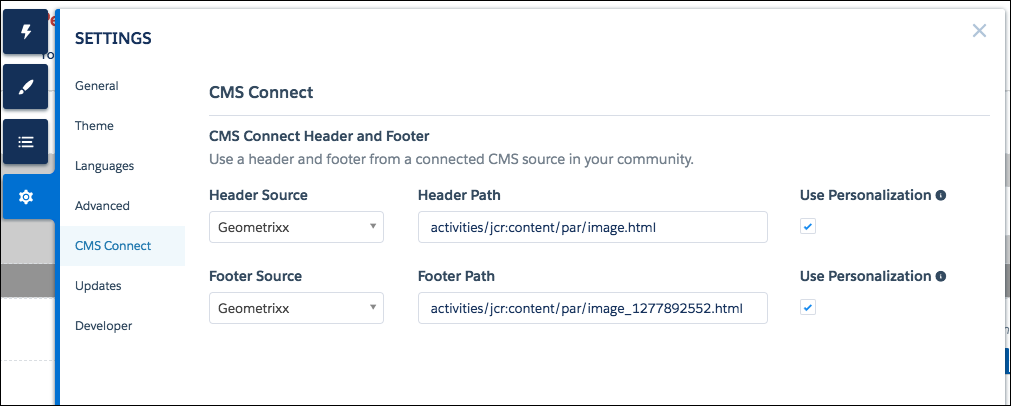
- In Header Source and Footer Source, choose the name of the connection that contains the personalized content. In Header Path and Footer Path, enter the Default Experience URL from AEM for the header and footer components. Append .html to default URLs copied from AEM. Enable Use Personalization for the header and footer.
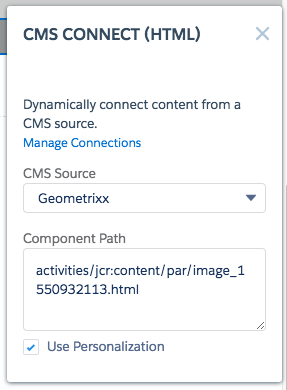
- To personalize content on a community page, drag a CMS Connect (HTML) component to your page
(or edit an existing one). In the component’s property editor, choose the connection name in
CMS Source. In Component Path, paste the Default
Experience URL for the component from AEM. Append .html
to the component path since it’s not included in the path in AEM.
- Voilà! Repeat these steps for any additional components you want to personalize.