Visualforce Developer Guide
 j
jNewer Version Available
Creating a Wizard
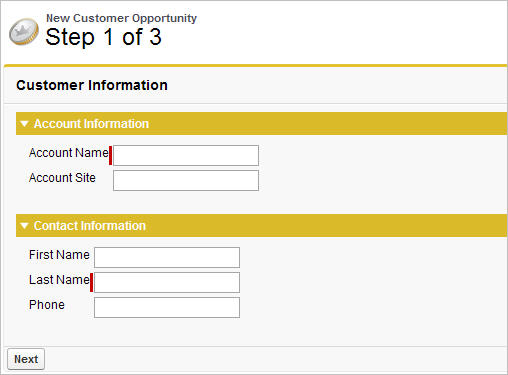
- The first step captures information related to the account and contact
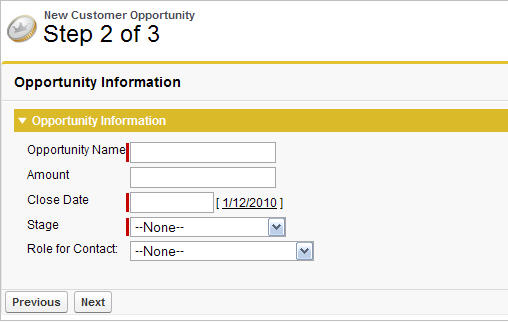
- The second step captures information related to the opportunity
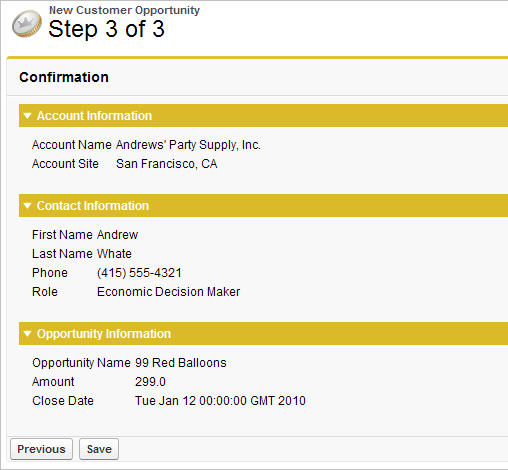
- The final step shows which records will be created and allows the user to save or cancel
The code for each of these components is included in the sections below, but first you need to understand the best procedure for creating them because each of the three pages references the controller, and the controller references each of the three pages. In what appears to be a conundrum, you cannot create the controller without the pages, but the pages have to exist to refer to them in the controller.
- Navigate to the URL for the first page, https://Salesforce_instance/apex/opptyStep1, and click Create Page opptyStep1.
- Repeat the step above for the other pages in the wizard, opptyStep2 and opptyStep3.
- Create the newOpportunityController controller by adding it as an attribute to the <apex:page> tag on one of your pages (for example, <apex:page controller="newOpportunityController">, and clicking Create Apex controller newOpportunityController. Paste in all of the controller code and click Save.
- Now return to the editors for the three pages that you created and copy in their code. The wizard should now work as expected.
The Opportunity Wizard Controller
The following Apex class is the controller for all three pages in the New Customer Opportunity wizard:
Step One of the Opportunity Wizard
The following code defines the first page of the wizard (opptyStep1) in which data about the associated contact and account is gathered from the user:
- The <apex:pageBlock> tag can take an optional <apex:pageBlockButtons> child element that controls the buttons that appear in the header and footer of the component. The order in which the <apex:pageBlockButtons> tag appears in the <apex:pageBlock> body does not matter. In this page of the wizard, the <apex:pageBlockButtons> tag includes the Next button that appears in the footer of the page block area.
- The wizard relies on JavaScript code to display a dialog box asking if a user wants to navigate away when clicking the Cancel button. Although the example includes the JavaScript directly in the markup for simplicity, it is a better practice to put JavaScript code in a static resource and reference that resource instead.
- In this page of the wizard, the Next button calls the step2 method in the controller, which returns a
PageReference to the next step of the wizard:
Command buttons must appear in a form, because the form component itself is responsible for refreshing the page display based on the new PageReference.
- An <apex:pageBlockSection> tag organizes a
set of data for display. Similar to a table, an <apex:pageBlockSection> consists of one or more columns, each of which
spans two cells—one for a field's label, and one for its value. Each component
found in the body of an <apex:pageBlockSection> tag is placed into the next cell in a row until
the number of columns is reached. At that point, the next component wraps to the next
row and is placed in the first cell.
Some components, including <apex:inputField>, automatically span both cells of a page block section column at once, filling in both a field's label and value. For example, in the Contact Information area of this page, the First Name field is in the first column, the Last Name field is in the second column, and the Phone field wraps to the first column of the next row:
- The value attribute on the first <apex:inputField> tag in the preceding code excerpt assigns the user's input to the firstName field of the contact record that's returned by the getContact method in the controller.
Step Two of the Opportunity Wizard
The following code defines the second page of the wizard (opptyStep2) in which data about the opportunity is gathered from the user:
Notice that although the markup for placing the Close Date, Stage, and Role for Contact fields on the form is the same as the other fields, the <apex:inputField> tag examines the data type of each field to determine how to display it. For example, clicking in the Close Date text box brings up a calendar from which users can select the date.
Step Three of the Opportunity Wizard
The last block of code defines the third page of the wizard (opptyStep3) in which all inputted data is displayed. The user can decide to save the operation or return to the previous step:
Notice that the third page of the wizard simply writes text to the page with <apex:outputField> tags.