Lightning Communities Developer Guide
 j
jNewer Version Available
Step 5: Build a Custom Search Component
1. Implement the forceCommunity:searchInterface Interface
1<aura:component implements="forceCommunity:searchInterface">
2<div class="slds-form-element slds-lookup" data-select="single">
3    <div class="slds-form-element__control">
4        <div class="slds-input-has-icon slds-input-has-icon--right">
5            <lightning:buttonIcon iconName="utility:search" variant="bare" onclick="{! c.handleClick }" alternativeText="Search" class="slds-input__icon" />
6            <input type="search" class="slds-lookup__search-input slds-input" placeholder="Search" />
7        </div>
8    </div>
9</div>
10</aura:component>1<aura:attribute name="searchText" type="String" default=""/>
2...
3<ui:inputText value="{!v.searchText}" class="slds-lookup__search-input slds-input" placeholder="Search" />2. Create an Apex Controller
1public class CustomSearchController {
2    @AuraEnabled
3    public static List<String> searchForIds(String searchText) {
4      return new List<String>{searchText};
5    }
6}1<aura:component implements="forceCommunity:searchInterface" controller="CustomSearchController">
2 <aura:attribute name="searchText" type="String" default=""/>
3 <div class="slds-form-element slds-lookup" data-select="single">
4 <div class="slds-form-element__control">
5 <div class="slds-input-has-icon slds-input-has-icon--right">
6 <lightning:buttonIcon iconName="utility:search" variant="bare" onclick="{! c.handleClick }" alternativeText="Search" class="slds-input__icon" />
7 <ui:inputText value="{!v.searchText}" class="slds-lookup__search-input slds-input" placeholder="Search" />
8 </div>
9 </div>
10 </div>
11</aura:component>1({
2 handleClick : function(component, event, helper) {
3 var searchText = component.get('v.searchText');
4 var action = component.get('c.searchForIds');
5 action.setParams({searchText: searchText});
6 action.setCallback(this, function(response) {
7 var state = response.getState();
8 if (state === 'SUCCESS') {
9 var ids = response.getReturnValue();
10 console.log(ids);
11 }
12 });
13
14 $A.enqueueAction(action);
15 }
16})3. Implement a Basic Search Query with SOQL
Now make the server controller do something more interesting. Salesforce supports the SOQL search language, which you can use in your Apex classes. For this query, take the input search text and try to find objects where that text appears in any field. Update the Apex class’s method to return a list of record IDs for the accounts, campaigns, contacts, or leads that match the search term.
1public static List<String> searchForIds(String searchText) {
2    List<List<SObject>> results = [FIND :searchText IN ALL FIELDS  RETURNING Account(Id), Campaign(Id), Contact(Id), Lead(Id)];
3    List<String> ids = new List<String>();
4    for (List<SObject> sobjs : results) {
5      for (SObject sobj : sobjs) {
6        ids.add(sobj.Id);
7      }
8    }
9    return ids;
10}
4. Return the Search Results to a Custom Page
Instead of just returning the record IDs, you can return the objects themselves or the IDs with extra information. You can even extend the search component to start searching after every key press and display partial results. For now, keep things simple and redirect to a new page that uses the IDs to display the record names and links to the full record details. You need two new components and a new custom page.
1<aura:component implements="force:hasRecordId" access="global">
2    <aura:attribute name="record" type="Object"/>
3    <aura:attribute name="simpleRecord" type="Object"/>
4    <aura:attribute name="recordError" type="String"/>
5    <force:recordData aura:id="recordLoader"
6      recordId="{!v.recordId}"
7      layoutType="COMPACT"
8      targetRecord="{!v.record}"
9      targetFields="{!v.simpleRecord}"
10      targetError="{!v.recordError}"
11      recordUpdated="{!c.handleRecordUpdated}"  />
12
13    <!-- Display a header with details about the record -->
14    <div class="slds-page-header" role="banner">
15      <p class="slds-text-heading--label">{!v.simpleRecord.Name}</p>
16      <h1 class="slds-page-header__title slds-m-right--small  slds-truncate slds-align-left"><a href="{! $Site.siteUrlPrefix + '/detail/' + v.simpleRecord.Id}">Go to details</a></h1>
17    </div>
18
19    <!-- Display Lightning Data Service errors, if any -->
20    <aura:if isTrue="{!not(empty(v.recordError))}">
21      <div class="recordError">
22        <ui:message title="Error" severity="error" closable="true">
23          {!v.recordError}
24        </ui:message>
25      </div>
26    </aura:if>
27</aura:component>1<aura:component implements="forceCommunity:availableForAllPageTypes" access="global">
2 <aura:attribute type="list" name="recordIds" />
3 <aura:handler name="init" value="{!this}" action="{!c.init}"/>
4 <h1>Search Results</h1>
5 <aura:iteration items="{!v.recordIds}" var="id">
6 <c:customSearchResultItem recordId="{!id}"/>
7 </aura:iteration>
8</aura:component>1({
2 init: function(component, event, helper) {
3 var idsJson = sessionStorage.getItem('customSearch--recordIds');
4 if (!$A.util.isUndefinedOrNull(idsJson)) {
5 var ids = JSON.parse(idsJson);
6 component.set('v.recordIds', ids);
7 sessionStorage.removeItem('customSearch--recordIds');
8 }
9 }
10})In Experience Builder, create a standard page called Custom Search Results, which produces a page URL of custom-search-results. Drag the customSearchResults component onto the page, along with whichever other customizations you want. You can even use the same custom theme layout that you created earlier in Step 1: Create the Basic Theme Layout Structure, which the Home page is using.
1sessionStorage.setItem('customSearch--recordIds', JSON.stringify(ids));
2var navEvt = $A.get('e.force:navigateToURL');
3navEvt.setParams({url: '/custom-search-results'});
4navEvt.fire();1.THIS .slds-input__icon{
2 margin-top: -.8rem;
3}
4
5.THIS {
6 padding: 0 10px;
7}1<design:component label="Custom Search">
2
3</design:component>In Experience Builder,
return to and click the edit icon (![]() ) to switch to the new Custom Search component.
) to switch to the new Custom Search component.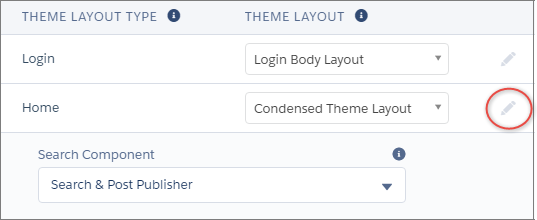
If all went well, you can test out your new search component by entering a text string, clicking Search, and seeing which results show up!