Experience Cloud Developer Guide
 j
jNewer Version Available
Set Up a Connection for Your JSON CMS
To set up a CMS connection to your JSON content, specify the server URL and paths to the
content. The CMS connection is the secret sauce that lets your site page locate and retrieve
CMS content.
- In Setup, enter Digital Experiences in the Quick Find box, then select All Sites.
- In Workspaces, click Content Management and then select CMS Connect.
- To create a connection, click Add CMS Connection, and enter
the connection details.
- Name—Enter a connection name, for example, Blogs.
- Connection Type—Select the connection type. To use an authenticated connection, first define a named credential for your CMS site.
- CMS Source—Select your CMS source, for example, WordPress.
- Server URL—Enter the URL for a CMS server that’s accessible using HTTPS. Use a fully qualified domain name, for example, https://public-api.wordpress.com.

You can also select an existing connection to edit and add JSON content.
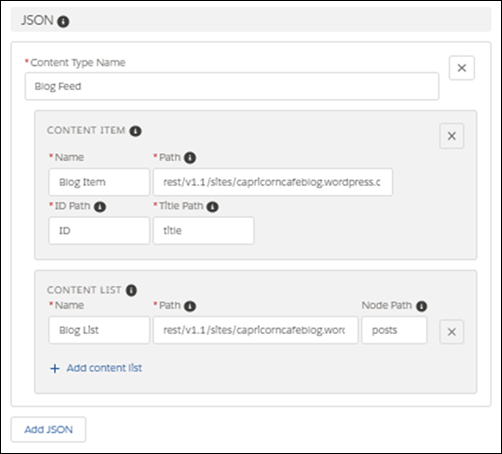
- In the JSON section, click Add JSON.
- Enter a content type name. It can be anything you want. For example, Home Improvement Blogs. The name provides an easy way to group related content.
- Select the type of content to add. Is it a single article or blog post, such as DIY
Dryer Vent Cleaning? Then select Content Item. Or is it a
grouping of items, such as DIY Featured Blogs, with links to individual blog posts?
Then select Content List.
Let’s create a content list that pulls in some blog articles. When you configure a content list, you also set up a content item that points to each item in the list.
- Click Add a content list.
- Enter a name for the list, for example, Featured Blogs.
- Enter the relative path to the JSON content in your CMS, for example,
rest/v1.1/sites/capricornblog.wordpress.com/posts.
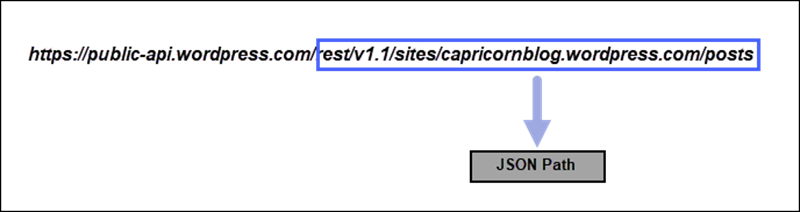
- For Node Path, enter a JSON expression for the starting node in the list. For example, posts. Because a JSON expression is expected here, you don’t enter an @.
- Click Add a content item.
- Enter a name for the content item, for example, Blog Item.
- Enter the relative path, for example, rest/v1.1/sites/capricornblog.wordpress.com/posts/{component}. The {component} variable indicates the path for an item ID, like $postId. It is appended dynamically at run time based on the content item referenced. There are four variables you can use in a JSON path: {component}, {itemsPerPage}, {pageNumber}, and {offset}.
- Enter the ID and title paths for the content item. JSON expressions are
expected in these paths, so don’t enter them with an @.
- Want to add more JSON served content? Repeat the previous steps for each content item or content list to add. You can add up to five different JSON connections, each with up to one JSON content item and 10 JSON content lists. Save the connection when you’re finished.
- If your content has multiple languages, select Enable language mapping, and add at least one language. When you specify a path to a content item or list, you can use the {language} variable to point to content in another language.
The next step is to drag a JSON component to your page using the Experience Builder. For instructions, see Add CMS Connect (JSON) Components to Your Site Pages.