Visualforce Developer Guide
 j
jNewer Version Available
List Views with Standard List Controllers
Many Salesforce pages include list views that allow you to filter the records displayed on the page. For example, on the opportunities home page, you can view a list of only the opportunities that you own by selecting My Opportunities from the list view dropdown. You can create list views on any page that’s associated with a list controller.
1<apex:page standardController="Account" recordSetvar="accounts">
2 <apex:pageBlock title="Viewing Accounts">
3 <apex:form id="theForm">
4 <apex:panelGrid columns="2">
5 <apex:outputLabel value="View:"/>
6 <apex:selectList value="{!filterId}" size="1">
7 <apex:actionSupport event="onchange" rerender="list"/>
8 <apex:selectOptions value="{!listviewoptions}"/>
9 </apex:selectList>
10 </apex:panelGrid>
11 <apex:pageBlockSection >
12 <apex:dataList var="a" value="{!accounts}" id="list">
13 {!a.name}
14 </apex:dataList>
15 </apex:pageBlockSection>
16 </apex:form>
17 </apex:pageBlock>
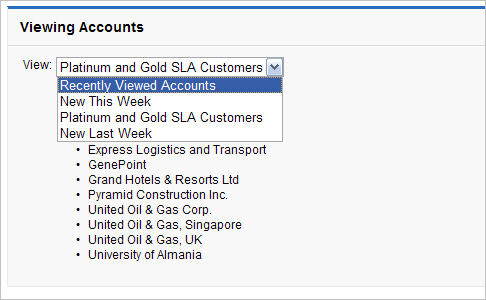
18</apex:page>The page is associated with the standard Account list controller, which is based on the StandardSetController Apex class. The {!listviewoptions} expression calls the getListViewOptions() method for StandardSetController and evaluates to the available list views. The value that the user selects from the dropdown is bound to the filterId property of the controller. When the filterId changes, the records available to the page change according to the filter. The <apex:datalist> renders as the updated list view.
The page displays a filtered list of account names according to the list view that the user selects from the dropdown.
1<apex:page standardController="Opportunity" recordSetVar="opportunities"
2              tabStyle="Opportunity"
3    sidebar="false">
4    <apex:form>
5        <apex:pageBlock>
6            <apex:pageMessages/>
7            <apex:pageBlock>
8                <apex:panelGrid columns="2">
9                    <apex:outputLabel value="View:"/>
10                    <apex:selectList value="{!filterId}" size="1">
11                        <apex:actionSupport event="onchange" rerender="opp_table"/>
12                        <apex:selectOptions value="{!listviewoptions}"/>
13                    </apex:selectList>
14                </apex:panelGrid>
15            </apex:pageBlock>
16
17            <apex:pageBlockButtons>
18                <apex:commandButton value="Save" action="{!save}"/>
19            </apex:pageBlockButtons>
20            <apex:pageBlockTable value="{!opportunities}" var="opp" id="opp_table">
21                <apex:column value="{!opp.name}"/>
22                <apex:column headerValue="Stage">
23                    <apex:inputField value="{!opp.stageName}"/>
24                </apex:column>
25                <apex:column headerValue="Close Date">
26                    <apex:inputField value="{!opp.closeDate}"/>
27                </apex:column>
28            </apex:pageBlockTable>
29        </apex:pageBlock>
30    </apex:form>
31</apex:page>