Lightning Aura Components Developer Guide
 j
jNewer Version Available
Lightning Action Examples
Let’s say you want to create a Lightning action that enables users to create contacts on an account record. You can do this easily using lightning:recordViewForm and lightning:recordEditForm. If you require granular customization, use force:recordData.
The following examples can each be added as a Lightning action on the account object. Clicking the action’s button on the account layout opens a panel to create a contact.
Create a Lightning Action Using lightning:recordViewForm and lightning:recordEditForm
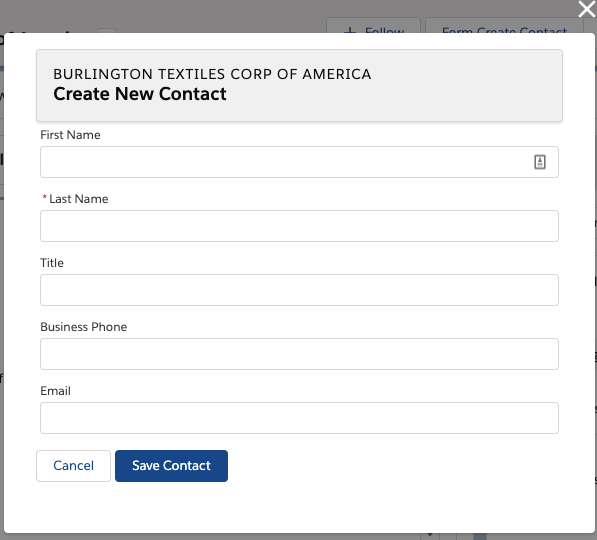
The Quick Contact action panel includes a header with the account name and a form that creates a contact for that account record. Display the account name using lightning:recordViewForm and display the contact form using lightning:recordEditForm.
1<aura:component implements="force:lightningQuickActionWithoutHeader,force:hasRecordId">
2
3   <div class="slds-page-header" role="banner">
4       <lightning:recordViewForm recordId="{!v.recordId}"
5                                 objectApiName="Account">
6
7           <div class="slds-text-heading_label">
8               <lightning:outputField fieldName="Name" variant="label-hidden"/>
9           </div>
10           <lightning:messages/>
11       </lightning:recordViewForm>
12       <h1 class="slds-page-header__title slds-m-right_small
13                      slds-truncate slds-align-left">Create New Contact</h1>
14    </div>
15    <lightning:recordEditForm aura:id="myform"
16                              objectApiName="Contact"
17                              onsubmit="{!c.handleSubmit}"
18                              onsuccess="{!c.handleSuccess}">
19        <lightning:messages/>
20        <lightning:inputField fieldName="FirstName"/>
21        <lightning:inputField fieldName="LastName"/>
22        <lightning:inputField fieldName="Title"/>
23        <lightning:inputField fieldName="Phone"/>
24        <lightning:inputField fieldName="Email"/>
25        <div class="slds-m-top_medium">
26            <lightning:button label="Cancel" onclick="{!c.handleCancel}" />
27            <lightning:button type="submit" label="Save Contact" variant="brand"/>
28        </div>
29    </lightning:recordEditForm>
30
31</aura:component>1({
2 handleCancel: function(cmp, event, helper) {
3 $A.get("e.force:closeQuickAction").fire();
4 },
5
6 handleSubmit: function(cmp, event, helper) {
7 event.preventDefault();
8 var fields = event.getParam('fields');
9 fields.AccountId = cmp.get("v.recordId");
10 cmp.find('myform').submit(fields);
11 },
12
13 handleSuccess: function(cmp, event, helper) {
14 // Success! Prepare a toast UI message
15 var resultsToast = $A.get("e.force:showToast");
16 resultsToast.setParams({
17 "title": "Contact Saved",
18 "message": "The new contact was created."
19 });
20
21 // Update the UI: close panel, show toast, refresh account page
22 $A.get("e.force:closeQuickAction").fire();
23 resultsToast.fire();
24
25 // Reload the view
26 $A.get("e.force:refreshView").fire();
27 }
28})Using lightning:recordEditForm, you can nest thelightning:inputField components in <div> containers and add custom styling. You also need to provide your own cancel and submit buttons.
Consider the simpler lightning:recordForm component, which provides default Cancel and Save buttons. You can achieve the same result by replacing the lightning:recordEditForm component with the following.
1<aura:attribute name="fields" type="String[]" default="['FirstName','LastName','Title','Phone','Email']" />
2<lightning:recordForm objectApiName="Contact"
3                      fields="{!v.fields}"
4                      onsubmit="{!c.handleSubmit}"
5                      onsuccess="{!c.handleSuccess}" />
Create a Lightning Action Using force:recordData
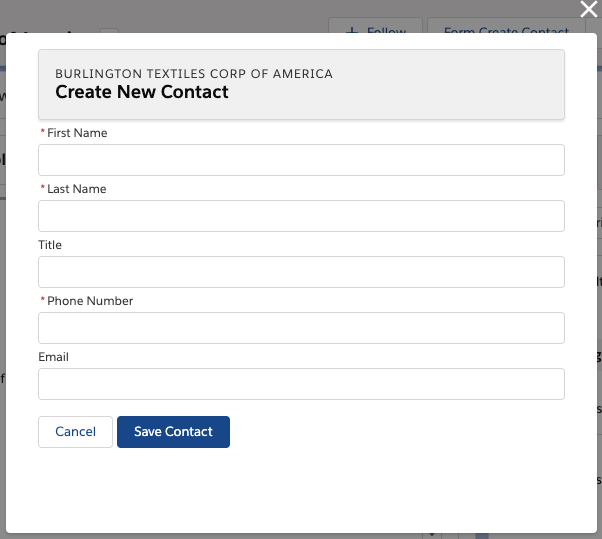
The Quick Contact action panel includes a header with the account name and a form that creates a contact for that account record. Display the account name and display the contact form using two separate instances of force:recordData.
This force:recordData example is similar to the example provided in Configure Components for Record-Specific Actions. Compare the two examples to better understand the differences between using @AuraEnabled Apex controllers and using Lightning Data Service.
1<aura:component implements="force:lightningQuickActionWithoutHeader,force:hasRecordId">
2
3    <aura:attribute name="account" type="Object"/>
4    <aura:attribute name="simpleAccount" type="Object"/>
5    <aura:attribute name="accountError" type="String"/>
6    <force:recordData aura:id="accountRecordLoader"
7        recordId="{!v.recordId}"
8        fields="Name,BillingCity,BillingState"
9        targetRecord="{!v.account}"
10        targetFields="{!v.simpleAccount}"
11        targetError="{!v.accountError}"
12    />
13
14    <aura:attribute name="newContact" type="Object" access="private"/>
15    <aura:attribute name="simpleNewContact" type="Object" access="private"/>
16    <aura:attribute name="newContactError" type="String" access="private"/>
17    <force:recordData aura:id="contactRecordCreator"
18        layoutType="FULL"
19        targetRecord="{!v.newContact}"
20        targetFields="{!v.simpleNewContact}"
21        targetError="{!v.newContactError}"
22        />
23
24    <aura:handler name="init" value="{!this}" action="{!c.doInit}"/>
25
26    <!-- Display a header with details about the account -->
27    <div class="slds-page-header" role="banner">
28        <p class="slds-text-heading_label">{!v.simpleAccount.Name}</p>
29        <h1 class="slds-page-header__title slds-m-right_small
30            slds-truncate slds-align-left">Create New Contact</h1>
31    </div>
32
33    <!-- Display Lightning Data Service errors, if any -->
34    <aura:if isTrue="{!not(empty(v.accountError))}">
35            {!v.accountError}
36    </aura:if>
37    <aura:if isTrue="{!not(empty(v.newContactError))}">
38        {!v.newContactError}
39    </aura:if>
40
41    <!-- Display the new contact form -->
42    <lightning:input aura:id="contactField" name="firstName" label="First Name"
43                     value="{!v.simpleNewContact.FirstName}" required="true"/>
44
45    <lightning:input aura:id="contactField" name="lastname" label="Last Name"
46                     value="{!v.simpleNewContact.LastName}" required="true"/>
47
48    <lightning:input aura:id="contactField" name="title" label="Title"
49                     value="{!v.simpleNewContact.Title}" />
50
51    <lightning:input aura:id="contactField" type="phone" name="phone" label="Phone Number"
52                     pattern="^(1?(-?\d{3})-?)?(\d{3})(-?\d{4})$"
53                     messageWhenPatternMismatch="The phone number must contain 7, 10, or 11 digits. Hyphens are optional."
54                     value="{!v.simpleNewContact.Phone}" required="true"/>
55
56    <lightning:input aura:id="contactField" type="email" name="email" label="Email"
57                     value="{!v.simpleNewContact.Email}" />
58
59    <lightning:button label="Cancel" onclick="{!c.handleCancel}" class="slds-m-top_medium" />
60    <lightning:button label="Save Contact" onclick="{!c.handleSaveContact}"
61                      variant="brand" class="slds-m-top_medium"/>
62
63
64</aura:component>1({
2 doInit: function(component, event, helper) {
3 component.find("contactRecordCreator").getNewRecord(
4 "Contact", // objectApiName
5 null, // recordTypeId
6 false, // skip cache?
7 $A.getCallback(function() {
8 var rec = component.get("v.newContact");
9 var error = component.get("v.newContactError");
10 if(error || (rec === null)) {
11 console.log("Error initializing record template: " + error);
12 }
13 else {
14 console.log("Record template initialized: " + rec.apiName);
15 }
16 })
17 );
18 },
19
20 handleSaveContact: function(component, event, helper) {
21 if(helper.validateContactForm(component)) {
22 component.set("v.simpleNewContact.AccountId", component.get("v.recordId"));
23 component.find("contactRecordCreator").saveRecord(function(saveResult) {
24 if (saveResult.state === "SUCCESS" || saveResult.state === "DRAFT") {
25
26 // Success! Prepare a toast UI message
27 var resultsToast = $A.get("e.force:showToast");
28 resultsToast.setParams({
29 "title": "Contact Saved",
30 "message": "The new contact was created."
31 });
32
33 // Update the UI: close panel, show toast, refresh account page
34 $A.get("e.force:closeQuickAction").fire();
35 resultsToast.fire();
36
37 // Reload the view so components not using force:recordData
38 // are updated
39 $A.get("e.force:refreshView").fire();
40 }
41 else if (saveResult.state === "INCOMPLETE") {
42 console.log("User is offline, device doesn't support drafts.");
43 }
44 else if (saveResult.state === "ERROR") {
45 console.log('Problem saving contact, error: ' +
46 JSON.stringify(saveResult.error));
47 }
48 else {
49 console.log('Unknown problem, state: ' + saveResult.state +
50 ', error: ' + JSON.stringify(saveResult.error));
51 }
52 });
53 }
54 },
55
56 handleCancel: function(component, event, helper) {
57 $A.get("e.force:closeQuickAction").fire();
58 },
59})1({
2 validateContactForm: function(component) {
3 var validContact = true;
4
5 // Show error messages if required fields are blank
6 var allValid = component.find('contactField').reduce(function (validFields, inputCmp) {
7 inputCmp.showHelpMessageIfInvalid();
8 return validFields && inputCmp.get('v.validity').valid;
9 }, true);
10
11 if (allValid) {
12 // Verify we have an account to attach it to
13 var account = component.get("v.account");
14 if($A.util.isEmpty(account)) {
15 validContact = false;
16 console.log("Quick action context doesn't have a valid account.");
17 }
18 return(validContact);
19 }
20 }
21})Usage Differences
Consider the following differences between the previous examples.
- Field labels and values
- lightning:recordViewForm and lightning:recordEditForm obtain labels and the requiredness properties from the object schema. In the first example, the Last Name field is a required field on the contact object. The component provides field-level validation.
- With force:recordData, you must provide your own labels and requiredness property for each field. You can also provide your own field-level validation, as shown by the lightning:input component with the pattern and messageWhenPatternMismatch attributes.
- Saving the record
- lightning:recordEditForm saves the record automatically when you provide a lightning:button component with the submit type.
- With force:recordData, you must call the saveRecord function.
- Lightning Data Service errors
- lightning:recordViewForm and lightning:recordEditForm display Lightning Data Service errors automatically using lightning:messages, and provide custom error handling via the onerror event handler.
- With force:recordData, you must handle and display the errors on your own.