Visualforce 開発者ガイド
 j
jメッセージクラスを使用したカスタムコントローラの作成
Apex Messaging 名前空間を使用するカスタムコントローラには、少なくともメールの件名、本文、および受信者が必要です。また、件名と本文を記入し、メールを配信するためのフォームとして機能するページが必要です。
sendEmailPage という新規ページを作成し、次のコードを使用します。
1swfobject.registerObject("clippy.codeblock-0", "9");
2
3
4
5
6
7
8
9
10
11
12
13
14
15
16
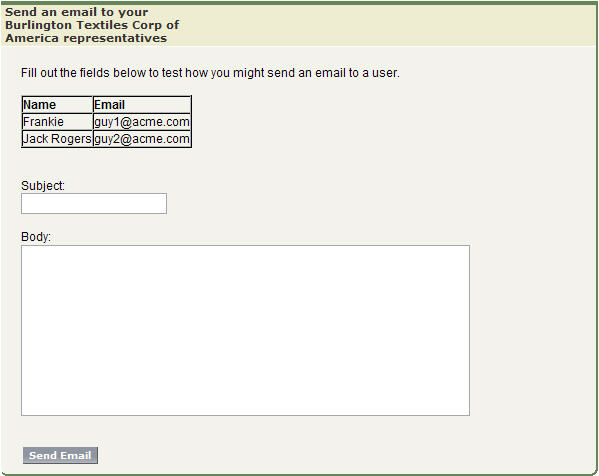
17<apex:page controller="sendEmail">
18 <apex:messages />
19 <apex:pageBlock title="Send an Email to Your
20 {!account.name} Representatives">
21 <p>Fill out the fields below to test how you might send an email to a user.</p>
22 <br />
23 <apex:dataTable value="{!account.Contacts}" var="contact" border="1">
24 <apex:column >
25 <apex:facet name="header">Name</apex:facet>
26 {!contact.Name}
27 </apex:column>
28 <apex:column >
29 <apex:facet name="header">Email</apex:facet>
30 {!contact.Email}
31 </apex:column>
32 </apex:dataTable>
33
34 <apex:form >
35 <br /><br />
36 <apex:outputLabel value="Subject" for="Subject"/>:<br />
37 <apex:inputText value="{!subject}" id="Subject" maxlength="80"/>
38 <br /><br />
39 <apex:outputLabel value="Body" for="Body"/>:<br />
40 <apex:inputTextarea value="{!body}" id="Body" rows="10" cols="80"/>
41 <br /><br /><br />
42 <apex:commandButton value="Send Email" action="{!send}" />
43 </apex:form>
44 </apex:pageBlock>
45</apex:page>ページマークアップでは、取引先 ID はページの URL から取得されます。この例が正しく機能するためには、Visualforce ページを URL の有効な取引先レコードに関連付ける必要があります。たとえば、001D000000IRt53 が取引先 ID の場合、次の URL を使用します。
1https://Salesforce_instance/apex/sendEmailPage?id=001D000000IRt53次のコードは、Messaging.SingleEmailMessage クラスを実装する sendEmail というコントローラを作成して、取引先に関連する取引先責任者を受信者として使用します。
1swfobject.registerObject("clippy.codeblock-2", "9");
2
3
4
5
6
7
8
9
10
11
12
13
14
15
16
17public class sendEmail {
18	public String subject { get; set; }
19	public String body { get; set; }
20
21	private final Account account;
22
23	// Create a constructor that populates the Account object
24	public sendEmail() {
25		account = [select Name, (SELECT Contact.Name, Contact.Email FROM Account.Contacts)
26				from Account where id = :ApexPages.currentPage().getParameters().get('id')];
27	}
28
29	public Account getAccount() {
30		return account;
31	}
32
33	public PageReference send() {
34		// Define the email
35		Messaging.SingleEmailMessage email = new Messaging.SingleEmailMessage();
36
37    String addresses;
38    if (account.Contacts[0].Email != null)
39    {
40        addresses = account.Contacts[0].Email;
41        // Loop through the whole list of contacts and their emails
42        for (Integer i = 1; i < account.Contacts.size(); i++)
43        {
44            if (account.Contacts[i].Email != null)
45            {
46                addresses += ':' + account.Contacts[i].Email;
47            }
48        }
49    }
50
51		String[] toAddresses = addresses.split(':', 0);
52
53		// Sets the paramaters of the email
54		email.setSubject( subject );
55		email.setToAddresses( toAddresses );
56		email.setPlainTextBody( body );
57
58		// Sends the email
59		Messaging.SendEmailResult [] r =
60			Messaging.sendEmail(new Messaging.SingleEmailMessage[] {email});
61
62		return null;
63	}
64}
コントローラでは、次の点に留意してください。
- メールの件名と本文は、別の Visualforce ページで設定され、コントローラに渡されます。
- メールを送信するメソッドは send() と呼ばれます。この名前は、メールを送信する Visualforce ボタンのアクション名と一致する必要があります。
- メールの受信者、つまり、toAddresses[] に保存されているメールアドレスは、関連付けられた取引先で使用可能な取引先責任者のアドレスから作成されます。取引先責任者、リード、またはその他のレコードから受信者のリストをコンパイルするとき、すべてのレコードをループ処理してメールアドレスがレコードごとに定義されているか確認することをお勧めします。取引先 ID がページの URL から取得されます。
sendEmailPage のフォーム例