Visualforce 開発者ガイド
 j
jカスタムコンポーネントコントローラ
標準の Visualforce ページと同様に、カスタムコンポーネントを Apex で記述されたコントローラに関連付けることができます。この関連付けは、コンポーネントの controller 属性をカスタムコントローラに設定して行います。コントローラを使用すると、関連付けられているページにコンポーネントのマークアップを返す前に追加のロジックを実行できます。
コントローラでのカスタムコンポーネントの属性へのアクセス
関連付けられているカスタムコンポーネントコントローラでカスタムコンポーネ���トの属性の値にアクセスする手順は、次のとおりです。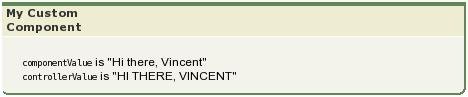 大文字で表示されるように Apex コントローラメソッドが controllerValue を変更している点に注目してください。
- 属性の値を格納するカスタムコンポーネントコントローラのプロパティを定義します。
- プロパティの getter メソッドと setter メソッドを定義します。次に例を示します。setter が値を変更していることに注目してください。
1public class myComponentController { 2 3 public String controllerValue; 4 5 public void setControllerValue (String s) { 6 controllerValue = s.toUpperCase(); 7 } 8 9 public String getControllerValue() { 10 return controllerValue; 11 } 12} - コンポーネント定義の <apex:attribute> タグで、assignTo 属性を使用して定義したばかりのクラス変数に属性をバインドします。次に例を示します。assignTo 属性を使用する場合は、getter メソッドおよび setter メソッドまたは get 値および set 値を含むプロパティを定義する必要があります。
1<apex:component controller="myComponentController"> 2 <apex:attribute name="componentValue" description="Attribute on the component." 3 type="String" required="required" assignTo="{!controllerValue}"/> 4 <apex:pageBlock title="My Custom Component"> 5 <p> 6 <code>componentValue</code> is "{!componentValue}" 7 <br/> 8 <code>controllerValue</code> is "{!controllerValue}" 9 </p> 10 </apex:pageBlock> 11 Notice that the controllerValue has been upper cased using an Apex method. 12</apex:component> - ページにコンポーネントを追加します。次に例を示します。
1<apex:page>
2  <c:simpleComponent componentValue="Hi there, {!$User.FirstName}"/>
3</apex:page>
大文字で表示されるように Apex コントローラメソッドが controllerValue を変更している点に注目してください。