Option 1: Import Mobile SDK Template Files
In this option, you replace files from the Xcode Swift template with files from the Mobile SDK native Swift template—work that otherwise would be done by forceios. A few drags and drops, and the app is ready to connect to Salesforce and display org data.
Where possible, we changed noninclusive terms to align with our company value of Equality. We maintained certain terms to avoid any effect on customer implementations.
- Create an Xcode Swift Project
- Add Mobile SDK Libraries to Your Project
- Configure Your Project’s Build Settings
-
In Xcode, open the
MyMobileSDKApp/MyMobileSDKAppproject folder. -
Select all files except the
Assets.xcassetsandPreview Contentfolders. -
Control-Click and select Delete.
-
Select Move to Trash.
-
In Finder, navigate to your SalesforceMobileSDK-Templates clone and expand its
/iOSNativeSwiftTemplate/iOSNativeSwiftTemplate/subfolder. -
Drag the following Swift template files into Xcode’s Project Navigator. Drop them in your project’s
MyMobileSDKApp/MyMobileSDKApp/folder.AccountsListModel.swiftAccountsListView.swiftAppDelegate.swiftbootconfig.plistBridging-Header.hContactDetailModel.swiftContactDetailsView.swiftContactsForAccountListView.swiftContactsForAccountModel.swiftInfo.plistInitialViewController.swiftmain.swiftiOSNativeSwiftTemplate.entitlementsSceneDelegate.swiftuserstore.jsonusersyncs.json
-
Select the following:
Option Value Destination: Copy items if needed Added folders: Create folder references Add to targets: MyMobileSDKApp -
If Xcode asks for permission to create an Objective-C bridging header, click Don’t Create.
-
In your Project settings, select Build Phases.
-
Under Copy Bundle Resources, select
Info.plistif it’s present and click Remove Items (-). -
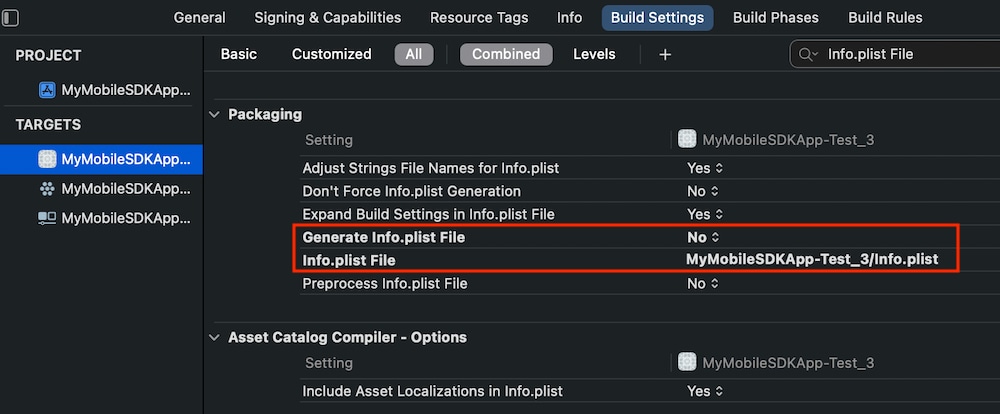
Xcode 13 only:
- In Build Settings, search for “Info.plist File”.
- Set Generate Info.plist File to No.
- Set Info.plist File to “MyMobileSDKApp/Info.plist”.
For more information on the template files, see Overview of Application Flow.
- Select your top-level project.
- Your project is ready to build. Select Product | Run.
- If the Salesforce login screen appears, you’re done!
Your new project is ready for customization. You can now add your own assets, customize the AppDelegate.swift and SceneDelegate.swift classes, and do as you like with the Accounts and Contacts functionality.
Before posting your app to the App Store, be sure to update the remoteAccessConsumerKey and oauthRedirectURI in the bootconfig.plist file with settings from your connected app. See Get Started with Native iOS Development.