Building modern apps that react to changes in real-time used to require some implementation effort, but the latest update to our streaming technologies greatly simplifies things. In this post we will go through a brief refresher on the Streaming API and we will introduce you to a new way of subscribing to streaming events using the lightning:empApi component. We’ll give you an overview of this game changer plus some sample code.
A brief refresher on the Streaming API
The Streaming API enables the streaming of near real-time events using push technology. This can be used to react to data changes or to broadcast messages across different systems for integration purposes.
With the release of Change Data Capture (CDC) in Developer Preview in Winter ’19, the Streaming API now includes four types of events: PushTopic events, generic events, platform events and CDC events. Each of these event types have their own characteristics but they all rely on the same routing technology: CometD.
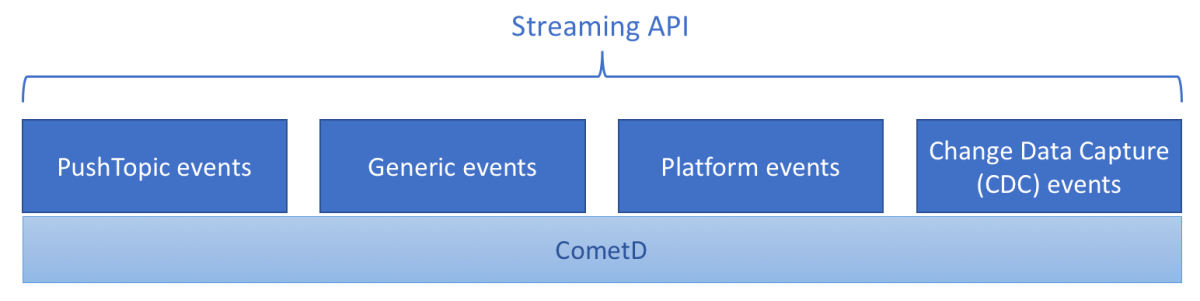
In other words, CometD acts as a radio and all streaming events are registered as channels. These are the streaming channels currently available:
| Event type | Channel | Description | Example |
|---|---|---|---|
| PushTopic event | /topic/<Topic_Name> | A PushTopic event | /topic/MyPushTopic |
| Generic event | /u/<Event_Name> | A generic event | /u/MyGenericEvent |
| Platform event | /event/<Platform_Event_Name> | A platform event | /event/MyPlatformEvent__e |
| CDC event | /data/ChangeEvents | All CDC events (standard and custom) | |
| CDC event | /data/<Standard_Object_Name>ChangeEvent | A CDC event associated to a standard object | /data/AccountChangeEvent |
| CDC event | /data/<Custom_Object_Name>__ChangeEvent | A CDC event associated to a custom object | /data/MyCustomObject__ChangeEvent |
Up till Winter ’19, developers had to manually manage CometD connections in JS in order to subscribe to streaming events in Lightning. Now times are changing! What used to be a rather complex setup is now greatly simplified with lightning:empApi, a new Lightning component that streamlines the use of the Streaming API (pun intended).
A game changer
If you were already establishing and managing CometD connections in Lightning, you’ll quickly see why lightning:empApi is a game changer: it provides an abstraction layer that increases performance and greatly reduces code complexity.
Performance increase
lightning:empApi increases streaming performances by saving some precious time on the CometD server connection initialization and reducing network traffic.
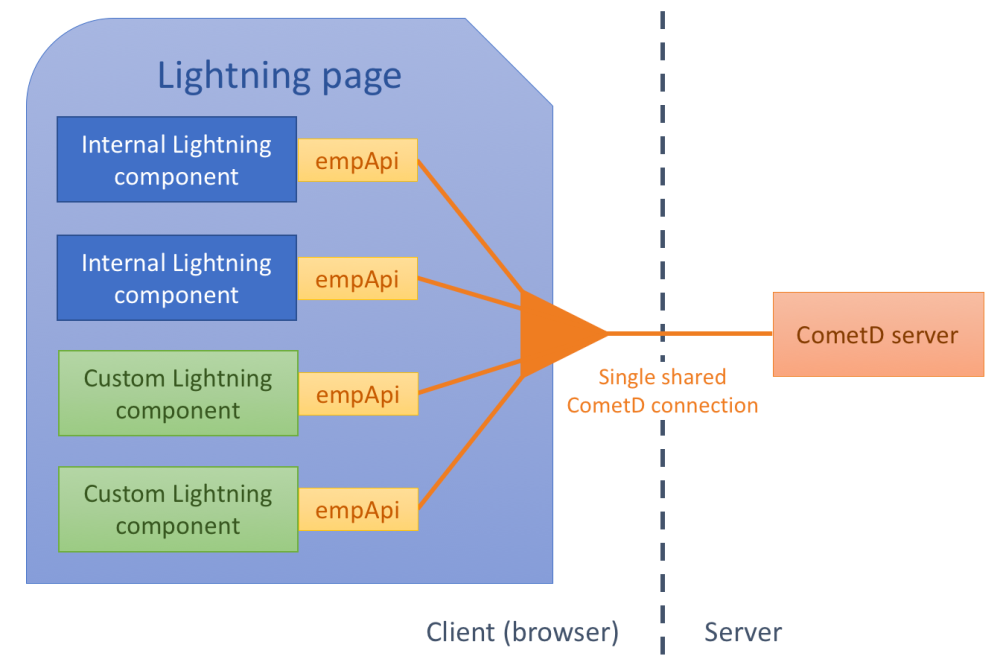
What happens behind the scenes is that as soon as a Lightning page loads, we are establishing a CometD connection in the background. This was already the case prior to Winter ’19 but we were reserving that connection for internal use. You had to establish your own connection in parallel for custom components.
With lightning:empApi you can now benefit from a single shared connection. Thanks to that, you no longer have to configure CometD, establish a connection, and wait for it to become available before subscribing to a streaming event. This reduces network traffic and solves potential connection conflicts you might have experienced in the past. You can now safely and efficiently add multiple lightning:empApi components to the same page.
Reduced code complexity
lightning:empApi greatly reduces code complexity by allowing you to get rid of close to a hundred lines of code for a basic use case. With lightning:empApi you won’t have to deal with the CometD server handshake and authentication. All of this is automated and performed in the background for you. This means no more custom Apex controller, no JS static resources and only a few JS lines. This lets you focus on what matters the most: subscribing to events and handling errors.
Working with the lightning:empApi component
lightning:empApi is a Lightning service component and like other service components, it has no user interface of its own and exposes its functionalities via Aura methods.
In order to use it, you just have to include it your Lightning component markup:
Then get a reference to the service in your JS controller or helper and call the service’s aura methods.
As a best practice, I recommend setting up the debugging flag (if needed) and specifying an error handler in the component initialization handler, even if you plan to subscribe to events at later point in time.
All error types (subscribe and unsubscribe errors) are handled by a unique function passed to onError. Make sure that you call onError only once in your component’s lifespan. Calling onError multiple times overwrites the previous error handler. Doing so may lead to inconsistent error handling such as handling a subscribe error with a function that you designed to handle unsubscribe errors.
Once you have set up an error handler, you can subscribe to a streaming event. To do so, you need to get the streaming channel associated with that event. Once you have the channel, subscribe to the event with the following code:
Later on, you can unsubscribe from the event with the following code:
Full ‘stream’ ahead on Trailhead
Now that we have covered the basics of streaming events and the use of lightning:empApi, how about some hands-on exercises? We have updated the Build an Instant Notification Trailhead project to use the new lightning:empApi component. Why don’t you give it at try or even retry it? You’ll notice how easy it is to use the Streaming API with platform events in less than an hour.
Resources
- Documentation: lightning:empApi Component
- Documentation: Streaming API Developer Guide
- Tool: Streaming Monitor
- Trailhead Project: Build an Instant Notification
- Sample Gallery: Sample Lightning apps using lightning:empApi
- Video: Dreamforce ’18 Developer Keynote
About the author
Philippe Ozil is a Senior Developer Evangelist at Salesforce where he focuses on the Salesforce Platform. He writes technical content and speaks frequently at conferences. He is a full stack developer and a VR expert. Prior to joining Salesforce, he worked as a developer and consultant in the Business Process Management (BPM) space. Follow him on Twitter @PhilippeOzil or check his GitHub projects @pozil.