Follow and complete a Learn MOAR Winter ‘23 trailmix for admins or developers by November 30, 2022, 11:59 pm PT, to earn a special community badge and enter for a chance to win one of five $200 USD Salesforce Certification vouchers. Restrictions apply. Learn how to participate and review the Official Rules by visiting the Trailhead Quests page.
Introducing External Actions
With External Actions available in Winter ’23, Salesforce empowers businesses to leverage external services and third-party apps outside of Salesforce from within their Engagement Studio programs. For instance, you might want to register prospects for a webinar on their behalf, or use an external service to send an SMS message. Be sure to check out the Pardot API Guide for more information.
The key to using External Actions lies in the ability to invoke Salesforce Invocable Actions. Invocable Actions allow you to add more functionality to your application either with standard actions, such as posting to Chatter and sending an email, or custom actions using Apex that you can write yourself to meet your unique needs. You can also package up your custom invocable actions and deploy them to the AppExchange so that others can use your feature.
In this post, we’ll take a look at how to create your own custom invocable action with an external service that you can then use with External Actions.
Get started with External Actions
For this example, we’ll create an integration with Twilio to send SMS messages from Engagement Studio. Let’s first look at the steps that an admin would take to create the named credential, external service, invocable action Apex class, and marketing app extension. After that, we’ll look at the steps that a marketer would take to create an action node in an Engagement Studio program that uses the newly created external action.
Steps for the Administrator
1) Authentication Setup
To start, head over to the Setup section on Salesforce, where we’ll create the named credential and external service for Twilio. We’ll need to know the username and password for the API that we have set up on the Twilio service (Twilio even offers a free trial account to let us give it a spin). When ready, create a named credential as in the image below (using the mentioned username/password).
Note: A named credential specifies the URL of a callout endpoint and its required authentication parameters in one definition.

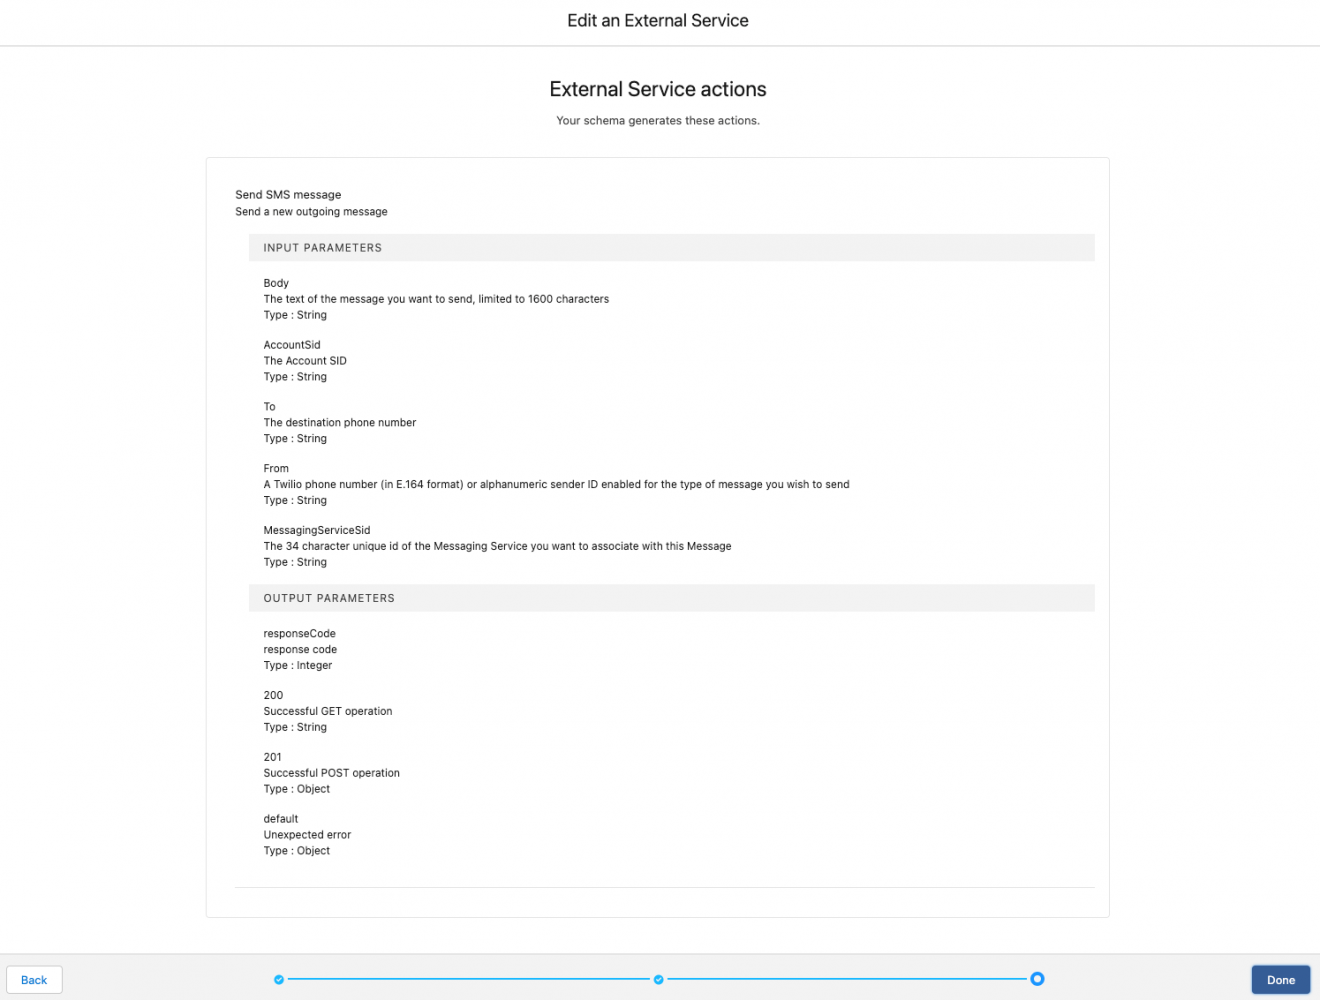
Next, create an external service (also found in the Setup section) using that named credential. When creating external services, we’ll need to define a schema for that service, which is based on the OpenAPI 2.0 specs. Most vendors supply Swagger documentation for their API, which can be converted into the Open API spec. Here’s an example schema in JSON format:
When creating the external service and putting in the JSON schema, the setup pages should look something like this:

Then, we’ll navigate through the rest of the screens, ensuring that the operation we defined in the schema is there with the correct input and output parameters.

The last page is just a summary of the service that we’ve created. Once we hit done, our new service is ready.
2) Create an invocable action
The next thing we’ll need to do is create the Apex class that will use our new external service and make calls to the Twilio API. We don’t necessarily need to create an Apex class; in a lot of cases, we could just use the external service that we created as the invocable action and skip this section. However, we may have unique business logic, error handling, logging, etc. that we might want to perform. In that case, we would create an Apex class to do that type of work.
To do this, open up your developer console, create a new Apex class, and call it SendTwilioSmsMessageActionMessage.
There are a few noteworthy things in this Apex class:
- The
@InvocableMethodannotation (see docs) is required for any External Action that relies on the functionality of invocable actions. - When sending a Twilio SMS message, there are certain things that are unique to that message or the sender, so we want those to be configurable. This is why we’ve used the
@InvocableVariableannotation foraccoundSid,messageServiceSid,To, andBodyvariables. These will be used as input variables in our Engagement Studio program. - The named credential that we created earlier (
TwilioNC) is used when creating the endpoint as follows:- req.setEndpoint(‘callout:TwilioNC/2010-04-01/Accounts/’ + twilioReq[0].accountSid + ‘/Messages.json’);
3) Create the extension and configure the external action
Once we’ve saved our new Twilio SMS Apex class, we’ll need to create a new marketing app extension and action that will use it.
So, navigate to the Marketing Setup page, and then the Marketing App Extensions section. Here, we’ll create a new one and call it “Twilio.”

Then, we’ll need to add the invocable action Apex class that we created earlier as an action under the related tab of the extension. We can see that when we search for the Apex class name that we created before (SendTwilioSmsMessageActionMessage); it shows up in the Invocable Action for Action box.

The action schema and action params are auto-populated for us by the invocable action that we created before, so we can just accept the defaults. But for clarity, the action schema is as follows:
We can see that the schema is just about defining the input properties needed to be passed into the invocable action, as well as which ones are required when calling the invocable action.
For our example action, we’ve taken the liberty of populating the accountSid, messageSid, and To fields here in the schema, so that our marketer doesn’t have to. The accountSid and messageServiceSid are unique to the sender’s Twilio account and must be retrieved from there.
If we were planning to package this up and deploy it to the AppExchange, we wouldn’t want to hard code the accountSid and messageSid like we’ve done here. We would create a setup screen to capture those values. For the To field, we’ve put in the HML (Handlebar Markup Language) value that will automatically pull the recipient’s phone number from their account.
The actions params in this example indicate that we’ve created an Apex type. But it could also be standard or Flow.
We also need to assign this extension to the correct business unit.

The next step enables the external app extension that we created to sync with Engagement Studio. We’ll need to assign the Apex class (SendTwilioSmsMessageActionMessage) to the B2BMA Integration User profile.
So, navigate to that user profile, scroll to the Enabled Apex Class Access section, and hit Edit. Here, we can see the Apex class in the left column, so we just need to hit Add to add it to the right column to enable it, and then hit the Save button. If we head back to the Profile page, we can see that the class is now enabled.

That’s it for admin work. At this point, we could hand it off to our marketing folks, so they can now use our newly created action in Engagement Studio.
Steps for the marketer
Marketers will want to send SMS messages to their prospects via Twilio, so we’re going to create a simple program showing that. First, let’s go ahead and create our new program. Then, we’ll select our new action called TwilioSendSMS.

All we need to do now is to put it in the body of the SMS message, and we’re done. There’s nothing left to do after this but run our new Engagement Studio program!
Are you an ISV?
If we happen to be an ISV that wants others to easily integrate with our external service, we will want to create a managed package and upload that to the AppExchange. This allows others to easily use the invocable action that we’ve written, and it negates the need for them to have to write their own Apex code. We would also want to create a setup screen for our package that prompts for the Twilio credentials and business unit to use for the integration.
See these new features in action!
Don’t forget to watch the replay of the Winter ’23 Developer Preview to see demos of a subset of these new, exciting features. Be sure to check out the Learn MOAR Winter ’23 for Developers Trailmix for more Learn MOAR!
About the author

Gary Ogden is an engineer at Salesforce. He’s been building great things for Salesforce customers for over six years. Follow Gary on LinkedIn.