Force.com Platform Fundamentals
 j
j
No Results
Search Tips:
- Please consider misspellings
- Try different search keywords
Newer Version Available
Try It Out: Create the “Send Rejection Letter” Workflow Rule
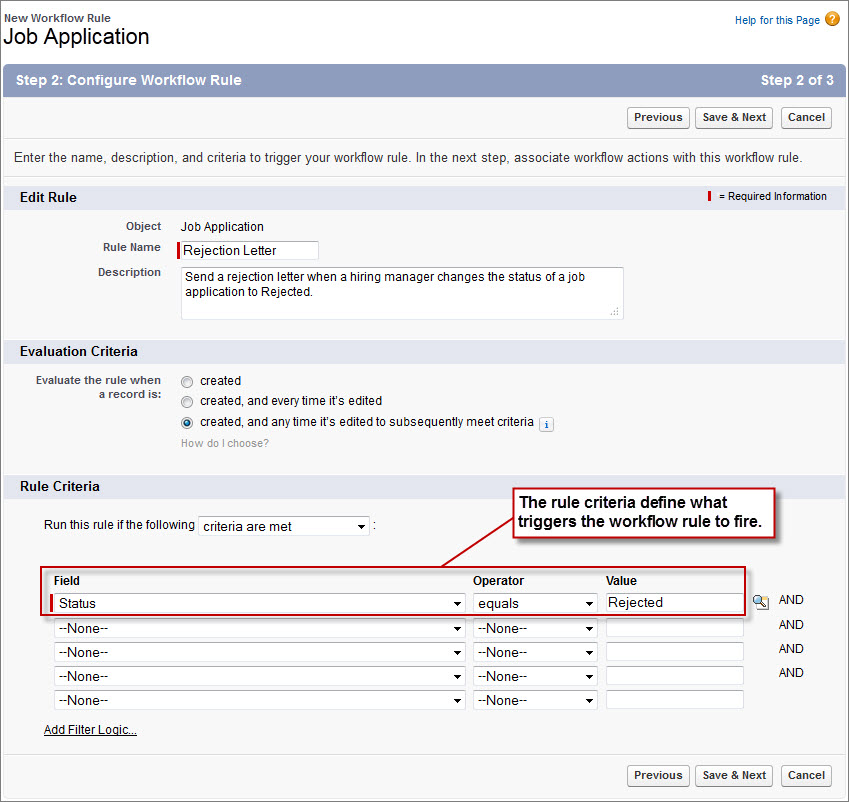
To make this rule entirely functional, we'll need to define both a workflow rule, which specifies the criteria for when the rule should be executed, and a workflow task that includes the “Send Rejection Letter” task template. Although we can define workflow components in any order, let's start with defining the workflow rule itself. It'll save us a couple of clicks a little later when we define the rule's associated workflow task.
- From Setup, click .
- If you see an introductory splash page, simply click Continue.
- Click New Rule.
- In the Object drop-down list, choose Job Application, and click Next.
- In the Rule Name text box, enter Send Rejection Letter.
- In the Description text box, enter Send a rejection letter when a hiring manager changes the status of a job application to Rejected.
Since we don't want to assign duplicate tasks to a recruiter every time the record is saved, we'll keep the default option.
- Under “Evaluate the rule when a record is:,” select created, and any time it’s edited to subsequently meet criteria.
To finish up defining the rule, we need to specify the conditions that will trigger execution of the rule's associated actions. We can do this by defining a set of criteria that trigger the workflow rule when met, or we can create a formula that triggers the workflow rule if it evaluates to True. While creating a formula provides more flexibility, setting the criteria is easier. For this rule, we can achieve our objective by setting the criteria, so let's do that.
Every workflow rule requires at least one row of filter criteria, but we can set as many filters as we want using additional rows.
- In the first row of Rule Criteria filters:
- Set the Field column to Job Application: Status.
- Set the Operator column to equals.
- Set the Value column to Rejected.
- Click Save & Next.
At this point, we've just defined our “Send Rejection Letter” workflow rule. If we canceled out of the workflow wizard and, from Setup, clicked , we'd see it in the list view. However, because workflow rules aren't all that useful without an associated action, the workflow wizard takes us directly to a screen where we can define the “Send Rejection Letter” workflow task. Let's work through that now.