Lightning Components Developer’s Guide
 j
j
No Results
Search Tips:
- Please consider misspellings
- Try different search keywords
Newer Version Available
Component Composition
Let's see how we can fit components together.
nestedComponents.cmp shows an example of including components inside other components.
Component source
1swfobject.registerObject("clippy.codeblock-0", "9");<aura:component>
2    Observe!  Components within components!
3
4    <auradocs:helloHTML/>
5
6    <auradocs:helloAttributes whom="component composition"/>
7</aura:component>
8
9
Output
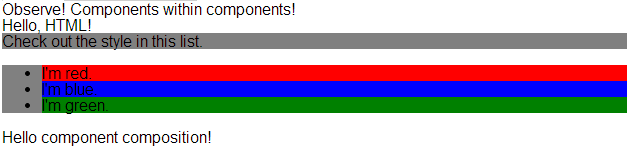
Including an existing component is similar to including an HTML tag: we just reference the component by its "descriptor", which is of the form <namespace>:<component>. nestedComponents.cmp references the helloHTML.cmp component, which lives in the auradocs namespace. Hence, its descriptor is auradocs:helloHTML.
Note how nestedComponents.cmp also references auradocs:helloAttributes. Just like adding attributes to an HTML tag, you can set attribute values in a component as part of the component tag. nestedComponents.cmp sets the whom attribute of helloAttributes.cmp to "component composition".
Here is the source for helloHTML.cmp.
Component source
1swfobject.registerObject("clippy.codeblock-1", "9");<aura:component>
2  <div class="white">
3    Hello, HTML!
4  </div>
5
6  <h2>Check out the style in this list.</h2>
7
8  <ul>
9    <li class="red">I'm red.</li>
10    <li class="blue">I'm blue.</li>
11    <li class="green">I'm green.</li>
12  </ul>
13</aura:component>
14
15
CSS source
1swfobject.registerObject("clippy.codeblock-2", "9");.THIS {
2    background-color: grey;
3}
4
5.THIS.white {
6    background-color: white;
7}
8
9.THIS .red {
10    background-color: red;
11}
12
13.THIS .blue {
14    background-color: blue;
15}
16
17.THIS .green {
18    background-color: green;
19}
20
Output

Here is the source for helloAttributes.cmp.
Component source
1swfobject.registerObject("clippy.codeblock-3", "9");<aura:component>
2    <aura:attribute name="whom" type="String" default="world"/>
3    Hello {!v.whom}!
4</aura:component>
5
6
Attribute Passing
You can also pass attributes to nested components. nestedComponents2.cmp is similar to nestedComponents.cmp, except that it includes an extra passthrough attribute. This value is passed through as the attribute value for auradocs:helloAttributes.
Component source
1swfobject.registerObject("clippy.codeblock-4", "9");<aura:component>
2    <aura:attribute name="passthrough" type="String" default="passed attribute"/>
3    Observe!  Components within components!
4
5    <auradocs:helloHTML/>
6
7    <auradocs:helloAttributes whom="{!v.passthrough}"/>
8</aura:component>
9
10
Output

Notice that helloAttributes is now using the passed through attribute value.
Definitions versus Instances
If you're familiar with object-oriented programming, you know the difference between a class and an instance of that class. Components have a similar concept. When you create a .cmp resource, you are providing the definition (class) of that component. When you put a component tag in a .cmp , you are creating a reference to (instance of) that component.
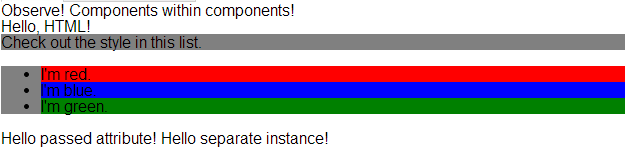
It shouldn't be surprising that we can add multiple instances of the same component with different attributes. nestedComponents3.cmp adds another instance of auradocs:helloAttributes with a different attribute value. The two instances of the auradocs:helloAttributes component have different values for their whom attribute .
Component source
1swfobject.registerObject("clippy.codeblock-5", "9");<aura:component>
2    <aura:attribute name="passthrough" type="String" default="passed attribute"/>
3    Observe!  Components within components!
4
5    <auradocs:helloHTML/>
6
7    <auradocs:helloAttributes whom="{!v.passthrough}"/>
8
9    <auradocs:helloAttributes whom="separate instance"/>
10</aura:component>
11
12
Output