Force.com Platform Fundamentals
 j
jNewer Version Available
Try It Out: Create a Dependent Picklist
Looking at the picklists that we've created, it's quickly obvious that our users might get frustrated with the length of our Job Level picklist. Let's make our users happy by turning Job Level into a dependent field of the Functional Area picklist. Doing this will allow users to see only the four relevant job level values when a department is selected in the Functional Area picklist:
- From Setup, enter Objects in the Quick Find box, then select Objects.
- Click Position.
- In the Custom Fields & Relationships related list, click Field Dependencies.
- Click New.
- For the Controlling Field drop-down list, choose Functional Area.
- For the Dependent Field drop-down list, choose Job Level.
- Click Continue.
A field dependency matrix displays with all the values in the controlling field across the top header row and the dependent field values listed in the columns below. For each possible value of the controlling field, we need to include the values that should be displayed in the dependent picklist when that controlling value is selected. In the field dependency matrix, yellow highlighting shows which dependent field values are included in the picklist for a particular controlling field value.
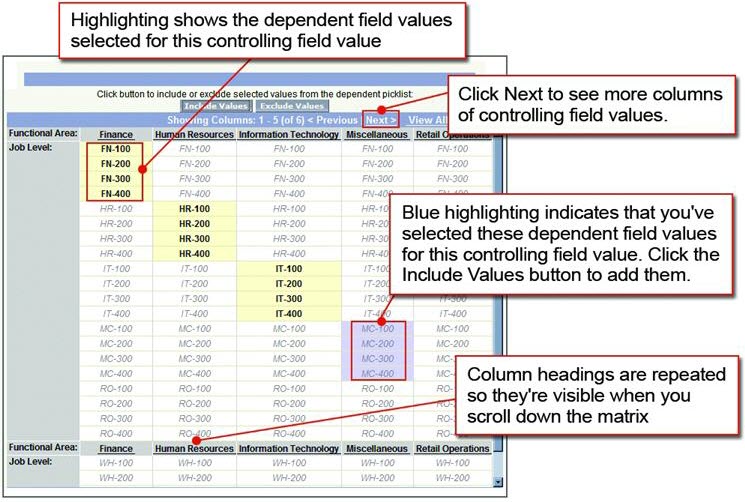
To include a dependent field value, you simply double-click it. To exclude a dependent value from the list, double-click it again.
For example, let's try it out by including the values that should be displayed in the Job Level picklist whenever Finance is selected in the Functional Area picklist:
- In the column labeled Finance, double-click FN-100, FN-200, FN-300, and FN-400.
Those four fields should now be shaded yellow in the Finance column.
Instead of double-clicking every Job Level value, we can also use SHIFT+click to select a range of values or CTRL+click to select multiple values at once. Once those values are highlighted in blue, we can click Include Values to include them, or Exclude Values to remove them. Let's try it out.
- In the column labeled Human Resources, single-click HR-100 and then press and hold the SHIFT key while clicking HR-400.
- Click Include Values.
Now we have values selected for both the Finance and Human Resources columns!
- Continue highlighting the appropriate values for all of the remaining columns, as described in the following table.
- Click Preview to test the results in a small popup window.
- Click Save.