Salesforce1 Mobile App Developer Guide
 j
jTry It Out: Customize an Object-Specific Action Layout
The first time you view the layout for an action you’ve created, certain fields are prepopulated: target object default fields, standard required fields, and any custom universally required fields. We’re going to add more fields to the Create a Case action so the mobile technicians can put more information into the case for the Acme Wireless support reps.
- In the object management settings for accounts, go to Buttons, Links, and Actions.
-
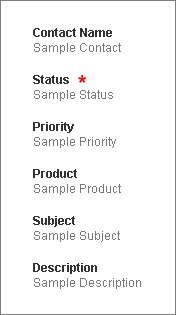
Click Layout next to our Create
a Case action.The action has four fields already set by default: Contact Name, Status, Subject, and Description. The red asterisk next to the Status field shows that it’s a required field. Let’s add a few more fields.
- Click and drag Priority into position right after Status.
-
Click and drag Product into position
right after Priority.This field lets the technicians indicate what product the customer is having trouble with.
- Click Save.
Now when the Acme Wireless mobile technicians view an account in Salesforce1, they can create a case from any account record page. Let’s give it a try.