


Lightning Platform Fundamentals
 j
jTry It Out: Define an App
- Open a browser and go to www.salesforce.com.
- Click Log in to Salesforce.
- Enter your username and password.
- From Setup, enter Apps in the Quick Find box, then select Apps.
- If you see an introductory splash page, simply click Continue.
Welcome to the Apps list page! Like many of the setup tools, the starting page for the Apps tool consists of a list of all the apps that are currently enabled for your organization. Depending on which edition you're using or have installed from the AppExchange, you'll probably already have some standard apps listed here.
Beyond the Basics
There are actually two ways to create an app. The Quick Start button creates an app with one custom object and associated tab. With the New button, you create an app with a logo, add existing tabs, and specify the app's visibility for your profiles. In this book we'll use the New button, but feel free to try out the Quick Start button later.
- Click New. The New Custom App wizard appears.
- If you are a new user, select Custom app.
- In the App Label field, enter Recruiting.
The app label is the name that represents our app in the app menu that appears at the top right of all pages. Users can use this menu to switch back and forth between apps.
Notice that a vertical red bar appears just to the left of this Label field. This red bar indicates that you must provide a value for this field in order to save your work. If you don't enter a value here and try to proceed, an error message is displayed.
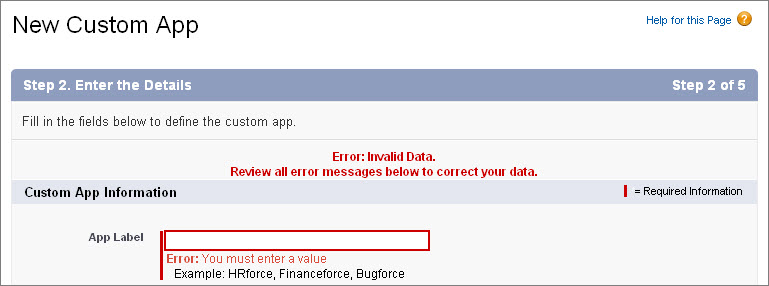
- Click your mouse inside the App Name field.
The app name is what developers use to identify an app when writing code for the Lightning platform. We won't do anything in this book that uses the app name, but the field is required, so it needs a value. Fortunately, when you enter a value in the App Label field, the same value should automatically appear in the App Name field. If it doesn't, enter Recruiting in the App Name field now.
- In the Description field, enter Manage positions, candidates, and job applications, and track job postings on employment websites.
- Click Next.
The next screen in the New Custom App wizard allows you to specify the image file to use for this app's logo. Whenever the app is selected in the app menu, this logo appears in the upper-left corner of all pages. Since we're just creating a simple app, let's accept the default logo that's already provided. We can always change it later.
- Click Next.
As we said before, an app is a container for an ordered collection of tabs, and this step of the New Custom App wizard allows us to specify which tabs we want to include in our new app. The Available Tabs list shows us the standard and custom tabs that are available for us to choose, and the Selected Tabs list shows us which tabs are already included, listed in the order that they should be displayed. You'll notice that one tab, the Home tab, is already included in our app by default. This is because the Home tab is required in every app, and must always be in the first position; however, you can use the Default Landing Tab drop-down menu to select which tab is first displayed when the app opens.
Again, since we're just creating a simple app, let's accept the defaults and move on. We'll add more tabs later.
- Click Next.
Now that we've defined some of the basic features of our app, you might be wondering what remains to be done in the New Custom App wizard—shouldn't we already be done? It turns out that one crucial step remains: we need to define the users who can access our app.
In this step of the New Custom App wizard, we can choose which user profiles should have access to the app. We'll learn more about profiles in Securing and Sharing Data. For now, just understand that every user is assigned to a profile, and profiles control which apps the users assigned to that profile can view.
- Select the Visible checkbox next to the Standard User and System Administrator profiles.
- Click Save.
That's it!