Salesforce Security Guide
 j
jNewer Version Available
Login Flow Examples
Collect and Update User Data at Login
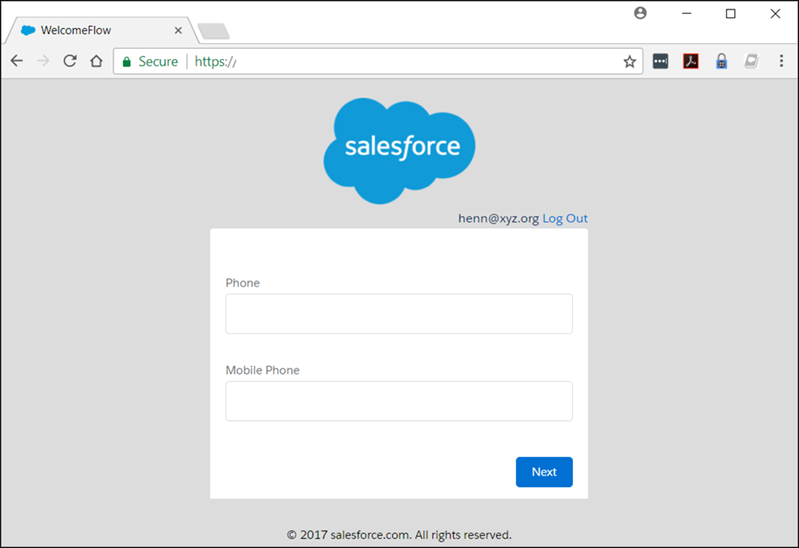
This login flow collects and updates information about the user at login by requesting the user’s phone numbers.
- Query the user object to look up the user’s phone numbers, if they exist.
- Display the numbers, and ask the user to confirm or update them.
- Update the user object with new numbers, if provided.
Create the Flow
- Go to the Cloud Flow Designer.
- On the Resources tab, create a variable that contains the UserId of the current user.
The login event passes a list of context attributes to the flow. To query and use these attributes, define local text variables using the LoginFlow_ATTRIBUTE_NAME format, for example, LoginFlow_UserId.

After you add the attribute, it appears on the Explorer tab under Variables.
When you use the following input attributes, their values are populated in the flow when it starts.- LoginFlow_LoginType
- LoginFlow_IpAddress
- LoginFlow_UserAgent
- LoginFlow_Platform
- LoginFlow_Application
- LoginFlow_Community
- LoginFlow_SessionLevel
- LoginFlow_UserId
These output attributes can also be set in the flow.
- LoginFlow_FinishLocation (type string). This attribute determines where to send the user when the flow completes.
- LoginFlow_ForceLogout (type boolean). When this variable is set to true, the user is immediately logged out.
You can use the attribute LoginFlow_UserId to verify the ID of the user logging in and query the associated user object.
- On the Resources tab, click Create New and create an SObject
variable where you can store the user object.

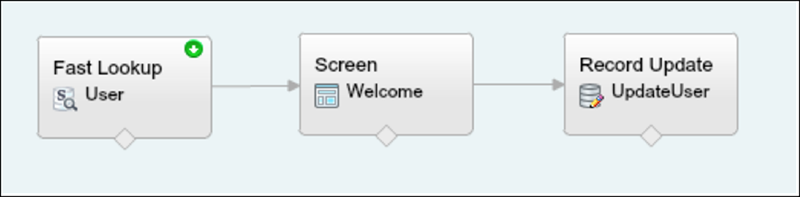
- Create a Fast Lookup element that looks up the user object.
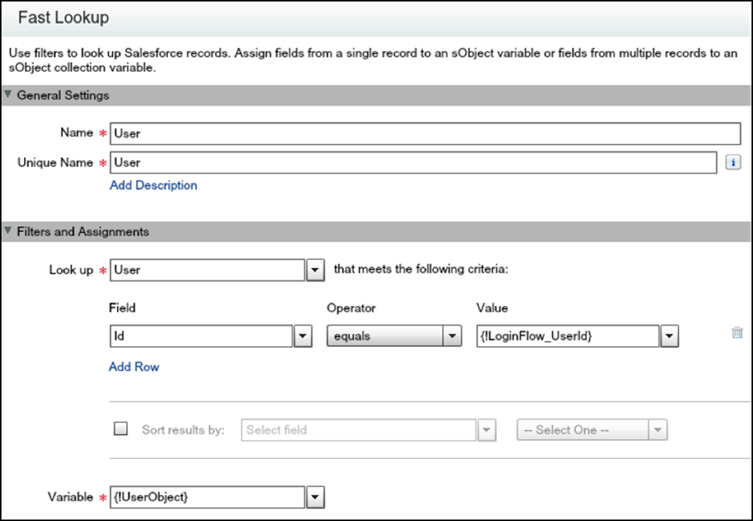
- Specify the user attributes that you want to store in the variable, for example, Phone and MobilePhone.
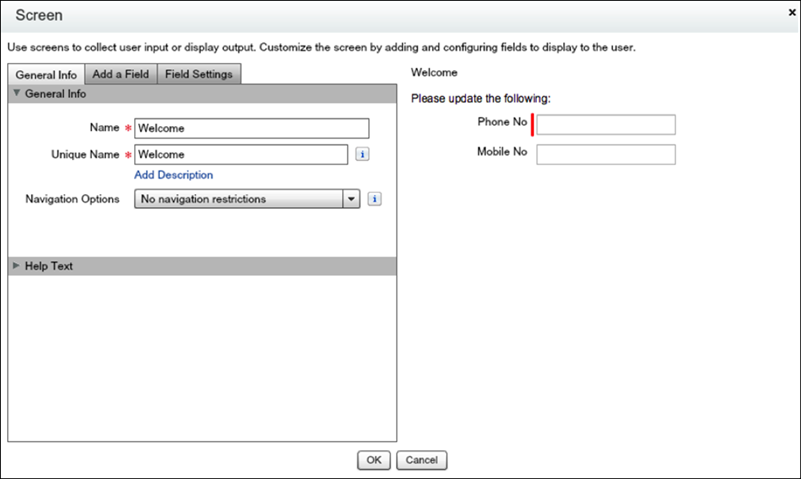
- Create a welcome screen to collect or display the phone numbers at login.
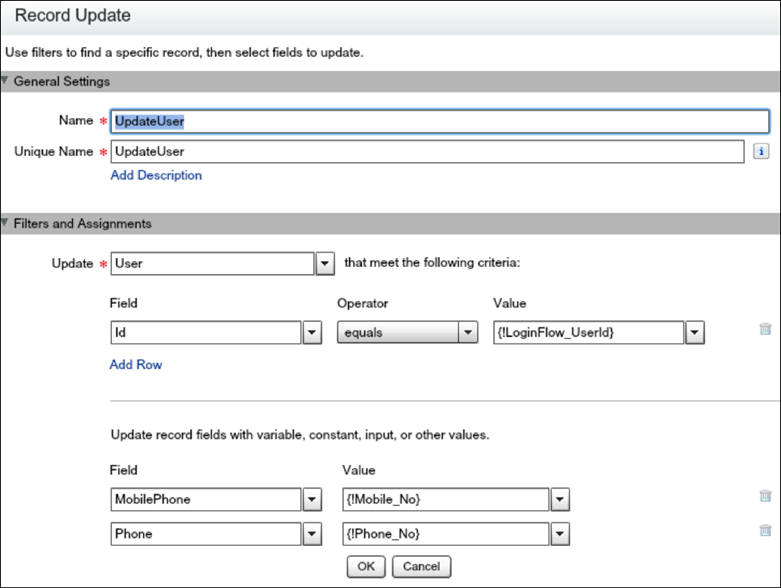
- Create a Record Update component to update the numbers.
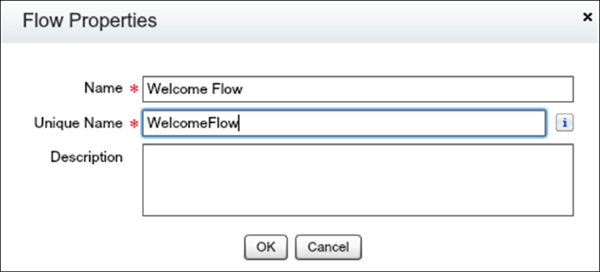
- Name the login flow and save it.
- Connect the login flow to a user profile. Best practice is to create a dedicated test user with a test profile.
- Log out, and then log in as the test user and test the flow.
When you test the Welcome Flow example, here’s how it looks using the Lightning Experience.
Configure Two-Factor Authentication
This example implements a login flow that enhances time-based one-time password (TOTP) authentication with a two-factor authentication method that Salesforce supports. The TOTP algorithm computes a one-time password from a shared secret key and the current time.
The flow does the following.
- If the user is not yet registered, generates a new secret key, and prompts the user to register the key with a QR (Quick Response) code. After the user provides a valid TOTP token, the secret key is stored in the user record. The key is reused for future logins.
- If the user is already registered, prompt the user only for the TOTP token.
Users can use a time-based authentication application (such as Salesforce Authenticator or Google Authenticator) to scan the QR code and generate a TOTP token.
You can enhance this flow and customize the user experience by adding a corporate logo, colors, and so forth. You can even add and enforce different policies. For example, you can build an IP-based, two-factor authentication process that requires a second authentication factor only when IP addresses are outside of a certain range.
This example uses the TwoFactorInfo object and the Auth.SessionManagement Apex class to customize and manage the standards-based TOTP two-factor authentication that Salesforce supports.
- Look up the TwoFactorInfo object for the current user. If the user is not registered, generate a key.
- Determine whether the user is already registered with TOTP.
- If the user is already registered, prompt the user to provide the TOTP token.
- If the user is not registered, prompt the user to register with a QR code and provide the TOTP token.
- Validate the TOTP token. If the token is valid, the login flow finishes, and the user logs in.
- If the TOTP token is invalid, send the user back to step 2.

Configure the TOTP Flow
- Create the variables.
- secret—Stores the secret key for all two–factor operations.
- qr_url—Stores the URL for the QR code encoding of the secret key.
- IsTokenValid—Stores the verification result.
The variables secret and qr_url are text, while IsTokenValid is a Boolean data type.

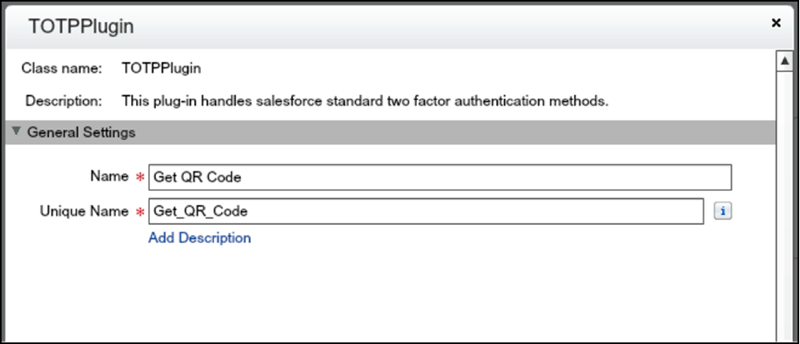
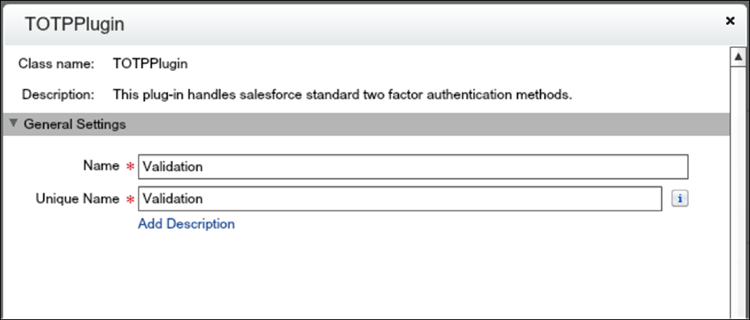
- Set up the TOTPPlugin to generate a new secret for users that are not are already
registered with a TOTP.
A plug-in is an Apex class that extends the standard functionality of a flow. You can use a plug-in to do a complex calculation, make API calls to external services, and more.
TOTPPlugin accesses the Salesforce TOTP methods, generates a time-based secret key with a QR code, and validates the TOTP. The Apex class for TOTPPlugin is available in the login flow sample package.
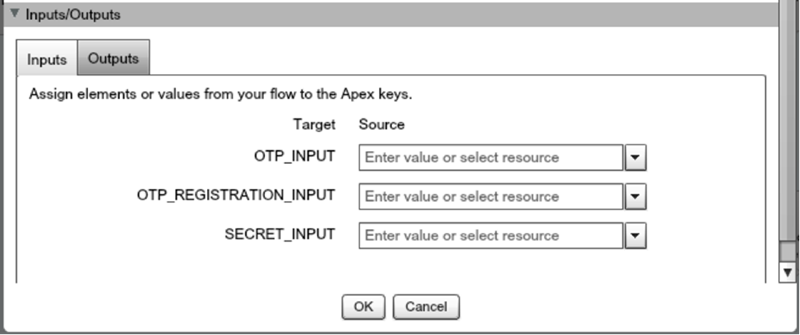
The plug-in takes these input parameters.
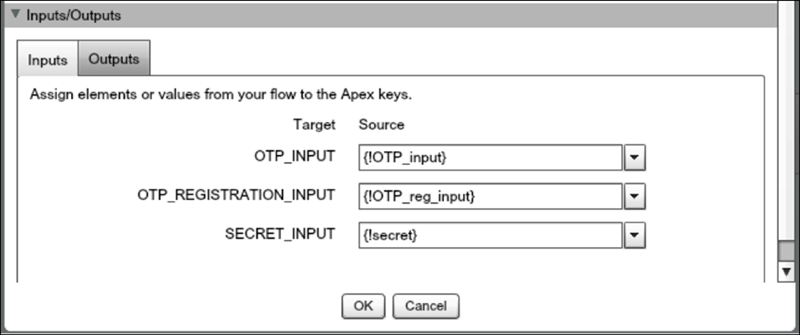
- OTP_INPUT—The TOTP token that the user provides.
- OTP_REGISTRATION_INPUT—The TOTP token that the user provides when first registering.
- SECRET_INPUT—The secret key used to generate the TOTP.
It returns the following parameters.
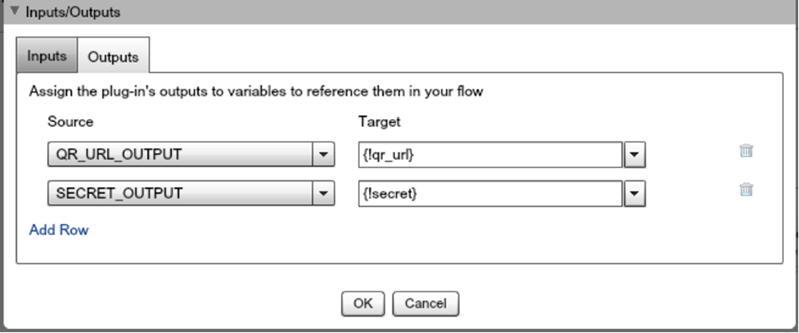
- SECRET_OUTPUT—A secret key generated by the plug-in.
- QR_URL_OUTPUT—A QR encoding of the secret key.
- IsValid_OUTPUT—If the validation succeeded, it returns true. Otherwise, it returns false.
Configure a TOTPPlugin instance to generate a new secret key and QR code if the user is not already registered. In this case, no input is passed.
The secret key and URL for the QR code are stored in the qr_url and secret variables.
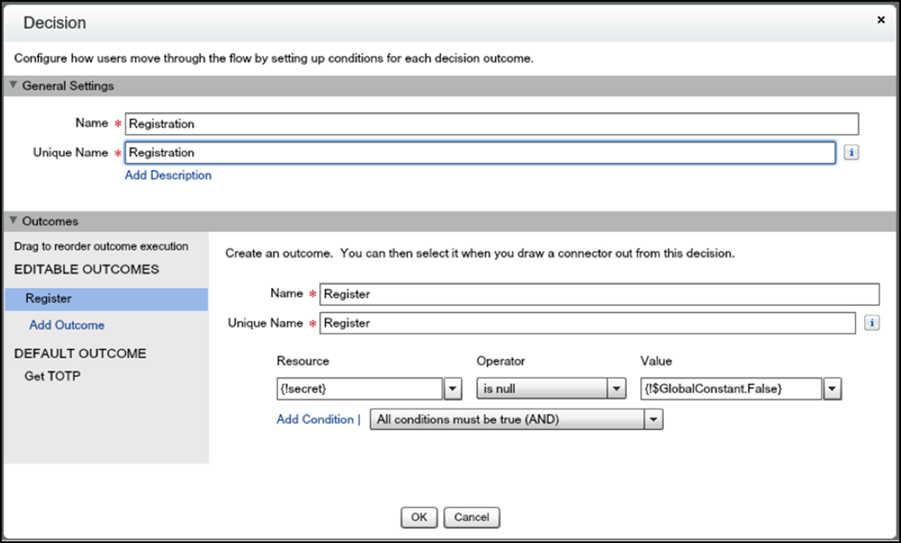
- Configure a decision element to register a user.
The decision element Registration verifies whether secret is null. If it is not null, the user must register, so define Register as the outcome of the decision. Otherwise, the user is already registered and must provide only the TOTP token. In this case, the outcome is Get TOTP, which is also the default outcome.
- Configure the Get TOTP screen.
Users that are already registered are redirected to this screen and asked to provide the TOTP token. The input TOTP token is saved in OTP_input.
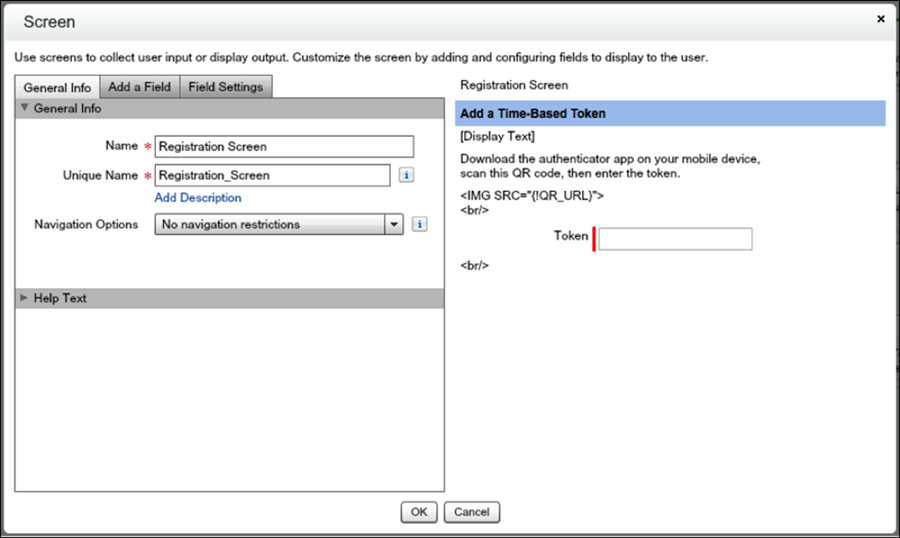
- Configure the Registration screen.
This screen presents the QR code, asks the user to scan and initialize the TOTP client application and provide the TOTP token.
- Validate the TOTP token.
Define another instance of the TOTPPlugin to validate the TOTP token that the user provides.
The plug-in supports these use cases.
- The user comes from the Registration screen. The user has to scan the QR code and provide the TOTP token. Both the TOTP token and secret are passed to the TOTPPlugin for validation. The TOTPPlugin validates the TOTP token against the secret. If valid, the secret is registered on the user record and used for future logins.
- The user comes from the Get Token screen. The user is already registered, so provides only the TOTP. The TOTP token is passed via the TokenInput parameter to the TOTPPlugin for validation.
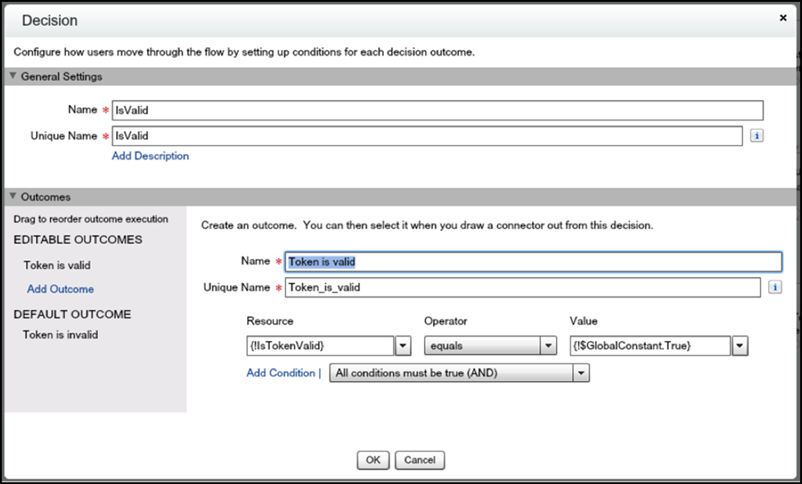
The isTokenValid parameter returns the validation status, which is then saved in isTokenValid.
 The decision element has two possible outcomes.
- The token is valid if IsTokenValid is true.
- The token is invalid, which is the default.
- Configure a decision element to log in the user.
If the validation succeeds, the user proceeds to the end of the flow, clicks to the next step, and logs in to the application. If the validation fails, the flow redirects the user back to Step 2 in the flow. In Step 2, a registered user is asked to provide a new TOTP token. If the user isn’t yet registered, the user is asked to register and provide a new TOTP token.
- Save the login flow, activate it, and connect it with a user profile.
Integrate Third-Party Strong Authentication Methods
You can also use login flows to interact with external third-party authentication services by using an API.
For example, Yubico offers strong authentication using a hardware token called a YubiKey. Yubico also provides an example Apex library and login flow on GitHub. The library supplies Apex classes for validating YubiKey OTPs (one-time passwords). The classes allow Salesforce users to use a YubiKey as a second authentication factor at login. For more information, see yubikey-salesforce-client.
You can also implement a third-party SMS or voice delivery service, like Twilio or TeleSign, to implement a SMS-based two–factor authentication and identity verification flow. For more information, see Deploy Third–Party SMS–Based Two–Factor Authentication.
Login Flow Samples Package
- Email Confirmation—Send email with a verification code
- SF-TOTP—TOTP two-factor authentication
- Conditional Two–Factor—Skip two-factor authentication for users who come from a trusted IP address
- Identity Confirmation—Confirm the user identity using email or two-factor authentication
- Accept Terms of Service—Ask the user to agree to terms before continuing