Salesforce DX Setup Guide
 j
jNewer Version Available
Install the Salesforce CLI
Install the CLI on macOS
- Download the .pkg file.
- Double-click the .pkg file.
Install the CLI on Windows
Install the CLI on the Windows 10 Subsystem for Linux
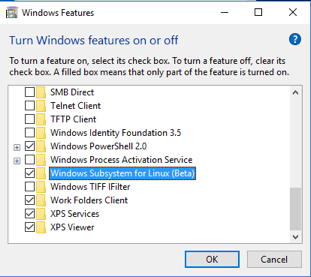
- From the Run dialog box (Windows key + R), run optionalfeatures.exe.
-
In Windows Features, select Windows Subsystem for
Linux.
-
From the command prompt, enter bash,
which triggers the installation of Ubuntu. At the prompt, enter y to agree to install the components.
1> bash -
When the Ubuntu install is finished, create the directory /mnt/c/ProgramFilesLinux.
1mkdir /mnt/c/ProgramFilesLinux -
Change to the new directory.
1cd /mnt/c/ProgramFilesLinux -
Download or wget one of these tarballs.
1wget https://developer.salesforce.com/media/salesforce-cli/sfdx-linux-amd64.tar.xz1wget https://developer.salesforce.com/media/salesforce-cli/sfdx-linux-386.tar.xz -
Create an sfdx directory.
1mkdir sfdx -
Unpack the contents for your tarball version:
1tar xJf sfdx-linux-amd64.tar.xz -C sfdx --strip-components 11tar xJf sfdx-linux-386.tar.xz -C sfdx --strip-components 1-C unpacks the contents in the sfdx directory, while --strip-components 1 removes the root path component.
-
Run the install script.
1./sfdx/installThe Salesforce CLI is installed in /usr/local/bin/sfdx.
Install the CLI on Linux
Find the download URL for your tarball from this manifest file. The downloads section lists unversioned URLs for the latest installers, which are especially useful for CI use cases. Select the URL based on your target platform.
-
Download or wget one of these tarballs.
1wget https://developer.salesforce.com/media/salesforce-cli/sfdx-linux-amd64.tar.xz1wget https://developer.salesforce.com/media/salesforce-cli/sfdx-linux-386.tar.xz -
Create an sfdx directory.
1mkdir sfdx -
Unpack the contents for your tarball version:
1tar xJf sfdx-linux-amd64.tar.xz -C sfdx --strip-components 11tar xJf sfdx-linux-386.tar.xz -C sfdx --strip-components 1-C unpacks the contents in the sfdx directory, while --strip-components 1 removes the root path component.
-
Run the install script.
1./sfdx/installThe Salesforce CLI is installed in /usr/local/bin/sfdx.
Install the CLI with npm
This installation method is a good option if you don’t have administrator permissions on your workstation, or if group policy blocks CLI installation and updates. Installing the CLI with npm doesn’t require root permissions.
-
Ensure that Node v8.6.0 or later is installed on your computer. For example, on macOS or
Linux:
1node --version 2v8.6.0 -
Run this command.
1npm install sfdx-cli --globalIf you receive a permission error when installing the CLI using npm, we recommend not using sudo. See Fixing npm permissions.
Verify Your Installation
1sfdx --version
2sfdx-cli/6.0.10-3713d7b alpha (darwin-x64) node-v8.6.0
Run this command to verify the Salesforce CLI plug-in version:
1sfdx plugins --core
2salesforcedx 41.2.0 (core)
This command returns a list of the other plug-ins installed in the CLI:
1sfdx pluginsThe core salesforcedx plug-in is not included in the preceding list unless you’ve explicitly installed a newer version with the sfdx plugins:install command.
Run this command to return a list of the command families in the force topic:
1sfdx force --helpThis command returns all the force commands:
1sfdx force:doc:commands:listInstall a Specific Version of the salesforcedx Plug-In
1sfdx plugins:install salesforcedx@42.2.0