Visualforce Developer Guide
 j
jNewer Version Available
Examples of Visualforce Page Execution Order
The following examples illustrate the lifecycle of a Visualforce page as a user interacts with it. The page used in the examples is designed to show information about an account, the value of the variables on the page, and allows the user to edit details of the account if the key value is set to anything except false.
To set up the Visualforce page for the examples:
- Create a controller for a custom component called componentController:
- Create a custom component called editMode:
- Create a custom controller called myController:
- Create a controller extension called lifecycle:
- Create a page called setEmps:
Get Request Example One
For the first example, visit the setEmps page
using a URL of the form https://Salesforce_instance/apex/setEmps?id=recordId,
where Salesforce_instance is the name of your instance (for example, na1) and recordID is the ID of
an account record in your organization (for example, 001D000000IRt53). You'll see a page with content similar to the
following: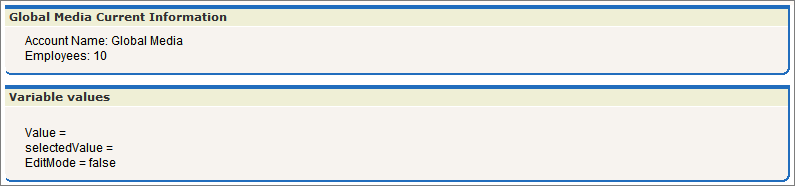
Let's trace the lifecycle to see why the page displays what it does. Since you've requested the page directly by entering a URL, this page is the result of a get request, not a postback request.
- The first thing that happens in a get request is that constructor methods on the custom controller and controller extension are called. The myController method is the constructor on the controller and the lifecycle method is the constructor on the extension. Those are executed and the two objects now exist. The controller now has a variable, called account, that is the result of a query that uses the id parameter from the URL, to identify which account object to query. The extension now has a variable, called acct, that is created by calling the getAccount method on the controller. The getAccount method has no side-effects.
- The next step in a get request is to create the custom components and execute
constructor methods on associated controllers or controller extensions. The page
includes one custom
component:
This custom component has an associated controller, but the controller has no explicit constructor. As with all Apex objects without explicit constructors, the object is created using an implicit, no-argument, public constructor. As part of creating the custom component, the value attribute on the custom component is set. In this case, it is equal to the result of the expression {!$CurrentPage.parameters.key}. Since we did not specify the key attribute in the URL, value is set to null.
- After custom components are created, all assignTo attributes on those custom components are executed. An assignTo attribute is a setter method that assigns the value of this attribute to a class variable in the associated custom component controller. The editMode custom component does have an assignTo method, so it is executed. The assignTo method sets selectedValue on the attribute to the value attribute. The value attribute is set to null, so selectedValue is set to null.
- The next step in a get request is evaluation of the action attribute on the <apex:page> component , expressions, and
the required getter and setter methods. Although we'll step through these below,
remember that the order of these evaluations is indeterminate and may be
different than the following:
- The <apex:page> component has an action attribute which calls the resetEmp method on the extension. That method sets the numberofemployees field on the acct object to 10.
- There are several expressions that evaluate on the page. Let's focus on three:
-
<apex:pageBlock
title="{!greeting}">
The title attribute on <apex:pageblock> calls the getter method on the lifecycle extension getGreeting. This is rendered on the page as “Global Media Current Information.”
-
<apex:form
rendered="{!$CurrentPage.parameters.key =
'true'}">
The rendered attribute on <apex:form> is set based on the value of the key parameter. We did not set key when calling the page, so the form is not rendered.
-
Value = {!value}<br/>
selectedValue = {!selectedValue}<br/> EditMode =
{!EditMode}This expression occurs in the custom component. We've already discussed that value and selectedValue are set to null, however, the value of EditMode is not yet known. EditMode is a boolean variable on the componentController. It is set based on the whether value is equal to null:
Since value is null, EditMode is set to false. Note, however, that there is a side-effect in the setter method for EditMode. As part of setting editMode, we also setselectedValue to value. Since value is null, this doesn't change anything, but this behavior has an impact in a later example.
-
<apex:pageBlock
title="{!greeting}">
- The other expressions and methods are evaluated in a similar manner.
- Since the <apex:form> component isn't rendered, the view state isn't created.
-
The last step in the get request is to send the HTML to the browser, which renders the HTML.
Get Request Example Two
For the second example, visit the setEmps
page using a URL of the form https://Salesforce_instance/apex/setEmps?id=recordId&key=false,
where Salesforce_instance is the name of your instance (for example, na1) and recordID is the ID
of an account record in your organization (for example, 001D000000IRt53). Unlike the first example, this example includes a
second parameter, key=false. You'll see a page with content
similar to the following:
Let's trace the lifecycle again. This page is also the result of a get request:
- The first thing that happens in a get request is that constructor methods on the custom controller and controller extension are called. The myController method is the constructor on the controller and the lifecycle method is the constructor on the extension. These are executed and the two objects now exist. The controller now has a variable, called account, that is the result of a query that uses the id parameter from the URL to identify which account record to query. The extension now has a variable, called acct, that is created by calling the getAccount method on the controller.
- The next step in a get request is to create the custom components and execute
constructor methods on associated controllers or controller extensions. The page
includes one custom
component:
This custom component has an associated controller without a constructor, so the controller object is created using an implicit, no-argument, public constructor. As part of creating the custom component, the value attribute on the custom component is set. In this case, it is equal to the result of the expression {!$CurrentPage.parameters.key}. We specified the key attribute as false, so value is set to false.
- After custom components are created, all assignTo attributes on those custom components are executed. The assignTo method sets selectedValue on the attribute to the value attribute. The value attribute is set to false, so selectedValue is set to false.
- The next step in a get request is evaluation of the action attribute on the <apex:page> component , expressions, and
the required getter and setter methods. Although we'll step through these below,
remember that the order of these evaluations is indeterminate and may be
different than the following:
- The <apex:page> component has an action attribute which calls the resetEmp method on the extension. That method sets the numberofemployees field on the acct object to 10.
- Of the expressions on the page, let's see how our chosen three are evaluated:
- <apex:pageBlock title="{!greeting}">
- The title attribute on <apex:pageblock> calls the getter method on the lifecycle extension getGreeting. It is rendered on the page as “Global Media Current Information.”
- <apex:form rendered="{!$CurrentPage.parameters.key = 'true'}">
- The rendered attribute on <apex:form> is set based on the value of the key parameter. We set key to false when calling the page, so the form is not rendered.
- Value = {!value}<br/> selectedValue = {!selectedValue}<br/> EditMode = {!EditMode}
- This expression occurs in the custom component. Since value is not null, EditMode is set to true. At this point, selectedValue is set to null. Remember, however, that the setter method for EditMode has a side-effect. In this case, the side-effect sets selectedValue to the value attribute on the custom component. Since value is set to false, selectedValue is set to false. This illustrates why you should not use side-effects in your methods. If the evaluation order were different, and the value for selectedValue were determined before the setter for EditMode was evaluated, selectedValue would still be null. Execution order is not guaranteed, and the result for selectedValue could change the next time this page is visited.
- Since the <apex:form> component isn't rendered, the view state isn't created
- The last step in the get request is to send the HTML to the browser, which renders the HTML.
Get Request Example Three
For the third example, visit the setEmps
page using a URL of the form https://Salesforce_instance/apex/setEmps?id=recordId&key=true,
where Salesforce_instance is the name of your instance (for example, na1) and recordID is the ID of
an account record in your organization (for example, 001D000000IRt53). Unlike the second example, this example sets
key=true. You'll see a page with content similar to the
following: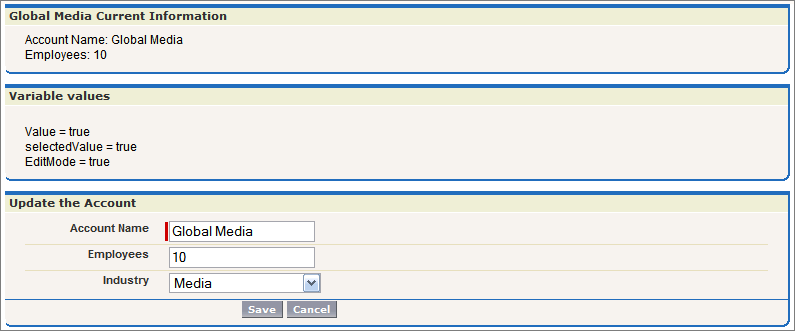
Let's trace the get request lifecycle one more time:
- The first thing that happens in a get request is that constructor methods on the custom controller and controller extension are called. The myController method is the constructor on the controller and the lifecycle method is the constructor on the extension. These are executed and the two objects now exist. The controller now has a variable, called account, that is the result of a query that uses the id parameter from the URL to identify which account record to query. The extension now has a variable, called acct, that is created by calling the getAccount method on the controller.
- The next step in a get request is to create the custom components and execute
constructor methods on associated controllers or controller extensions. The page
includes one custom
component:
This custom component has an associated controller without a constructor, so the controller object is created using an implicit, no-argument, public constructor. As part of creating the custom component, the value attribute on the custom component is set. In this case, it is equal to the result of the expression {!$CurrentPage.parameters.key}. We specified the key attribute as true, so value is set to true.
- After custom components are created, all assignTo attributes on those custom components are executed. The assignTo method sets selectedValue on the attribute to the value attribute. The value attribute is set to true, so selectedValue is set to true.
- The next step in a get request is evaluation of the action attribute on the <apex:page> component, expressions, and
the required getter and setter methods. Although we'll step through these below,
remember that the order of these evaluations is indeterminate and may be
different than the following:
- The <apex:page> component has an action attribute which calls the resetEmp method on the extension. That method sets the numberofemployees field on the acct object to 10.
- Of the expressions on the page, let's see how our chosen three are evaluated:
- <apex:pageBlock title="{!greeting}">
- The title attribute on <apex:pageblock> calls the getter method on the lifecycle extension getGreeting. It is rendered on the page as “Global Media Current Information.”
- <apex:form rendered="{!$CurrentPage.parameters.key = 'true'}">
- The rendered attribute on <apex:form> is set based on the value of the key parameter. We set key to true when calling the page, so the form is rendered.
- Value = {!value}<br/> selectedValue = {!selectedValue}<br/> EditMode = {!EditMode}
- This expression occurs in the custom component. Since value is not null, EditMode is set to true. As in the previous example, selectedValue is set to null. The side-effect in the setter method for EditMode sets selectedValue to true.
- Since the <apex:form> component is rendered, the view state is created.
- The last step in the get request is to send the HTML to the browser, which renders the HTML.
Postback Request Example
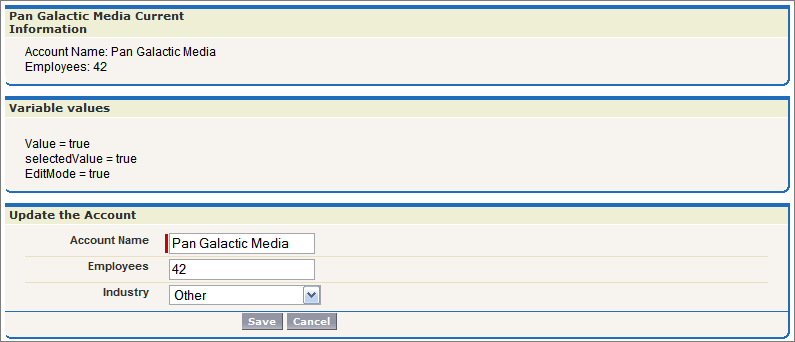
Unlike the first two examples, the third example rendered a final page with editable fields clickable buttons. To understand how a postback request works, use the final page in Example 3 to change the account name to “Pan Galactic Media,” the employee count to 42,” and the industry to “Other.” Then click Save. This initiates a postback request:
- The first thing that happens in a postback request is that the view state is decoded. The view state contains all the information required to render the page. If, during the postback request, an operation fails, the view state is used to display the page to the user.
- Next, all expressions are evaluated and methods on controllers and controller
extensions are executed.Of the expressions on the page, let's see how our chosen three are evaluated:
- <apex:pageBlock title="{!greeting}">
- The title attribute on <apex:pageblock> calls the getter method on the lifecycle extension getGreeting. In our edit, we changed the value of the Account name. Thus, the value of greeting changes to “Pan Galactic Media Current Information.”
- <apex:form rendered="{!$CurrentPage.parameters.key = 'true'}">
- The rendered attribute on <apex:form> is set based on the value of the key parameter. We have not changed the key parameter, so the value in the view state is used. Since the value was true when the view state was created, it is still true and the form is rendered.
- Value = {!value}<br/> selectedValue = {!selectedValue}<br/> EditMode = {!EditMode}
- We have not changed any of these values, so, for each expression, the value in the view state is used.
- Lastly, the save action, the action that triggered the postback request, is
evaluated. The save action is the following method on the
controller:
This method updates the record with the new data. If this method fails, which it might do if the user does not have permission to update the record, or if there are validation rules that are triggered by the change, the page is displayed along with error messages describing the error. The values the user entered are not lost. They remain as they were when the user clicked the Save button. Assuming there are no errors, the data on the object is updated, the view state is updated, and, since the action that triggered the postback did not include a page redirect, the view state is updated. The resulting HTML is sent to the browser: