


Headless Identity Implementation Guide
 j
jNewer Version Available
Headless Registration Overview
The Headless Registration Flow extends the Authorization Code and Credentials Flow. At
the end of this flow, a new user is registered and logged in, and they can access Salesforce data.
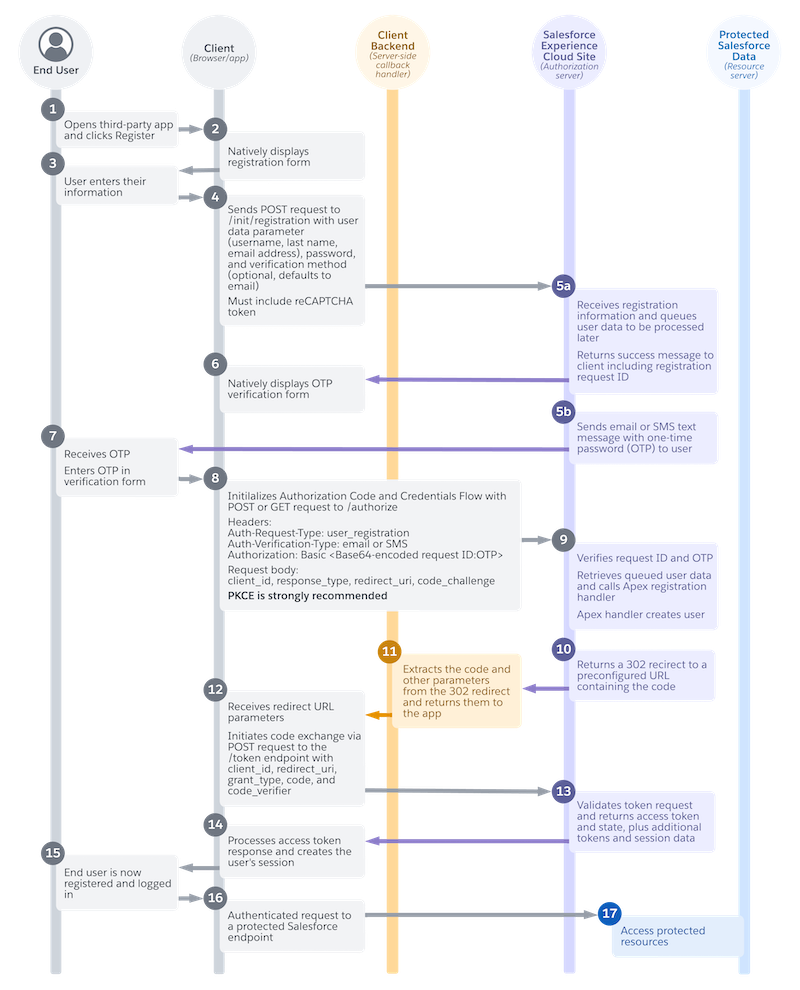
Here’s a high-level overview of how the flow works with a single-page app.
| Available in: both Salesforce Classic (not available in all orgs) and Lightning Experience |
| Available in: Enterprise, Unlimited, and Developer Editions |
- An end user opens your app and clicks Register (1).
- In your app, you natively display a registration form to collect user data. The look and feel of this form is entirely up to you, and you can fully customize what kind of information that you want to collect (2).
- The end user enters their information in the app. For example, they enter their new username, password, and first name (3).
- Your app submits the user information to the Headless Registration API endpoint on your Experience Cloud site (4).
- Salesforce receives the user information and queues it to be processed later (5a).
- Salesforce then sends an email or an SMS text message containing a one-time password (OTP) to the user (5b).
- In your app, you natively display an OTP verification form. Again, it’s up to you how you want this form to look (6).
- The user receives their OTP and enters it in the verification form (7).
- Your app then initializes the Authorization Code and Credentials Flow with an authorization code request. The request includes the OTP and the request ID, along with other parameters (8).
- Salesforce verifies the request ID and OTP. It retrieves the queued user data that it stored earlier and calls the headless registration handler. The headless registration handler creates a user in Salesforce (9).
- Salesforce returns a 302 redirect to a preconfigured URL containing the authorization code. If the flow is executed in the browser, the 302 redirect is processed and the response is delivered headlessly to your callback endpoint. For single-page apps, you can use the OAuth 2.0 echo endpoint, which is designed to make development for this use case easier (10).
- The callback endpoint extracts the code and other parameters from the 302 redirect. It returns this information to your app (11).
- Your app initiates the code exchange via a POST request to the token endpoint (12).
- From the token endpoint, Salesforce returns an access token response to your app (13).
- Your app processes the token response and creates the user’s session (14).
- The user is now registered and logged in. They perform an action in your custom app that initiates a request for Salesforce data. For example, they click a button to access their travel booking history, which is stored in the Salesforce Experience Cloud site (15).
- Your custom app makes an authenticated request to a protected Salesforce endpoint, such as a Salesforce API (16).
- The customer can now access their protected data in your custom app. For example, they can see their travel booking history (17).
Here are a few key concepts to keep in mind.
- Your app initiates registration with a request to Headless Registration API.
- When Salesforce receives the user information from this request, it queues the information to be processed later. At this point, the user isn’t registered yet.
- Your app initializes the Authorization Code and Credentials Flow with an authorization request to Headless Login API.
- The information sent in this authorization request prompts Salesforce to retrieve the queued user information and pass it to the headless registration handler. The registration handler creates the user.
- At the end of the flow, the user is registered and logged in.